# ZeroDev
> The most powerful smart account.
## DeFi Integrations
ZeroDev partners with [Enso](https://www.enso.finance/) to support seamless token swaps and DeFi integrations, even across chains.
The API deals with two types of tokens:
* **Base tokens** are normal tokens that do not represent a DeFi position. Examples are ETH, USDC, etc.
* **DeFi tokens** are ERC20 tokens that represent a DeFi position, such as in a [ERC-4626 vault](https://ethereum.org/en/developers/docs/standards/tokens/erc-4626/). For example, depositing ETH into Lido gets you `stETH` that represents staked ETH.
By allowing you to swap between base tokens and DeFi tokens, you can easily:
* Swap between any token pairs.
* Entering and exiting DeFi positions (staking, lending, etc.)
ZeroDev leverages [batching](/smart-accounts/batch-transactions) and [delegatecall](/advanced/delegatecall) internally to ensure that even complex routes are executed in one atomic UserOp, providing the user with low latency, low gas cost, and high safety.
### Supported Tokens
See the full lists of supported base tokens and DeFi tokens:
* [Base tokens](/cross-chain/chain-abstraction/supported-base-tokens)
* [DeFi tokens (protocols)](/cross-chain/chain-abstraction/supported-defi-tokens)
### Installation
:::code-group
```bash [npm]
npm i @zerodev/defi
```
```bash [yarn]
yarn add @zerodev/defi
```
```bash [pnpm]
pnpm i @zerodev/defi
```
```bash [bun]
bun add @zerodev/defi
```
:::
### API
:::info
Check out [these code examples](https://github.com/zerodevapp/zerodev-examples/tree/main/defi).
:::
#### Creating a DeFi client
All DeFi APIs are exposed through a "DeFi client":
```ts
import { createKernelDefiClient } from "@zerodev/defi"
const defiClient = createKernelDefiClient(kernelClient, projectId)
```
Where:
* `kernelClient` is the [account client](/smart-accounts/create-a-smart-account#create-an-account-client) object.
* `projectId` is your ZeroDev project ID, obtained from the dashboard.
#### Swapping Tokens
Suppose you want to swap 100 USDC to USDT:
```ts
import { baseTokenAddresses } from "@zerodev/defi"
import { parseUnits } from "viem"
import { arbitrum } from "viem/chains"
// Replace this with your network
const chain = arbitrum
const userOpHash = await defiClient.sendSwapUserOp({
fromToken: baseTokenAddresses[chain.id].USDC,
fromAmount: parseUnits('100', 6), // USDC uses 6 decimals
toToken: baseTokenAddresses[chain.id].USDT,
gasToken: 'sponsored',
})
```
Where:
* `fromToken` is the input token.
* `fromAmount` is a `bigint` representing the input token amount. Note that this uses the smallest unit for the token, e.g. Wei for Ether.
* `toToken` is the output token.
* `toAddress`: defaults to the account's own address. If specified, it will send the output token to that address instead.
* `gasToken`: [see below.](#gas-tokens)
#### Entering / Exiting DeFi positions
Entering a DeFi position simply means swapping a token into a DeFi token.
You can get a DeFi token address through the `defiTokenAddresses` constant, which is a map with three keys: `chainId => tokenName => protocolName`. For example, the DeFi token representing the USDC vault on AAVE v3 on Arbitrum would be `defiTokenAddresses[arbitrum.id]['USDC']['aave-v3']`. So, to enter the vault:
```ts
import { defiTokenAddresses } from "@zerodev/defi"
import { arbitrum } from "viem/chains"
const chain = arbitrum
const userOpHash = await defiClient.sendSwapUserOp({
fromToken: baseTokenAddresses[chain.id].USDC,
fromAmount: 1_000_000,
toToken: defiTokenAddresses[chain.id]['USDC']['aave-v3'],
gasToken: 'sponsored',
})
```
Similarly, exiting a DeFi position is just swapping a DeFi token into another token.
#### Cross-chain Swaps
To swap tokens across chains, use `sendSwapUserOpCrossChain`. For example, to swap USDC on Arbitrum to DAI on Polygon:
```ts
// Convert mainnet DAI to USDC, and lend it through AAVE on Arbitrum
const userOpHash = await defiClient.sendSwapUserOpCrossChain({
fromToken: baseTokenAddresses[mainnet.id].DAI,
fromAmount: 1_000_000,
toToken: defiTokenAddresses[arbitrum.id]['USDC']['aave-v3'],
toChainId: arbitrum.id,
// Pay gas with input token
gasToken: "fromToken"
})
```
Where:
* `fromToken` is the input token.
* `fromAmount` is a `bigint` representing the input token amount. Note that this uses the smallest unit for the token, e.g. Wei for Ether.
* `toToken` is the output token.
* `toChainId`: the chain for `toToken`,
* `toAddress`: defaults to the account's own address. If specified, it will send the output token to that address instead.
* `gasToken`: [see below.](#gas-tokens)
#### Listing Tokens
You can list all ERC20 tokens an account owns with the `listTokenBalances` function:
```ts
const accountBalances = await defiClient.listTokenBalances({
account: account.address,
chainId: chain.id,
})
```
#### Gas Tokens
The `gasToken` flag specifies how gas is paid for the UserOp. It can be one of the following values:
* `sponsored`: sponsor the UserOp.
* `fromToken`: pays gas in the input token, using a [ERC20 paymaster](/smart-accounts/pay-gas-with-erc20s).
* `toToken`: pays gas in the output token, using a [ERC20 paymaster](/smart-accounts/pay-gas-with-erc20s).
* `native`: pays gas in the native token, using the account's balance.
* You can also specify an `Address` for a ERC20 token, to pay gas with that token using a [ERC20 paymaster](/smart-accounts/pay-gas-with-erc20s).
#### Getting the UserOp without sending
If you want to just construct a UserOp but not send it immediately, use:
* `getSwapUserOp` instead of `sendSwapUserOp`
* `getSwapUserOpCrossChain` instead of `sendSwapUserOpCrossChain`
If you want to get regular transaction data instead of UserOps (presumably because you want to send the transaction through a EOA), use `getSwapUserOpCrossChain`.
## Delegatecall
:::warning
`delegatecall` is very dangerous. Unless you know exactly what you are doing, don't do it, or you might risk losing all your funds.
:::
:::info
Impatient? Check out [complete examples here](https://github.com/zerodevapp/zerodev-examples/blob/main/delegatecall/main.ts).
:::
`delegatecall` is a powerful EVM opcode that allows the calling contract to execute code in another contract, while keeping the storage context. [You can read more about `delegatecall` here](https://solidity-by-example.org/delegatecall/).
### API
To send a UserOp that uses `delegatecall`, simply specify the `callType` of the UserOp:
```typescript
const userOpHash = await kernelClient.sendUserOperation({
callData: await kernelClient.account.encodeCalls([{
to: targetAdress,
data: callData,
value: 0n,
}], "delegatecall"),
})
```
## Deploying Contracts
:::info
Impatient? Check out [complete examples here](https://github.com/zerodevapp/zerodev-examples/blob/main/deploy-contract/main.ts).
:::
To deploy smart contracts from your smart account, use the `deployContract` function:
```typescript
const txnHash = await kernelClient.sendTransaction({
callData: await kernelClient.account.encodeDeployCallData({
abi,
bytecode,
})
})
```
## Fallback Providers
:::info
Impatient? Check out [a complete example here](https://github.com/zerodevapp/zerodev-examples/blob/main/fallback-clients/main.ts).
:::
ZeroDev aggregates multiple bundler and paymaster services to provide the highest possible reliability to our users. You can set up "fallbacks" so that when one of the services fails, another takes over.
### API
Start by creating multiple account clients:
```ts
// Get these from your ZeroDev dashboard
const PAYMASTER_RPC = 'your ZeroDev paymaster RPC'
const BUNDLER_RPC = 'your ZeroDev bundler RPC'
const PAYMASTER_RPC_ALCHEMY = PAYMASTER_RPC + '?provider=ALCHEMY'
const BUNDLER_RPC_ALCHEMY = BUNDLER_RPC + '?provider=ALCHEMY'
const PAYMASTER_RPC_PIMLICO = PAYMASTER_RPC + '?provider=PIMLICO'
const BUNDLER_RPC_PIMLICO = BUNDLER_RPC + '?provider=PIMLICO'
// Create an account client with alchemy as provider
const kernelClient1 = createKernelAccountClient({
account,
chain,
bundlerTransport: http(BUNDLER_RPC_ALCHEMY),
client: publicClient,
paymaster: {
getPaymasterData: ( userOperation ) => {
const zeroDevPaymasterClient = createZeroDevPaymasterClient({
chain,
transport: http(PAYMASTER_RPC_ALCHEMY),
})
return zeroDevPaymasterClient.sponsorUserOperation({
userOperation,
})
}
},
entryPoint
})
// Create an account client with pimlico as provider
const kernelClient2 = createKernelAccountClient({
account,
chain,
bundlerTransport: http(BUNDLER_RPC_PIMLICO),
client: publicClient,
paymaster: {
getPaymasterData: ( userOperation ) => {
const zeroDevPaymasterClient = createZeroDevPaymasterClient({
chain,
transport: http(PAYMASTER_RPC_PIMLICO),
})
return zeroDevPaymasterClient.sponsorUserOperation({
userOperation,
})
}
},
})
```
Then combine the Kernel clients with the `createFallbackKernelAccountClient` function:
```ts
const kernelClient = createFallbackKernelAccountClient([
kernelClient1,
kernelClient2,
])
```
Now you can use `kernelClient` as usual. Your `kernelClient` will use `kernelClient1` by default, and if it runs into any issues with it, it will fallback to `kernelClient2`.
### Using non-ZeroDev infra as fallbacks
In the previous example, we used different providers as fallbacks through ZeroDev. If you are worried that ZeroDev itself might go down, you can also sign up directly with providers like Pimlico and set them up as fallback providers.
To do that, simply:
* [Set up a Kernel account client with Pimlico](/api-and-toolings/infrastructure/pimlico).
Then combine them with `createFallbackKernelAccountClient`:
```ts
const kernelClient = createFallbackKernelAccountClient([
zerodevKernelClient,
pimlicoKernelClient,
])
```
## Key Storage
:::warning
The remote signer feature is a paid add-on. Please [contact us](https://t.me/derek_chiang) before you use this feature in production, in order to avoid service disruptions.
:::
Sometimes you might want to manage session keys or even actual private keys for your users, but you may not want to store the keys on your database.
ZeroDev offers a key management API you can use to generate private keys and sign with them. The private key is never transmitted to you or stored on your server -- the API executes the signing remotely.
### Code Example
Check out [a complete example here](https://github.com/zerodevapp/zerodev-examples/blob/main/remote-signer/main.ts).
### Installation
:::code-group
```bash [npm]
npm i @zerodev/remote-signer
```
```bash [yarn]
yarn add @zerodev/remote-signer
```
```bash [pnpm]
pnpm i @zerodev/remote-signer
```
```bash [bun]
bun add @zerodev/remote-signer
```
:::
### API
First, obtain the ZeroDev API key from [your dashboard](https://dashboard.zerodev.app/account). Remember: you must secure this API key. Whoever has access to this API key effectively controls all the private keys you manage with the key management API.
#### Generating a private key
```ts
import { toRemoteSigner, RemoteSignerMode } from "@zerodev/remote-signer"
const remoteSigner = await toRemoteSigner({
apiKey,
mode: RemoteSignerMode.Create
})
```
`remoteSigner` is a [Viem account](https://viem.sh/docs/accounts/privateKey) which you can use for signing.
Note that if you want to get this key later, you must store its "address" which is basically its public key: `remoteSigner.address`.
#### Getting an existing private key
When getting an existing key, specify the "address" of the key.
```ts
import { toRemoteSigner, RemoteSignerMode } from "@zerodev/remote-signer"
const remoteSigner = await toRemoteSigner({
apiKey,
keyAddress: remoteSignerAddress,
mode: RemoteSignerMode.Get
})
```
#### Signing with the key
Since `remoteSigner` is a [Viem account](https://viem.sh/docs/accounts/privateKey), you can use it wherever a Viem account is expected.
For example, to use the remote signer as a [session key](/smart-accounts/permissions/intro):
```ts
const ecdsaSigner = toECDSASigner({ signer: remoteSigner })
const permissionPlugin = await toPermissionValidator(publicClient, {
entryPoint,
kernelVersion,
signer: ecdsaSigner,
policies: [
// ...
]
})
```
## Migration Guide
### API v2 => API v3
With API v3, the notable changes are:
* A ZeroDev project can now support multiple networks.
* The same RPC can be used for both bundler and paymaster.
Here's what a v3 RPC looks like:
```txt
https://rpc.zerodev.app/api/v3/xxxxxf2d-xxxx-xxxx-90cc-xxxxxxxxx007/chain/42161
```
Note that the last part `42161` is the chain ID. Therefore, if you'd like to programmatically use the RPC for different chains, you can do something like:
```ts
// replace the prefix with your own RPC prefix
const rpcPrefix = `https://rpc.zerodev.app/api/v3/xxxxxf2d-xxxx-xxxx-90cc-xxxxxxxxx007/chain/`
const rpc = rpcPrefix + chain.id
```
Of course, you can also simply copy the RPC for different chains from the dashboard.
The same RPC can then be used as both the bundler RPC and the paymaster RPC. See [the tutorial](/get-started/quickstart#creating-a-kernel-client) for an example.
### SDK 5.3.x => 5.4.x
In version **5.4.x** of the `@zerodev/sdk`, we've migrated to using `viem@2.18.x` with native Account Abstraction (AA) modules instead of the `permissionless` package. This change brings significant updates to types, imports, function signatures, and overall API usage.
This guide will help you migrate your codebase to be compatible with the new version.
#### Update dependencies
1. **Remove the `permissionless` package**:
```bash
npm uninstall permissionless
```
2. **Ensure you have `viem@^2.21.40` version**
#### Update `permissionless` Account Abstractions
Replace any imports from `permissionless` with the equivalent from `viem/account-abstraction` or `@zerodev/sdk` if applicable.
#### Update Type Definitions
Replace `EntryPoint` Types
```typescript
import type { EntryPoint } from 'permissionless/types'; // [!code --]
import type { EntryPointVersion } from 'viem/account-abstraction'; // [!code ++]
```
Replace `UserOperation` Types
```typescript
import type { UserOperation } from 'permissionless/types'; // [!code --]
import type { UserOperation } from 'viem/account-abstraction'; // [!code ++]
```
#### Replaced `entryPoint: Address` with `entryPoint: { address: Address; version: EntryPointVersion}`
For `createKernelAccount` and `signerToEcdsaValidator` among other plugins, replace the `entryPoint` parameter as shown:
```typescript
import { getEntryPoint } from "@zerodev/sdk/constants"; // [!code ++]
createKernelAccount(publicClient, {
// ...
entryPoint: ENTRYPOINT_ADDRESS_V07, // [!code --]
entryPoint: getEntryPoint("0.7"), // [!code ++]
})
```
```typescript
signerToEcdsaValidator(publicClient, {
// ...
entryPoint: ENTRYPOINT_ADDRESS_V07, // [!code --]
entryPoint: getEntryPoint("0.7"), // [!code ++]
})
```
#### Removed `entryPoint` from `createKernelAccountClient`
```typescript
const kernelClient = createKernelAccountClient({
entryPoint, // [!code --]
// ...
});
```
#### Replaced `middleware.sponsorUserOperation` from `createKernelAccountClient` with `paymaster.getPaymasterData`
```typescript
const kernelClient = createKernelAccountClient({
middleware: { // [!code --]
sponsorUserOperation: paymasterClient.sponsorUserOperation, // [!code --]
}, // [!code --]
paymaster: { // [!code ++]
getPaymasterData(userOperation) { // [!code ++]
return paymasterClient.sponsorUserOperation({ userOperation }) // [!code ++]
} // [!code ++]
} // [!code ++]
// ...
});
```
#### Added `client` to `createKernelAccountClient`
`client` is now required in `createKernelAccountClient`.
```typescript
const kernelClient = createKernelAccountClient({
client: publicClient, // [!code ++]
// ...
});
```
#### Added `estimateFeesPerGas` to `userOperation` in `createKernelAccountClient`
`estimateFeesPerGas` is now required in `userOperation` in `createKernelAccountClient` to estimate the gas price for the user operation.
The default gas prices might be too high, so it's recommended to use this function to estimate the gas price.
```typescript
const kernelClient = createKernelAccountClient({
userOperation: { // [!code ++]
estimateFeesPerGas: async ({bundlerClient}) => { // [!code ++]
return getUserOperationGasPrice(bundlerClient) // [!code ++]
} // [!code ++]
}, // [!code ++]
// ...
});
```
#### `kernelClient.sendUserOperation` and `kernelClient.signUserOperation` now take `userOperation` properties directly
```typescript
await kernelClient.sendUserOperation({
userOperation: { sender, callData, nonce, ...rest }, // [!code --]
sender, // [!code ++]
callData, // [!code ++]
nonce, // [!code ++]
...rest // [!code ++]
});
await kernelClient.signUserOperation({
userOperation: { sender, callData, nonce, ...rest }, // [!code --]
sender, // [!code ++]
callData, // [!code ++]
nonce, // [!code ++]
...rest // [!code ++]
});
```
#### Replaced `account.encodeCallData` with `account.encodeCalls`
```typescript
await account.encodeCallData( // [!code --]
{ // [!code --]
to: zeroAddress, // [!code --]
value: BigInt(0), // [!code --]
data: "0x", // [!code --]
callType // [!code --]
}, // [!code --]
), // [!code --]
await account.encodeCalls([ // [!code ++]
{ // [!code ++]
to: zeroAddress, // [!code ++]
value: BigInt(0), // [!code ++]
data: "0x", // [!code ++]
}, // [!code ++]
], callType), // [!code ++]
```
#### Replaced `kernelClient.sendTransactions` with `kernelClient.sendTransaction`
```typescript
await kernelClient.sendTransactions({ // [!code --]
transactions: [ // [!code --]
// ... // [!code --]
], // [!code --]
}); // [!code --]
await kernelClient.sendTransaction({ // [!code ++]
calls: [ // [!code ++]
// ... // [!code ++]
], // [!code ++]
}); // [!code ++]
```
#### `KernelAccountClient` extends `bundlerActions` by default
For example:
```typescript
const bundlerClient = kernelClient.extend(bundlerActions(entryPoint)); // [!code --]
await bundlerClient.waitForUserOperationReceipt({ // [!code --]
hash: userOpHash, // [!code --]
}); // [!code --]
await kernelClient.waitForUserOperationReceipt({ hash }) // [!code ++]
```
#### Merged `bundlerClient.sendUserOperation` and `kernelClient.sendUserOperation`
`kernelClient.sendUserOperation` now prepares the `userOperation` if needed and directly calls `eth_sendUserOperation`.
### SDK 5.1.x => 5.2.x
#### Most functions now take an `entryPoint` param
EntryPoint 0.7 is the most recent update to ERC-4337, but we will still be supporting EntryPoint 0.6.
The SDK will automatically use Kernel v3 for EntryPoint 0.7, and Kernel v2 for EntryPoint 0.6.
You will need to specify an `entryPoint` parameter to many functions, including:
* Functions for creating validators, such as `signerToEcdsaValidator`
* Functions for creating Kernel accounts, such as `createKernelAccount`
* Function for creating Kernel client: `createKernelAccountClient`
For example:
```ts
import { ENTRYPOINT_ADDRESS_V06, ENTRYPOINT_ADDRESS_V07 } from "permissionless"
// If migrating a live app
const entryPoint = ENTRYPOINT_ADDRESS_V06
// If launching a new app
const entryPoint = ENTRYPOINT_ADDRESS_V07
const account = await createKernelAccount(publicClient, {
plugins: {
sudo: ecdsaValidator,
},
entryPoint,
})
```
* If you are migrating a live app that is using EntryPoint 0.6 (Kernel v2), set `entryPoint` to `ENTRYPOINT_ADDRESS_V06`.
* If you are launching a new app, set `entryPoint` to `ENTRYPOINT_ADDRESS_V07`.
#### Replaced `transport` with `bundlerTransport` inside `createKernelAccountClient`
```ts
const kernelClient = createKernelAccountClient({
transport: http(bundlerUrl), // [!code --]
bundlerTransport: http(bundlerUrl), // [!code ++]
// ...
})
```
#### Replaced `sponsorUserOperation` with `middleware.sponsorUserOperation`
Instead of accepting just a `sponsorUserOperation` middleware, `createSmartAccountClient` now accepts a `middleware` function that can specify a `sponsorUserOperation` function internally, as well as a `gasPrice` function.
```ts
const kernelClient = createKernelAccountClient({
sponsorUserOperation: paymasterClient.sponsorUserOperation, // [!code --]
middleware: { // [!code ++]
sponsorUserOperation: paymasterClient.sponsorUserOperation, // [!code ++]
}, // [!code ++]
// ...
})
```
## Multi-chain Signing
You can use Kernel with a "multi-chain validator" which can sign multiple UserOps in one signature, even if the UserOps are on different chains. For example, if you want to bridge some assets from chain A, and then execute a transaction on chain B with the bridged assets, you can sign both the bridging transaction and the target transaction in a single signature.
### Examples
#### Sending multi-chain transactions
If you want to send transactions across multiple chains with a single ecdsa signature, [refer to this code example.](https://github.com/zerodevapp/zerodev-examples/blob/main/multi-chain/main.ts)
If you want to use passkey instead of ecdsa, [refer to this code example.](https://github.com/zerodevapp/multi-chain-passkey-example)
#### Creating multi-chain session keys
If you want to create multiple session keys across different chains, with a single signature, [refer to this code example](https://github.com/zerodevapp/zerodev-examples/blob/main/multi-chain/useSessionKeyWithApproval.ts).
If you want to use passkey instead of ecdsa, [refer to this code example.](https://github.com/zerodevapp/multi-chain-passkey-example/tree/session-key-with-serialization)
#### Enabling plugins across chains
If you want to enable validators across chains (e.g. to enable recovery), with a single signature, [refer to this code example](https://github.com/zerodevapp/zerodev-examples/blob/main/multi-chain/sendUserOpsWithEnable.ts).
If you want to use passkey instead of ecdsa, [refer to this code example.](https://github.com/zerodevapp/multi-chain-passkey-example/tree/enable-regular)
## Parallel UserOps
:::info
Impatient? Check out [a complete example here](https://github.com/zerodevapp/zerodev-examples/blob/main/send-transactions/with-2d-nonce.ts).
:::
With a EOA, the nonce is sequential: 1, 2, 3, ... This means that transactions must be ordered sequentially, and a transaction cannot be processed unless a previous transaction was completed.
With smart accounts, the nonce can be two-dimensional, which allows for *parallel UserOps*. Imagine that your user wants to place three trades:
1. Swap 100 USDC to DAI
2. Swap 100 DAI to USDT
3. Swap 1WETH to USDT
In this example, assuming the user did not have DAI to start with, the first two trades have dependencies, since the user needs to wait for the first trade to complete before they can do the second trade. However, the third trade doesn't depend on either of the first two trades, so it ought to be able to be placed in parallel.
### API
To send parallel UserOps, use "nonce keys" to compute nonces:
```ts
import { getCustomNonceKeyFromString } from "@zerodev/sdk"
const entryPoint = "0.7"
const nonceKey = getCustomNonceKeyFromString(
"nonce key",
entryPoint,
)
const nonce = await account.getNonce({ key: nonceKey})
await kernelClient.sendUserOperation({
callData,
nonce: nonce,
})
// This UserOp won't wait for the previous one, because it uses
// a different nonce key.
const nonceKey2 = getCustomNonceKeyFromString(
"nonce key 2",
entryPoint,
)
const nonce2 = await account.getNonce({ key: nonceKey2})
await kernelClient.sendUserOperation({
callData,
nonce: nonce2,
})
```
All UserOps using the same nonce key will be ordered sequentially. UserOps using different nonce keys will be parallel to each other.
For example, if you want to order all UserOps that interact with Uniswap, and order all UserOps that interact with AAVE, but you want the Uniswap UserOps and the AAVE UserOps to be parallel to each other, you can use the string "Uniswap" and "AAVE" as the nonce keys for their UserOps respectively.
## Run code when creating an account
:::info
Impatient? Check out [a complete example here](https://github.com/zerodevapp/zerodev-examples/blob/main/emit-event-when-creating-account/main.ts).
:::
Sometimes, you might want to execute some custom code when you create an account. One common use case is when you want to emit an event whenever a user creates an account.
Running custom code during initialization can be done via plugins. Specifically you can follow this process:
* Write a custom validator that executes your custom code during initialization.
* Install the validator to your account during account initialization.
### Developing a custom validator
Kernel implements the [ERC-7579 interface](https://eips.ethereum.org/EIPS/eip-7579), so you can write a 7579 validator.
[Here's an example of a validator that simply emits an event](https://github.com/zerodevapp/kernel/blob/ab30532763de3cdbe05dab7821652f11cc0a01c7/src/validator/EmitIdentifierValidator.sol). Note that [the `onInstall` function](https://github.com/zerodevapp/kernel/blob/ab30532763de3cdbe05dab7821652f11cc0a01c7/src/validator/EmitIdentifierValidator.sol#L12) accepts an initialization data, which you can use to run customized code per account.
Once you have developed the custom validator, deploy it using `CREATE2` so that it has the same address across all chains.
### Install the validator
Once you have deployed the validator, the easiest way to install it is like this:
```ts
const account = await createKernelAccount(publicClient, {
plugins: {
sudo: ecdsaValidator,
},
entryPoint,
kernelVersion,
pluginMigrations: [ // [!code ++]
{ // [!code ++]
// This is the deployed validator address // [!code ++]
address: "0x43C757131417c5a245a99c4D5B7722ec20Cb0b31", // [!code ++]
type: PLUGIN_TYPE.VALIDATOR, // [!code ++]
// this is the data passed to `onInstall` // [!code ++]
data: "0x", // [!code ++]
}, // [!code ++]
], // [!code ++]
})
```
Now, your validator's `onInstall` function will run whenever an account is created.
## Upgrading Kernel
:::info
Impatient? Check out [a complete example here](https://github.com/zerodevapp/zerodev-examples/blob/main/create-ecdsa-migration-account/main.ts).
:::
[Kernel](https://github.com/zerodevapp/kernel), our smart account implementation, receives updates from time to time to keep up with the latest standards and best practices. We do NOT recommend upgrading Kernel accounts unless you NEED TO, since there are many ways to accidentally screw up. But if you do need to upgrade, you can follow the steps here.
The tricky thing about upgrading a smart account is that it affects the *deterministic address computation* (i.e. `CREATE2`), since a Kernel address is partially derived from the smart account implementation. Thankfully, the ZeroDev SDK offers a convenience function for upgrading Kernel accounts without messing up the deterministic address.
### API
We currently offer an API for upgrading a ECDSA Kernel account. For other account types, reach out for assistance.
To migrate, replace the code that you used to set up the Kernel validator and account with a single `createEcdsaKernelMigrationAccount` function:
```ts
import { KERNEL_V3_1, KERNEL_V3_2 } from "@zerodev/sdk/constants"
import { createEcdsaKernelMigrationAccount, signerToEcdsaValidator } from "@zerodev/ecdsa-validator"
import { createKernelAccount } from "@zerodev/sdk";
const originalKernelVersion = KERNEL_V3_1
const migrationVersion = KERNEL_V3_2
const ecdsaValidator = await signerToEcdsaValidator(publicClient, { // [!code --]
signer, // [!code --]
entryPoint, // [!code --]
kernelVersion: originalKernelVersion, // [!code --]
}) // [!code --]
// [!code --]
const account = await createKernelAccount(publicClient, { // [!code --]
plugins: { // [!code --]
sudo: ecdsaValidator, // [!code --]
}, // [!code --]
entryPoint, // [!code --]
kernelVersion, // [!code --]
}) // [!code --]
const migrationAccount = await createEcdsaKernelMigrationAccount(publicClient, { // [!code ++]
entryPoint, // [!code ++]
signer, // [!code ++]
migrationVersion: { // [!code ++]
from: originalKernelVersion, // [!code ++]
to: migrationVersion, // [!code ++]
}, // [!code ++]
}) // [!code ++]
```
Then you can use this account to set up a Kernel client as usual:
```ts
const migrationKernelClient = createKernelAccountClient({
account: migrationAccount,
// other params...
})
```
## UserOp Builder API
The UserOp Builder API provides a server-side solution for building and sending ERC-7702 User Operations with [Kernel smart accounts](https://docs.zerodev.app/sdk/core-api/create-account). It handles gas estimation, paymaster integration, and bundler submission—perfect for backend services that need to construct user operations without client-side SDKs.
:::info
The UserOp Builder API is only available for users on the Enterprise plan.
:::
### Overview
The UserOp Builder API supports:
* **EIP-7702** — EOA to smart account delegation
* **Gas sponsorship** — Automatic paymaster integration
* **Kernel versions** — `0.3.1`, `0.3.2`, `0.3.3`
### Quick Start
```typescript
// 1. Build the user operation
const buildResponse = await fetch(
`${BASE_URL}/${projectId}/${chainId}/build-userop`,
{
method: "POST",
headers: {
"X-API-KEY": apiKey,
"Content-Type": "application/json",
},
body: JSON.stringify({
entrypoint: "0.7",
kernelVersion: "0.3.1",
account: "0xYourSmartAccountAddress",
calls: [{ to: "0xRecipient", value: "1000000000000000000" }],
}),
},
);
const userOp = await buildResponse.json();
// 2. Sign the userOpHash with your account's private key
const signature = await signMessage(userOp.userOpHash);
// 3. Send the signed user operation
const sendResponse = await fetch(
`${BASE_URL}/${projectId}/${chainId}/send-userop`,
{
method: "POST",
headers: {
"X-API-KEY": apiKey,
"Content-Type": "application/json",
},
body: JSON.stringify({
...userOp,
entryPointVersion: "0.7",
signature,
}),
},
);
const { userOpHash } = await sendResponse.json();
```
### Authentication
:::info
Get your API key from the [ZeroDev Dashboard](https://dashboard.zerodev.app).
:::
All endpoints require authentication via API key headers. Either one of the following headers must be included:
| Header | Format | Description |
| ---------------- | ------ | -------------------- |
| `X-API-KEY` | UUID | Your project API key |
| `X-TEAM-API-KEY` | UUID | Team-level API key |
### Path Parameters
All endpoints use the following path structure:
```
POST /:projectId/:chainId/
```
| Parameter | Type | Description |
| ----------- | ------ | --------------------------- |
| `projectId` | UUID | Your ZeroDev project ID |
| `chainId` | number | Target chain (e.g., 1, 137) |
### API Reference
#### Build User Operation
Builds an unsigned ERC-7702 user operation with gas estimation and paymaster data.
```
POST /:projectId/:chainId/build-userop
```
##### Request
```typescript
interface BuildUserOpRequest {
// Required
entrypoint: "0.7";
kernelVersion: "0.3.1" | "0.3.2" | "0.3.3";
account: Address;
calls: Array<{
to: Address;
value?: string; // Wei amount
data?: Hex;
}>;
// Optional
nonce?: string; // Auto-fetched if omitted
authorization?: SignedAuthorization; // Required for EIP-7702
isEip7702Account?: boolean;
callGasLimit?: string;
maxFeePerGas?: string;
maxPriorityFeePerGas?: string;
}
```
##### Response
```typescript
interface BuildUserOpResponse {
sender: Address;
nonce: Hex;
callData: Hex;
callGasLimit: Hex;
verificationGasLimit: Hex;
preVerificationGas: Hex;
maxFeePerGas: Hex;
maxPriorityFeePerGas: Hex;
paymaster: Address;
paymasterData: Hex;
paymasterVerificationGasLimit: Hex;
paymasterPostOpGasLimit: Hex;
factory: Address;
factoryData: Hex;
userOpHash: Hex; // Sign this hash
}
```
> **Important:** The `userOpHash` in the response is what you need to sign with your account's private key.
***
#### Send User Operation
Submits a signed user operation to the bundler.
```
POST /:projectId/:chainId/send-userop
```
##### Request
```typescript
interface SendUserOpRequest {
// Required
entryPointVersion: "0.7";
sender: Address;
nonce: string;
callData: Hex;
signature: Hex; // Your signature of userOpHash
callGasLimit: string;
verificationGasLimit: string;
preVerificationGas: string;
maxFeePerGas: string;
maxPriorityFeePerGas: string;
userOpHash: Hex;
// Optional (from build response)
paymaster?: Address;
paymasterData?: Hex;
paymasterVerificationGasLimit?: string;
paymasterPostOpGasLimit?: string;
factory?: Address;
factoryData?: Hex;
// Required for EIP-7702 accounts
authorization?: SignedAuthorization;
}
```
##### Response
```typescript
// 201 Created
{
userOpHash: Hex;
}
```
:::info
Use the returned `userOpHash` to poll for the receipt.
:::
***
#### Get User Operation Receipt
Retrieves the receipt for a submitted user operation.
```
POST /:projectId/:chainId/get-userop-receipt
```
##### Request
```typescript
{
userOpHash: Hex;
}
```
##### Response
```typescript
interface UserOpReceipt {
userOpHash: Hex;
entryPoint: Address;
sender: Address;
nonce: Hex;
paymaster: Address;
actualGasCost: Hex;
actualGasUsed: Hex;
success: boolean;
reason: string;
logs: Log[];
receipt: TransactionReceipt;
}
```
> **Tip:** Poll this endpoint until you get a successful response. The user operation may take a few seconds to be included in a block.
***
#### Initialize Kernel Client
Pre-warms the kernel client cache for a project/chain. Optional but recommended for reducing latency on first request.
```
POST /:projectId/:chainId/init-kernel-client
```
##### Response
```typescript
// 200 OK
{
success: true;
}
```
### Types
```typescript
type Address = `0x${string}`; // 42-character hex address
type Hex = `0x${string}`;
// EIP-7702 authorization for EOA delegation
interface SignedAuthorization {
address: Address; // Kernel implementation to delegate to
chainId: number;
nonce: number;
r: Hex;
s: Hex;
yParity: number;
v?: bigint;
}
```
### Using with EIP-7702
[EIP-7702](https://docs.zerodev.app/sdk/advanced/eip7702) allows EOAs to temporarily delegate to a smart contract. To use an EOA as a Kernel smart account:
```typescript
const response = await fetch(
`${BASE_URL}/${projectId}/${chainId}/build-userop`,
{
method: "POST",
headers: {
"X-API-KEY": apiKey,
"Content-Type": "application/json",
},
body: JSON.stringify({
entrypoint: "0.7",
kernelVersion: "0.3.1",
account: "0xYourEOAAddress", // Your EOA, not a smart account
isEip7702Account: true,
authorization: {
address: "0xKernelImplementation",
chainId: 1,
nonce: 0,
r: "0x...",
s: "0x...",
yParity: 0,
},
calls: [{ to: "0xRecipient", value: "1000000000000000000" }],
}),
},
);
```
### Supported Chains
The API supports any chain configured in your ZeroDev project:
See [ZeroDev's supported networks](https://docs.zerodev.app/sdk/faqs/chains) for the full list.
### Related Resources
* [Kernel Smart Accounts](https://docs.zerodev.app/sdk/core-api/create-account)
* [EIP-7702 Guide](https://docs.zerodev.app/sdk/advanced/eip7702)
* [Gas Sponsorship](https://docs.zerodev.app/sdk/core-api/sponsor-gas)
* [ZeroDev Dashboard](https://dashboard.zerodev.app)
## WalletConnect
### Overview
The `@zerodev/walletconnect` Core SDK facilitates the connection between a WalletConnect-compatible wallet and a blockchain application, handling session proposals, requests, and responses. It leverages a kernel EIP1193 provider to sign transactions or messages.
### Installation
:::code-group
```bash [npm]
npm i @zerodev/walletconnect
```
```bash [yarn]
yarn add @zerodev/walletconnect
```
```bash [pnpm]
pnpm i @zerodev/walletconnect
```
```bash [bun]
bun add @zerodev/walletconnect
```
:::
### Initialization
We will use the `WalletConnectKernelService` class to connect to the WalletConnect-compatible wallet.
```typescript
await walletConnectKernelService.init({
walletConnectProjectId: "your_project_id",
walletConnectMetadata: {
"name": "ZeroDev Wallet",
"url": "https://example.com",
"description": "Smart contract wallet for Ethereum",
"icons": [
"https://example.com/images/400x400.jpg"
]
},
kernelClient: optionalKernelClient,
kernelProvider: optionalKernelProvider
});
```
* `walletConnectProjectId`: Your WalletConnect project ID. You will get this from the [WalletConnect dashboard.](https://cloud.walletconnect.com/sign-in)
* `walletConnectMetadata`: Metadata related to the WalletConnect session.
* `kernelClient`: An optional kernel client for creating a kernel provider.
* For detailed information on kernel clients, see [the kernel clients documentation.](/smart-accounts/create-a-smart-account#create-an-account-client)
* `kernelProvider`: An optional pre-initialized kernel provider.
* If you are using wagmi with the capabilities pattern (for more information, see [the capabilities quickstart](/get-started/quickstart)), you can get the `kernelProvider` from wagmi.
```typescript
import { useAccount } from "wagmi";
const { connector } = useAccount();
// If using typescript you'll need to cast the provider to the correct type
const kernelEIP1193Provider = (await connector.getProvider()) as unknown as KernelEIP1193Provider;
```
:::info
You must either pass a `kernelProvider` or a `kernelClient` to the `init` method.
:::
### Connecting to a Wallet
To start a session, use the `connect` method with a WalletConnect URI:
```typescript
await walletConnectKernelService.connect("wc:example_uri");
```
### Event Handling
Subscribe to various session-related events:
```typescript
// Handle session request
walletConnectKernelService.onSessionRequest((request) => {
// This request object is what will be passed to the approveSessionRequest method or rejectSessionRequest method
});
// Handle session proposal
walletConnectKernelService.onSessionProposal((proposal) => {
// This proposal object is what will be passed to the approveSessionProposal method or rejectSessionProposal method
});
// Handle session addition
walletConnectKernelService.onSessionAdd(() => {
// You can get the updated session using the getActiveSessions method
const sessions = walletConnectKernelService.getActiveSessions();
});
// Handle session deletion
walletConnectKernelService.onSessionDelete(() => {
// You can get the updated session using the getActiveSessions method
const sessions = walletConnectKernelService.getActiveSessions();
});
```
### Session Management
#### Approving or Rejecting Proposals
Handle incoming session proposals by approving or rejecting them:
```typescript
await walletConnectKernelService.approveSessionProposal(proposal, chainId, address);
await walletConnectKernelService.rejectSessionProposal(proposal);
```
#### Handling Session Requests
Approve or reject session requests based on business logic:
```typescript
await walletConnectKernelService.approveSessionRequest(request, chainId);
await walletConnectKernelService.rejectSessionRequest(request);
```
### Disconnecting
Terminate an active session using the `disconnect` method:
```typescript
const sessions = walletConnectKernelService.getActiveSessions();
await walletConnectKernelService.disconnect(sessions[0]);
```
### Example: WalletConnect ZeroDev Example
For an example of integrating the `@zerodev/walletconnect` Core SDK with a React app, check out [this example repo.](https://github.com/zerodevapp/walletconnect-example).
## Quickstart
Create a new project with `npm` (or whatever package manager you use):
```bash
mkdir zerodev
cd zerodev
npm init -y
```
Install the ZeroDev SDK and a plugin:
```bash
npm i @zerodev/sdk @zerodev/ecdsa-validator
```
Install dev packages for TypeScript:
```bash
npm i --save-dev @types/node tslib
```
Create the following `tsconfig.json` (TypeScript config):
```json
{
"compilerOptions": {
"target": "es5",
"module": "commonjs",
"declaration": true,
"outDir": "./lib",
"strict": true,
"esModuleInterop": true
},
"include": ["./**/*.ts"]
}
```
Create a script `index.ts` with the following code:
```ts
import { createKernelAccount, createKernelAccountClient, createZeroDevPaymasterClient } from "@zerodev/sdk"
import { KERNEL_V3_1, getEntryPoint } from "@zerodev/sdk/constants"
import { signerToEcdsaValidator } from "@zerodev/ecdsa-validator"
import { http, createPublicClient, zeroAddress } from "viem"
import { generatePrivateKey, privateKeyToAccount } from "viem/accounts"
import { baseSepolia } from "viem/chains"
const ZERODEV_RPC = 'https://rpc.zerodev.app/api/v3/61016d2a-e0df-4350-929c-d5f2110700d1/chain/84532'
const chain = baseSepolia
const entryPoint = getEntryPoint("0.7")
const kernelVersion = KERNEL_V3_1
const main = async () => {
// Construct a signer
const privateKey = generatePrivateKey()
const signer = privateKeyToAccount(privateKey)
// Construct a public client
const publicClient = createPublicClient({
// Use your own RPC provider in production (e.g. Infura/Alchemy).
transport: http(ZERODEV_RPC),
chain
})
// Construct a validator
const ecdsaValidator = await signerToEcdsaValidator(publicClient, {
signer,
entryPoint,
kernelVersion
})
// Construct a Kernel account
const account = await createKernelAccount(publicClient, {
plugins: {
sudo: ecdsaValidator,
},
entryPoint,
kernelVersion
})
const zerodevPaymaster = createZeroDevPaymasterClient({
chain,
transport: http(ZERODEV_RPC),
})
// Construct a Kernel account client
const kernelClient = createKernelAccountClient({
account,
chain,
bundlerTransport: http(ZERODEV_RPC),
// Required - the public client
client: publicClient,
paymaster: {
getPaymasterData(userOperation) {
return zerodevPaymaster.sponsorUserOperation({userOperation})
}
},
})
const accountAddress = kernelClient.account.address
console.log("My account:", accountAddress)
// Send a UserOp
const userOpHash = await kernelClient.sendUserOperation({
callData: await kernelClient.account.encodeCalls([{
to: zeroAddress,
value: BigInt(0),
data: "0x",
}]),
})
console.log("UserOp hash:", userOpHash)
console.log("Waiting for UserOp to complete...")
await kernelClient.waitForUserOperationReceipt({
hash: userOpHash,
timeout: 1000 * 15,
})
console.log("UserOp completed: https://base-sepolia.blockscout.com/op/" + userOpHash)
process.exit()
}
main()
```
Run it:
```bash
npx ts-node index.ts
```
You should see an output like this:
```txt
My account: 0xaf731E22Fe96979C5D864B07bad0EB999cDBbE76
UserOp hash: 0x7a8e0ba961cc0a34f745b81d64766f033269fee831104fee0269fa5bcc397dcb
Waiting for UserOp to complete...
View completed UserOp here: https://jiffyscan.xyz/userOpHash/0x7a8e0ba961cc0a34f745b81d64766f033269fee831104fee0269fa5bcc397dcb
```
Congrats -- you just sent your first gasless transaction with ZeroDev!
In this example, you used a public ZeroDev API key. Now read [Set up a project](/get-started/sdks/setup-project) to see how to set up your own ZeroDev project, then walk through the full [TypeScript / JavaScript tutorial](/get-started/sdks/client-side/typescript).
#### error
`Error | null`
The error object for the mutation, if an error was encountered.
#### isError / isIdle / isPending / isSuccess
`boolean`
Boolean variables derived from [`status`](#status).
#### isPaused
`boolean`
* will be `true` if the mutation has been `paused`.
* see [Network Mode](https://tanstack.com/query/v5/docs/react/guides/network-mode) for more information.
#### status
`'idle' | 'pending' | 'error' | 'success'`
* `'idle'` initial status prior to the mutation function executing.
* `'pending'` if the mutation is currently executing.
* `'error'` if the last mutation attempt resulted in an error.
* `'success'` if the last mutation attempt was successful.
#### reset
`() => void`
A function to clean the mutation internal state (e.g. it resets the mutation to its initial state).
#### error
`Error | null`
* The error object for the query, if an error was thrown.
* Defaults to `null`
#### isError / isPending / isSuccess
`boolean`
Boolean variables derived from [`status`](#status).
#### isFetched
`boolean`
Will be `true` if the query has been fetched.
#### isLoading
`boolean`
* Is `true` whenever the first fetch for a query is in-flight
* Is the same as `isFetching && isPending`
#### status
`'error' | 'pending' | 'success'`
* `pending` if there's no cached data and no query attempt was finished yet.
* `error` if the query attempt resulted in an error. The corresponding `error` property has the error received from the attempted fetch
* `success` if the query has received a response with no errors and is ready to display its data. The corresponding `data` property on the query is the data received from the successful fetch or if the query's `enabled` property is set to `false` and has not been fetched yet `data` is the first `initialData` supplied to the query on initialization.
#### refetch
`(options: { cancelRefetch?: boolean | undefined; throwOnError?: boolean | undefined }) => Promise`
* A function to manually refetch the query.
* `throwOnError`
* When set to `true`, an error will be thrown if the query fails.
* When set to `false`, an error will be logged if the query fails.
* `cancelRefetch`
* When set to `true`, a currently running request will be cancelled before a new request is made.
* When set to `false`, no refetch will be made if there is already a request running.
* Defaults to `true`
ZeroDev offers two modes for setting up social login: Development and Production. Follow the steps below to configure your social login in our [dashboard](https://dashboard.zerodev.app/auth-options).
* **Development Mode**:
* Available to all users by default.
* Functions only when your application is running locally on the `localhost` URI.
* Ideal for testing social sign-in features during development.
* **Production Mode**:
* Available to users on the "Growth" plan or higher.
* To activate, complete the form in the [Social Auth](https://dashboard.zerodev.app/auth-options) section of the ZeroDev dashboard.
* Submit the form for review; reviews are typically completed within 24 hours.
* Ensure all sections of the form are completed accurately to facilitate a successful review.
* ZeroDev uses [Magic](https://magic.link/docs/home/security/product-security) for its social integration. Links to Magic's documentation are provided in the form to assist with setup (e.g., Google Developer Console).
**Production Mode Configuration Steps**:
1. Enter the client ID and client secret from your social provider into the designated fields in the ZeroDev dashboard.
2. Copy the redirect URI provided by ZeroDev into your social provider’s dashboard.
3. Ensure that the redirect URI and whitelist URI for your application are input correctly in the form.
4. Submit the form for review.
For detailed information on how Magic handles the creation of public/private key pairs, integral to the security of the social login process, please refer to [Magic's product security documentation.](https://magic.link/docs/home/security/product-security)
## Reflections on Ethereum Governance Following the 3074 Saga
::authors
[Vitalik](https://twitter.com/VitalikButerin) and [Yoav](https://twitter.com/yoavw) kindly reviewed this post, but opinions are my own.
If you haven’t been following the AA drama, here’s a quick recap:
* Several weeks ago, EIP-3074, a proposal that would bring many of the benefits of AA to EOA users, was approved by the core devs to go into “Pectra,” Ethereum’s next hard fork.
* Ever since then, many in the ERC-4337 community, especially the 4337 authors themselves, have been [strongly pushing back](https://docs.zerodev.app/blog/4337-and-3074-disagreements) on 3074, on the grounds of [centralization concerns](https://notes.ethereum.org/@yoav/3074-implications) and its incompatibility with Ethereum’s [AA roadmap](https://notes.ethereum.org/@yoav/AA-roadmap-May-2024), which is centered around 4337 and its cousin 7560 (aka “native AA”).
* Last week, Vitalik proposed [EIP-7702](https://github.com/ethereum/EIPs/blob/master/EIPS/eip-7702.md) as an alternative to 3074. It mostly achieves the same goal — bringing many benefits of AA to EOA users — but in a way that’s more compatible with 4337 today, and forward-compatible with the “AA endgame” that is 7560.
* At this time, the core devs are deliberating on EIP-7702, but preliminary discussions and community sentiments suggest that EIP-7702 will most likely replace EIP-3074 in Pectra.
Personally, I was very happy with the outcome: EOA users will soon be able to enjoy most of the benefits of AA, using the tooling and infra built for ERC-4337.
And yet, I cannot help but feel that **the *way* in which we achieved this outcome was far from optimal**, a view that many had expressed in the past few weeks. I feel that with a better process, we could’ve collectively saved a tremendous amount of energy and headache, and arrived at the desired outcome much sooner.
In this blog post, I want to:
* Identify what went wrong with the process.
* Propose a mental model for thinking about Ethereum governance.
* Suggest improvements for avoiding similar governance failures in the future.
## Why the process made people unhappy
This whole saga made a lot of people unhappy for several reasons:
* It took years for 3074 to be approved.
* Only *after* 3074 was finally approved, did the core devs get a huge ton of pushbacks from the 4337 community.
* The 4337 *authors* themselves, on the other hand, had repeatedly voiced their concerns with 3074 to core devs, to no avail.
* Now we are on track to *un-approve* 3074 and replace it with another EIP (7702).
Now, there’s nothing inherently wrong with any of the above:
* It’s OK for a discussion to take years.
* It’s OK for a EIP to receive pushbacks after it’s approved.
* It’s OK to un-approve a EIP after it’s approved, if new issues are identified.
However, we can probably agree that things *could’ve* gone more smoothly. Imagine if this is how it went:
* The 4337 community actively engaged the core devs as they were debating 3074. Now, only one of two outcomes is possible:
* Either 3074 was approved (and possibly modified) *after* taking the 4337 community feedback into account, in which case the 4337 community would’ve been onboard with 3074 and we wouldn’t be reversing 3074.
* Or, 3074 was never approved, but the 4337 community and core devs worked together towards a proposal that everyone is happy with, à la 7702.
Everyone’s voice is heard, and there’s no dramatic reversals. That would’ve been nice — so why didn’t it happen?
## What went wrong?
Reflecting on the process, both sides of the debate have pointed fingers at each other.
The core devs (and authors of EIP-3074) felt that it was the “4337 people”’s fault that they didn’t actively engage with [the All Core Devs (ACD) process](https://github.com/ethereum/pm), where EIPs are deliberated for a long time before they are finally accepted by the client teams, and thereby implemented into the protocol.
At any point during this deliberation, the argument goes, the “4337 people” could’ve come in and expressed their concerns, as opposed to waiting until *after* 3074 had already been approved. After all, the ACD process is well-documented, [the meetings are open to all](https://github.com/ethereum/pm/issues), and there are people like [Tim Beiko](https://twitter.com/TimBeiko) that actively tweet out summaries after every ACD meeting. So if the 4337 people cared so much about this issue, why didn’t they spend the time to engage?
On the other side, the AA team (4337 authors) pointed out that they had been attending ACD meetings and pushed back on 3074 every chance they could, but the core devs didn’t listen. As for the 4337 community, they mostly felt blindsided — most people were under the impression that 3074 was dead, and were not even aware that 3074 was being actively considered for inclusion.
Many people also felt that the ACD process was too opaque and not friendly for participations from people who have “real jobs” and couldn’t afford to keep up with all the ACD updates. Some also felt that it should be the ACD’s responsibility to actively seek feedback from relevant stakeholders, in this case the 4337 community.
**It’s my opinion, however, that both sides missed the mark.** There’s a much deeper issue at work, and until we fix or at the very least acknowledge the issue, we will keep running into governance failures followed by unproductive finger-pointings.
## The Root Cause
The real cause of the governance failure was that, contrary to popular beliefs, the ACD is NOT the only governance power for protocol updates, and in this instance **it was overridden by another governance power**.
Problematically, the other governance power is rarely acknowledged, despite the fact that **it has an even larger influence than ACD on the most important matters of Ethereum**, such as AA and scaling.
In this article, I’m going to call this power **“roadmaps”**.
This whole 3074/7702 saga, as I will argue, **is no more and no less than an instance of the power of roadmaps overwhelming the power of ACD**. And if we are talking about governance, then any time we notice an invisible power overwhelming a visible power, we should be very concerned, for what’s invisible is unaccountable, and therefore must be brought to light.
## What is a roadmap?
Anyone in the Ethereum community must’ve come across the term “roadmap” a lot, such as in the “rollup-centric roadmap,” “ETH 2.0 roadmap,” or in this debate “[the AA roadmap](https://notes.ethereum.org/@yoav/AA-roadmap-May-2024).”
A search of “roadmap” on Ethereum Magicians
To illustrate my point, let’s imagine an ACD meeting where the core devs are discussing how to scale Ethereum:
* Core Dev Bob: I support EIP 1234 which proposes that we [speed up block time 10X, increase block size 10X & drop fee 100X](https://twitter.com/elonmusk/status/1393738154889338884).
* Other core devs: …are u out of ur \*\*\*\*\*\*\* mind?
Let’s think for a second here. Why did the core devs just shot down what Bob said? He just proposed a very legit form of scaling. Solana and many other L1s do it, to great scaling effects.
The reason, of course, is that this imaginary EIP is against Ethereum’s own [“rollup-centric” scaling roadmap](https://ethereum-magicians.org/t/a-rollup-centric-ethereum-roadmap/4698), which says, among other things, that [it's crucial for blockchain decentralization for regular users to be able to run a node](https://vitalik.eth.limo/general/2021/05/23/scaling.html#its-crucial-for-blockchain-decentralization-for-regular-users-to-be-able-to-run-a-node), and therefore the imaginary EIP is out of the question since it would vastly increase the barrier to running a node.
What I wanted to illustrate with this example is that **the core devs, who participate in the ACD process and decide on protocol updates, are guided by a higher force that I’m calling *the roadmaps***. There’s the scaling roadmap, the AA roadmap, the MEV roadmap, you name it — and collectively they form *the Ethereum roadmap* that the core devs base their decisions off.
## When core devs are misaligned with a roadmap
Since roadmaps are not a formal part of governance, there’s no guarantee that core devs are aligned with them. In particular, since there’s no formal process for “approving” a roadmap, **not all roadmaps are perceived to have equal legitimacy**. It’s up to the researchers behind the roadmaps to diligently champion their roadmaps to the core devs and the larger community, in order to gain legitimacy and therefore buy-in from the core devs.
In the case of AA, Vitalik himself has pushed for a 4337-centric AA roadmap on [multiple](https://notes.ethereum.org/@vbuterin/account_abstraction_roadmap) [occasions](https://www.youtube.com/watch?v=iLf8qpOmxQc\&t=2461s), but overall it has mostly been the 4337 team, notably Yoav and Dror, who champion the 4337-centric AA roadmap at conferences, online forums, and ACD meetings.
However, despite these efforts, there were strong oppositions from some core devs against the 4337-centric AA roadmap. They felt that 7560, the native version of 4337 that clients would eventually have to implement, is overly complex and not the only viable candidate for the “AA endgame.” Eventually the ACD decided to approve 3074 despite the 4337 team’s objections that it would fragment the AA ecosystem by creating an alternative and [less decentralized](https://notes.ethereum.org/@yoav/3074-implications) AA tech stack.
Once 3074 was approved, however, there was a strong reaction from the entire 4337 community, which forced core devs to re-engage in the 3074 debate. The debate then [became a stalemate](https://docs.zerodev.app/blog/4337-and-3074-disagreements) where neither the 4337 authors nor the 3074 authors could convince one another, until Vitalik came in [at the eleventh hour](https://twitter.com/decentrek/status/1788188707595403554) and proposed EIP-7702 as an alternative to 3074 that is explicitly compatible with the 4337-centric “AA endgame,” and thereby pushing the conflict in favor of the AA roadmap.
## The role of Vitalik
Even though Vitalik carries himself as a researcher, this saga clearly shows that Vitalik brings a qualitatively different governance power to the table than other researchers. So it begs the question — what role does Vitalik play in Ethereum governance?
Personally, I find it helpful to think of Vitalik as **the CTO of a very, very large company**.
*(For the purpose of this analogy, there’s no CEO at this company, by the way.)*
If you have worked at any technology company with more than, say, 50 people, you know that the CTO cannot possibly be involved in every technical decision. At a certain scale, technical decisions *necessarily* become decentralized — there’s typically a sub team for each area of the company’s product, and the sub team is mostly free to make their own decisions regarding specific implementation details.
Furthermore, the CTO is also not necessarily the foremost expert in every (or any) subject matter. There could very well be engineers at a company that are better than the CTO in specific areas. Therefore, in matters of technical debates, it’s frequently the engineers that make the ultimate decisions.
**The CTO, however, sets the company’s technical vision**. The execution of the vision is left to the devs.
While this is not a perfect analogy, I think it reasonably captures Vitalik’s role in the ecosystem. Vitalik isn’t involved in every technical decision — he can’t possibly be. Nor is he the top expert at every area. But he has an overwhelming influence on setting the roadmaps for all critical aspects of Ethereum (scaling, AA, Proof-of-Stake…), not just because of his technical expertise, but also because he is the ultimate judge for whether a roadmap is consistent with Ethereum’s vision — *his vision*.
## Every successful product starts with a vision
If my take that Vitalik is the CTO of Ethereum isn’t controversial enough for you, here comes the most controversial part: **we should embrace Vitalik as the CTO**.
It’s my opinion as a startup founder that behind every successful product — and yes Ethereum is a “product” in the sense that it solves real problems for real people — there must be a coherent vision. And a coherent vision must necessarily be set by a small number of people, such as the founders of a startup, and oftentimes just one founder.
The beauty of Ethereum is that, despite it being such a complex system with so many moving parts, the parts fit beautifully together into a functioning decentralized computer that’s moving billions of dollars worth of value every day. And the way we got here was *not* through design by committees. **It is precisely *because of* Vitalik’s active leadership through his vision that we are able to arrive at a coherent and beautiful product that is Ethereum today**. Ethereum was a brainchild of Vitalik in 2015, and it remains so today.
This is not, of course, to downplay the contributions of other researchers and engineers, who deserve most of the credits for getting Ethereum to where it is today. However, that’s not incompatible with the fact that Ethereum is a realization of Vitalik’s vision, orders of magnitude more so than anyone else’s.
And truthfully, can you complain? When you were attracted into the Ethereum ecosystem by its openness, censorship-resistance, and pace of innovation — did you complain that it started with Vitalik’s vision? Maybe you didn’t because you didn’t think of it that way — but now that you do, do you *really* mind?
## What about decentralization?
But but but, you say, what about decentralization? If one person has such overwhelming power over Ethereum, how can we claim that it’s decentralized?
To answer this question, we must go back to [this classic article](https://medium.com/@VitalikButerin/the-meaning-of-decentralization-a0c92b76a274) about the meaning of decentralization, written by, cough cough, Vitalik. The key insight of the article is that there are three types of decentralization:
* Architectural decentralization: how many nodes can be compromised before the system ceases to function?
* Logical decentralization: can the subsystems of the system evolve independently while keeping the system functioning? Or must they be closely coordinated?
* Political decentralization: how many people or organizations ultimately control this system?
Given these definitions, Ethereum is clearly architecturally decentralized, and it’s probably fair to say that it’s also logically decentralized, given the lack of strong coupling between its various components (e.g. consensus vs execution).
In terms of political decentralization, the good news is that no individual or organization can shut down Ethereum, not even Vitalik. However, one could argue that Ethereum is not as politically decentralized as one might think, given the prominent role that Vitalik plays in setting its vision and thereby defining its roadmaps.
However, it’s my opinion that **if we want Ethereum to keep innovating, we must embrace Vitalik as the de facto CTO, even if it means sacrificing some political decentralization.**
If Ethereum ever “ossifies” into a mostly immutable blockchain like Bitcoin, then Vitalik could retire. But before we reach that endgame, it’s critical that there’s an authority that all sides respect, who is trusted to make *judgements* on technical decisions not based on technical merits alone, but also on whether they are consistent with Ethereum’s vision.
Without a figure like Vitalik, only two outcomes are possible, both vividly illustrated by this 3074 saga:
* Ethereum governance could dissolve into endless *gridlocks* where neither side is willing to compromise and no one could make any progress, as seen by how the 3074 debate was at a stalemate until Vitalik came in.
* Or, Ethereum could wound up becoming a *Frankenstein monster of incoherent designs*, as indicated by how close we were to having 3074 and 4337 serving as two parallel AA stacks that are largely incompatible.
## The role of the community
We are very close to having a complete mental model of Ethereum governance, but there’s one glaring omission from our discussion so far — the community.
If Vitalik defines the vision, which are followed by roadmaps defined by researchers, which are in turn implemented by core devs — what role does the community play? Surely not nothing??
Fortunately, the community actually plays the most important role of all. The reason is that before there’s even a vision, there are *values*. We all came together as a community because we rallied around certain values, which ultimately Vitalik’s vision must be consistent with, **or it’d lose the community**.
Perhaps it was your upbringing. Perhaps it was something that happened in your last job. But at one point or another, all of us in the Ethereum community decided that it would be *good* for the world to have a decentralized computer that is accessible to all, that cannot be censored, that is [credibly neutral](https://nakamoto.com/credible-neutrality/). We assert and affirm these values everyday with the work we do on top of Ethereum, and in doing so we provide *[legitimacy](https://vitalik.eth.limo/general/2021/03/23/legitimacy.html)* to the vision, roadmaps, and code produced by Vitalik, researchers, and core devs.
## The VVRC model of Ethereum governance
So here, then, is a complete mental model for Ethereum’s governance, which I’m calling **the values ⇒ vision ⇒ roadmaps ⇒ clients model, or VVRC for short**:
* V == Values == Community
* V == Vision == Vitalik
* R == Roadmaps == Researchers
* C == Clients == Core Devs
Together they work like this:
* The **community** rallies around certain **values**.
* **Vitalik** articulates a **vision** consistent with these values.
* **Researchers** come up with **roadmaps** in accordance with the vision.
* **Core devs** implement **clients** based on the roadmaps.
Poorly drawn by the new GPT-4o. It refused to draw the word “Vitalik” due to “content policy.”
Of course, the reality is way messier than any simple model can capture. For example, core devs in reality are the only people who can “vote” on any decisions, by virtue of implementing the clients. Vitalik and other researchers only serve an advisory role, and sometimes their input is not accepted by the core devs, which was why 3074 was approved.
That said, I think the VVRC model reasonably captures how Ethereum governance works in the happy case, and it’s up to us to “debug” the process so that it doesn’t fail like it did with 3074.
## How can we improve Ethereum governance
Now that we have a mental model for how Ethereum governance *should* work, here are a few ideas for improving the governance process so that we can avoid the kind of whiplash we experienced with 3074/7702.
* There must be more visibility for EIPs that are actively being considered for inclusion. The community at large should never be “caught by surprise” that an EIP is accepted, which was the case with 3074.
* Contrary to what you might expect, the “status” of a EIP on [the EIPs site](https://eips.ethereum.org/EIPS/eip-3074) does not reflect its status in the ACD process. That’s why it still says 3074 is in “Review” even though the core devs had already voted to approve it, and there was even less indication that it was ever being considered for inclusion in the first place.
* **Ideally, EF would make it loud and clear on social media when an EIP is about to be accepted, to increase community awareness**.
* Sometimes the core devs can underestimate the impact a particular EIP has for downstream projects & users, which is the case with 3074 and the 4337 community. Since ACD meetings are limited in time and must coordinate across timezones, understandably there’s an emphasis that only “relevant people” should speak at the meetings. That said, it *could* make sense to allocate some time, every once in a while, **for community members to comment on the downstream impact of certain EIP proposals**.
* If researchers feel that their input is not being received by core devs, as was the case with the 4337 team, they could bring community members into the call to strengthen their case.
* Crucially, there must be a mutual recognition between core devs and researchers that they are both governance powers, albeit with different strengths. The “client power” of core devs is the only power that can actually “vote” by virtue of implementing clients. The “roadmap power” of researchers typically enjoys more public support thanks to the researchers actively speaking and writing about their roadmaps.
* When the two powers are at odds, it can be tempting for the core devs to simply override the researchers, such as when the core devs overrode objections from the 4337 team. However, overriding as such may result in whiplash since the powers are unstable when they are in conflict, as seen from the ensuing drama after 3074 was approved.
* Similarly, when faced with resistance, it can be tempting for researchers to simply give up engaging with core devs, which IMO is one reason why [the RIP process](https://github.com/ethereum/RIPs) was created and why native AA (7560) is now primarily being pushed as an RIP, not a EIP. **While there are real benefits to helping L2s experiment with protocol updates that are too controversial for L1, we cannot view RIPs as a substitute to engaging with the EIP governance process**. Researchers must keep on engaging with core devs until they are fully aligned with the roadmaps.
## Conclusion
The 3074/7702 saga sheds light on how Ethereum governance *really works* — that **besides the explicit governance power that is the EIP/ACD process driven by core devs, there’s also the implicit governance power of roadmaps driven by researchers**. When these powers become misaligned, we see gridlocks and whiplash, and it could take another power — Vitalik — to tip the balance one way or the other.
We then make the case that **Vitalik represents a distinct power that is the “vision” of Ethereum, which is the basis of legitimacy for any roadmaps**. We compare Vitalik with the CTO at a large company, and acknowledge that **his role as a pseudo-CTO is necessary for Ethereum to keep up its pace of innovation**, without degenerating into a Frankenstein system of incoherent designs.
Finally, we present a mental model for thinking about Ethereum governance as **VVRC: values (community) ⇒ vision (Vitalik) ⇒ roadmaps (researchers) ⇒ clients (core devs)**. We then suggest various ways to fix the “bugs” that sometimes cause the process to deviate from this model in practice.
Ethereum governance is “[the machine that builds the machine](https://www.youtube.com/watch?v=f9uveu-c5us)” — to get Ethereum right, we must get governance right. As such, 3074 provided an invaluable case study for when governance went wrong, and I hope I was able to draw some helpful lessons from it so we can improve Ethereum governance for the future.
*If you enjoyed this blog post, you can [amplify it here](https://twitter.com/decentrek/status/1790392200121225577).*
## The pitfalls of EIP-3074, and how to avoid them
::authors
(Thanks to [Yoav Weiss](https://twitter.com/yoavw) and [Dan Finlay](https://twitter.com/danfinlay) for feedback and review.)
[EIP-3074](https://eips.ethereum.org/EIPS/eip-3074) has been confirmed for the next Ethereum hardfork (”Pectra”), which is amazing news for the Ethereum community. For the first time, EOA users will be able to enjoy the benefits of account abstraction (AA) — gas sponsorship, transaction batching, session keys, passkeys, etc. At ZeroDev, we cannot be more excited to bring these smart account features to EOA users.
At its core, 3074 is a very simple proposal. Two new opcodes, `AUTH` and `AUTHCALL`, together enable a smart contract (known as an “invoker”) to take over the address of a EOA. Most of the complexity in enabling the aforementioned AA features is left out of the protocol itself, and left to the application layer (specifically invokers and relayers) to handle.
By leaving complexity out of the spec, however, EIP-3074 opens up many possible paths to account abstraction. **The danger is that some of these paths may lead to a future of AA that is more centralized and permissioned than any of us intended or desired.** This blog post explains:
* How EIP-3074 could lead to 1) permissioned mempools and 2) popular wallets gate-keeping account innovations.
* How to avoid such outcomes.
#### Why EIP-3074 needs relayers
One common misconception about EIP-3074 is that, by itself, it enables account abstraction. Actually, by itself, EIP-3074 only enables *execution abstraction*, meaning that EOAs can execute calls through smart contracts, notably enabling transaction batching.
The main part of AA, however, is *validation abstraction* — determining the validity of transactions through smart contracts. Validation abstraction is what enables use cases such as gas sponsorship, session keys, passkeys, etc.
“Native account abstraction,” such as EIP-7560, achieves validation abstraction by updating the protocol itself to support a new transaction type for smart accounts. Since EIP-3074 doesn’t go that far, it must rely on relayers to “package” smart account transactions into EOA transactions, in order to achieve validation abstraction and therefore most of the benefits of AA.
#### Can EIP-3074 relayers form a permissionless mempool?
A mempool is a network of relayers that shares transactions with one another. A mempool is said to be *permissionless* when:
* Any relayers can join the mempool.
* Anyone can send transactions to the mempool.
In Ethereum, about 90% of transactions go into the public mempool, which is permissionless; the rest go into various private and permissioned mempools such as Flashbots Protect, usually for MEV protection.
While permissioned mempools have an important role to play, it’s crucial that a permissionless mempool *exists*. To see why, consider the fact that currently [over 35% of MEV-Boost relays censor transactions](https://www.mevwatch.info/). Since permissioned mempools consist of a known set of nodes, they are particularly susceptible to government pressures. A permissionless mempool serves as the last line of defense against censorship, ensuring that transactions can be included even in the most adversarial scenarios.
If we are not careful, however, **EIP-3074 mempools may become exclusively permissioned**.
#### Why permissionless mempools are hard
In a permissionless mempool, every node sees the transactions received by everyone. Therefore, a permissionless mempool must protect nodes (relayers) from Denial-of-Service (DoS) attacks, where nodes are so busy processing invalid transactions that they can’t process valid transactions.
Smart account transactions are particularly challenging for DoS protection, because:
* It takes more computational resources to validate a transaction, since validation is implemented with smart contracts and therefore can consume significant computational resources.
* Since the validation contract can read chain state, valid transactions may become invalid as the chain state changes.
As a result, a mempool of nodes that verify smart account transactions are particularly vulnerable to DoS attacks. The second problem is especially tricky, because if a relayer thinks that a smart account transaction is valid, packages it into a EOA, and submits it on-chain, only to find out that it’s invalid after all, the relayer will have wasted not just computational resources but also gas, which makes the attack particularly economically disruptive.
Since EIP-3074 doesn’t address this problem, the problem must be solved by invokers and relayers. If it’s not solved, **the default behavior would be for all 3074 relayers to only accept transactions from trusted senders, resulting in fragmented and permissioned mempools, and a low degree of censorship resistance.**
#### How to build a permissionless mempool
The trick to protecting a mempool from DoS attacks is to ensure that:
* Validating a transaction is cheap, relative to the cost of executing the transaction.
* A valid transaction cannot be made invalid without significant cost to the attacker.
To achieve these properties, we can leverage *validation-execution separation*, [the idea that underpins ERC-4337 and EIP-7560 (native account abstraction)](https://twitter.com/VitalikButerin/status/1576199517434949634). Basically, the smart account should implement a `validate()` function separate from an `execute()` function. Relayers only simulate the `validate()` function, which is limited to a small amount of gas, to determine if the transaction is valid. And the `validate()` function can only access state inside the account, so that state change outside of the account cannot invalidate the transaction. The `execute()` function handles the actual execution of the transaction, which may consume a large amount of gas and access any state, since relayers don’t need to simulate it.
Therefore, **EIP-3074 invokers should implement validation-execution separation.** Without it, 3074 relayers will have to whitelist transaction senders and mempool participants in order to protect themselves, leading to permissioned and fragmented mempools.
#### Will popular wallets gate-keep account innovations?
Invokers, which are essentially smart accounts, are absolutely security-critical — a malicious or buggy invoker could easily lose all your assets. As such, wallets like MetaMask will almost certainly whitelist invokers for their users, so that using a non-whitelisted invoker would trigger a big warning or outright fail.
While some commentators have pointed to the whitelist as an issue, I think it’s in fact perfectly understandable, once you start thinking of invokers as just a part of the wallet software. After all, MetaMask doesn’t let users run custom code on MetaMask itself, so it makes sense that it won’t let users run custom invokers.
But wait — MetaMask actually *does* let users run custom code. It’s called [snaps](https://metamask.io/snaps/). So how does MetaMask let users run custom code, while keeping users safe?
The answer lies in a separation of concerns — there is a MetaMask *kernel* that handles the most security-critical aspects of the wallet, such as storing and signing with private keys. And then there are “modules” which are snaps that handle the less security-critical tasks, such as displaying notifications.
Since EIP-3074 says nothing about how invokers should be implemented, **the danger is that popular wallets might whitelist only *non-extensible invokers*, leaving no room for innovations from third parties whatsoever.**
#### Can there be “snaps” for invokers?
Ideally, an invoker would be architected like MetaMask itself — an “invoker kernel” would handle the core invoker logic, while exposing an “invoker modules” interface for the less security-critical functions.
As an example, consider gas abstraction — the idea that gas can be paid for by a “gas module,” such as a DEX that swaps ERC20s into native gas tokens to enable ERC20 gas payments. Assuming the invoker kernel is properly designed, a malicious gas module should not be able to steal user assets — the worst it can do is to NOT pay gas. This is the reason why in ERC-4337, any account can work with any paymaster without trusting each other, thus allowing paymasters to be developed independently of wallets.
The bottom line is, **given a securely designed “invoker kernel,” many aspects of a smart account can be securely modularized**. That’s what we should strive for with EIP-3074, so that we can **keep users safe while ensuring that account innovations are not monopolized by wallet companies**.
#### Conclusions
The greatest strength of EIP-3074, its simplicity, is also its greatest weakness. If it wasn’t so simple, it wouldn’t have been merged into the protocol. But because it’s so simple, the application layer has to tackle most of the complexity of AA, opening up a lot of room for mistakes.
This post highlights two particular pitfalls to avoid:
* If we don’t implement validation-execution separation for invokers, it will be hard for a permissionless mempool to exist for EIP-3074 transactions, fragmenting the relayer ecosystem and increasing the risks of censorship.
* If popular wallets don’t whitelist modular invokers that properly implement separation-of-concerns, users will only have access to a fixed set of account functionalities, severely limiting the potential of account abstraction.
In a follow-up blog post, I will make the case that the best way to avoid these pitfalls is to use EIP-3074 in conjunction with ERC-4337 (and eventually EIP-7560), which will give EOA users the benefits of ERC-4337 “for free”: permissionless mempools, diverse paymasters, modular smart accounts, and more.
At the end of the day, **the future of AA is bright, and all the more so with EIP-3074 bringing AA to EOA users**. Let’s try to build around EIP-3074 the right way, so that we can preserve the spirit of Ethereum itself: open, innovative, and permissionless.
## Why 4337 and 3074 authors are disagreeing, and who got it right
::authors
Update: Since this post was written, [EIP-7702](https://github.com/ethereum/EIPs/blob/master/EIPS/eip-7702.md) has been proposed to replace EIP-3074. This is a good outcome -- 7702 brings about the same benefits to EOAs as 3074, while addressing concerns from the 4337 team. This post remains helpful in explaining the disagreements that led to the creation of 7702.
If you have been closely following the discussions around EIP-3074, you will notice that it’s currently facing pushbacks from the authors of ERC-4337, including Vitalik himself, with some momentum building up for potentially removing it from Pectra, the next Ethereum hard fork.
This is of course NOT simply a matter of “my AA proposal good, your AA proposal bad.” As I will explain, the disagreement stems from the two sides having **fundamental different visions for the Ethereum roadmap**.
## The Core Disagreements
The two sides differ most strongly in their views on the following two topics:
* Whether 4337/7560 (the “native” version of 4337) is the “endgame for AA,” or merely one of the possible endgames.
* What’s the more urgent problem for Ethereum to solve — censorship-resistance (CR), or user experience (UX).
ERC-4337 authors believe that:
* 4337/7560 is the “official” endgame for AA that the entire community should rally around, in the same way that, say, the rollup-centric roadmap is the “official” endgame for scaling that the entire community rallies around.
* It’s more important for Ethereum to prioritize censorship-resistance even if it means delaying UX improvements.
EIP-3074 authors believe that:
* 4337/7560 is only one of the many possible endgames for AA, and there could very well be other popular ways of doing AA in the future.
* Ethereum is already censorship-resistant enough, and we don’t have to further delay UX improvements just to make it more censorship-resistant.
As I will argue, my personal take is that **each side got one thing right**:
* 4337/7560 should in fact be the endgame for AA that we all embrace.
* However, it’s more important to release 3074 now to improve Web3 UX, even if it means cleaning up some technical debt in the future and delaying the CR (censorship resistance) roadmap.
## Should 4337/7560 be the “official end-game”?
The answer is yes, and here is why:
ERC-4337/7560 is NOT, contrary to popular beliefs, just one of the many possible proposals for AA. **It’s the natural design arising out of solving one core problem, which is: “how do we build a censorship-resistant mempool for smart account transactions?”**
There are two great resources to learn about how the ERC-4337 design “naturally” arises:
* Short version: [Vitalik’s tweets](https://twitter.com/VitalikButerin/status/1576199517434949634).
* Long version: Alchemy blog series about how “[you could’ve invented account abstraction](https://www.alchemy.com/blog/account-abstraction).”
The core point of both resources is that **any AA system would naturally evolve towards something like 4337** if they need to solve the problem that 4337 sets out to solve, which is to build a decentralized, censorship-resistant mempool for smart account transactions.
Now, that’s not to say that there’s nothing opinionated about ERC-4337. But the authors have done an admirable job of slowly trimming down 4337/7560 and moving the more opinionated parts of it into separate RIPs that L2s can selectively adopt, such as [the 2D nonce system](https://github.com/eth-infinitism/RIPs/blob/73734b91e2b88db9e4247147d2d426925ab1b8af/RIPS/rip-9996.md).
Still, the point is that the *core* part of 4337/7560, namely the idea of 1) separating validation from execution and 2) enforcing storage access rules during the validation phase, will be a part of any AA design that can enable a decentralized mempool. Therefore, if we believe that it’s critical to keep the Ethereum mempool decentralized and censorship-resistant, which I certainly do, then it’s critical to embrace a AA design that shares core design elements with 4337/7560.
Given that, and given the already vibrant 4337 ecosystem of bundlers, paymasters, and smart accounts, it would be most productive in my opinion for the community to embrace 4337/7560 as the “official AA end-game,” the same way that we all embraced proof-of-stake or the rollup-centric roadmap.
## Why 3074 is at odds with censorship resistance
There are three reasons why 3074 has been criticized for being at odds with censorship resistance (CR), which [Yoav nicely summarized here](https://notes.ethereum.org/@yoav/3074-implications#Potential-centralization-vectors). In short:
* By not explicitly separating validation from execution, 3074 risks leading to centralized relayers.
* By not introducing any structure to invokers, wallets must fully trust invokers and therefore must whitelist invokers. Therefore, wallets will gate-keep account innovations.
* By including 3074 in Pectra (the next hardfork), we are delaying the inclusion of EIP-7547 aka “Inclusion Lists,” which is a core effort in the CR roadmap.
I wrote about the first two problems in [a previous blog post](https://twitter.com/decentrek/status/1784919543036719251), so I won’t go into them here, except to say that they are both solvable problems: 3074 can (and should) leverage decentralized mempools by [leveraging the 4337 mempool](https://notes.ethereum.org/@yoav/eip-3074-erc-4337-synergy#An-ultra-cheap-way-to-create-an-ERC-4337-account), and whitelisted invokers can allow for custom invoker code as long as they are [designed like modular accounts](https://twitter.com/decentrek/status/1784919543036719251).
I will focus on the third criticism — that we should choose EIP-7547 (CR) over EIP-3074 (UX). But first, let’s briefly explain why 3074 and 7547 are mutually exclusive in their current forms.
## Why 3074 and 7547 (inclusion lists) are mutually exclusive
In short, 7547 introduces a mechanism for a block proposer to “force-include” a set of txns in the next block. Blocks that don’t include these txns will be considered invalid by the protocol and rejected.
However, 3074 introduces the possibility of “mutually exclusive txns,” which makes it possible to produce an inclusion list that’s impossible to satisfy, thereby stalling the blockchain. For example, a EOA transaction may be valid in isolation, but when bundled in a block with another transaction that uses AUTH to spend all the EOA’s funds, the EOA transaction would be invalid.
This issue is not fundamental — we will just need more time to work out a design of inclusion lists that’s compatible with 3074. The argument however is that we should’ve released inclusion lists *first* and delayed 3074, not the other way around, because CR is more important than UX.
## Is CR or UX the more urgent problem for Ethereum?
CR is at the very core of the value proposition of Ethereum (or any blockchain really). There’s no denying that if Ethereum cannot achieve CR, it would lose the very reason it exists. Therefore, CR is no doubt a critically *important* problem.
But *important* is not the same as *urgent*, and CR is not a binary thing — it’s a spectrum. So how good is Ethereum’s CR right now?
While it’s not the only form of CR, we can look at [the state of MEV-Boost Relays](https://www.mevwatch.info/) for a clue. Currently about 38% of relays engage in censorship. Is that a lot? Certainly. But is that so bad that it’s already difficult to get a censored transaction included? Certainly not. The Ethereum public mempool is alive and functioning well.
Now, I’m not arguing for complacency by any means. We shouldn’t stop working on CR just because it’s still possible to get any transaction included. I would love to see more progress on inclusion lists and other forms of CR efforts.
However, **I don’t believe it’s productive to stifle all other valuable efforts in favor of getting as much CR as soon as possible**. The key question is, is the incremental gain of CR from inclusion lists more important than the incremental gain of UX from 3074?
## Why UX is an urgent problem
People pushing to delay or remove EIP-3074 tend to think that Ethereum UX is, while not ideal, mostly fine right now.
However, in the same way that it would be complacent to stop working on CR because users are still able to get their transactions included, it would be complacent to stop improving UX for EOA users because they seem to be able to use their wallets.
The reality, which we sometimes forget, is that Ethereum and Web3 in general are very, very far from mainstream adoption. If you are reading this post, you are an early adopter. And while token prices are going up, there has been no massive breakthrough in Web3 adoption in a very long time.
To put it bluntly — **what’s the point of making something censorship-resistant if no one uses it**? Of course, Ethereum is blessed to have a ton of users already. But my point is that the value of censorship-resistance of a thing scales with the *value* that the very thing provides, and to me 3074 can help Ethereum provide significantly more value by making EOAs more powerful & friendly.
## How Ethereum Governance Works
What’s fascinating to me about this whole debate is that it sheds light on how Ethereum governance works.
Ethereum is a decentralized movement, and just as important as the tech itself is the governance of it — how can a global network of people who don’t know each other, who have vastly different incentives and values, coordinate and create something *good*? And how do they agree on what *good* means anyways?
One of my favorite essays of all time is [The Tyranny of Structurelessness](https://www.jofreeman.com/joreen/tyranny.htm), in which the author argued that in an organization without formal hierarchies, “the lack of structure disguised an informal, unacknowledged, and unaccountable leadership, and in this way ensured its malefaction by denying its existence.” (quoting from Wikipedia.)
Now, I fully believe that everyone involved in this debate is *well-intentioned* and we all want what’s best for Ethereum. However, the reality is that we want *different things* — and **there’s a real *political* struggle at getting what we want**.
Historically, it would seem that the power to make protocol-level decisions has rested with the core devs through the EIP process, but this whole spectacle sheds light on the fact that power in the Ethereum community is more distributed than one might think, given the fact that we are now seriously considering removing a EIP that has been approved by core devs. This can be a very good thing, since some concerns had been raised in the past that the EIP process is far from perfect, and can be influenced by special interests (not unlike lobbying in the real world). Therefore, it’s a good thing to have a last line of defense if the EIP process results in a decision that’s wildly unpopular with the rest of the community.
## Conclusion
My personal take, though, is that **ultimately 3074 is good, and that we should respect the process this time around and see 3074 through**. Even if we decide to remove it, we should replace it with another EIP (in Pectra -- not delaying further) that would bring about the same level of benefits as EIP-3074, such as [EIP-5806](https://eips.ethereum.org/EIPS/eip-5806) or the new [transaction subtypes proposal](https://github.com/eth-infinitism/RIPs/pull/1).
In a future blog post, I will write about how to combine 3074 with 4337 to provide powerful UX to EOA users while preserving censorship-resistance. For now, let’s unite around shipping 3074 and get back to building great Web3 products that people love, which is ultimately all that matters.
## What does EIP-7702 mean for YOU? Part 1 -- The Adoption Cycle of 7702
::authors
[This article was originally published on X.](https://x.com/decentrek/status/1846216581979734156)
This is part 1 of a series I'm writing to examine the impact that EIP-7702 is likely to have on different parts of the crypto world, including:
* Users
* Wallets
* DApps
* WaaS (embedded wallets) and other infra providers
In part 1, I want to examine how the adoption of 7702 is likely to play out. Will it be adopted super quickly or will we see a very long adoption cycle? Who will adopt it first? That's what this article is about.
### What is EIP-7702
First, a quick recap. EIP-7702 is one of the EIPs slated to go live in Ethereum's next upgrade (Pectra), scheduled for Q1 2025.
With EIP-7702, an EOA can "upgrade" itself into a smart account, while simultaneously remaining an EOA and keeping the same address.
Once the account has been upgraded, the user can then experience most of the benefits of AA such as gas sponsorship, transaction batching, passkeys, etc.
### How EIP-7702 differs from ERC-4337
EIP-7702 is an account abstraction proposal, but it's different from ERC-4337 in critical ways:
* You can upgrade existing EOAs into 7702 smart accounts, whereas today you must create new accounts to use ERC-4337.
* A EIP-7702 account is simultaneously a EOA and a smart account, whereas a ERC-4337 account today is a smart account only.
* EIP-7702 is a EIP, whereas ERC-4337 is a ERC. In other words, Ethereum L1 and all Ethereum-equivalent L2s will "automatically" get EIP-7702, whereas ERC-4337 requires the deployment of specific contracts and infra.
In practice, the first two points -- that EIP-7702 can upgrade EOAs and that the EOAs remain EOAs even after the upgrade -- are the biggest reasons why EIP-7702 will likely boost AA adoption way more than ERC-4337 alone could do. This is because:
* People love their EOAs. Asking users to move their assets to a new account/wallet is simply too much for most users.
* Many dapps still don't support smart accounts. The fact that a 7702 account is both a EOA and a smart account will give the user the best of both worlds -- the capabilities of smart accounts, and the compatibility of EOAs.
However, it would be false to say that EIP-7702 will "kill" ERC-4337. As we will discuss in a future article, EIP-7702 will need to leverage ERC-4337 in order to achieve its full potential, so EIP-7702 is actually incredibly good news for ERC-4337 companies today such as @zerodev\_app.
### How fast will 7702 adoption happen
Now onto the main point of this article: how fast will 7702 be adopted, and how will the adoption play out in practice, i.e. how will different parts of the Web3 stack (e.g. wallets, dapps, infra) adopt 7702?
For the first question -- how fast -- there are a few possible scenarios:
* 7702 achieves huge adoption overnight because a ton of wallets/dapps will already have their 7702 integration ready to go on day 1 (since 7702 will go live on testnets like @ithacaxyz before it goes live on mainnet, giving projects a chance to support it on day 1).
* 7702 achieves huge adoption over a short time (say within a year) after the launch.
* 7702 will eventually achieve huge adoption, but it will play out over a long period of time (say between 1-3 years).
* 7702 never achieves real adoption.
My personal ranking of the likelihoods of these scenarios is 2 > 3 >> 4 > 1 (with 2/3 being the likely scenarios and 4/1 being the less likely scenarios). In other words, 7702 will likely achieve massive adoption within a few years, but it's unlikely to be adopted overnight nor to be completely ignored.
To see why, let's examine how 7702 adoption will likely play out in practice.
### How wallets will adopt 7702
Let's start by examining wallets, who are upstream in the adoption cycle of 7702, because without wallets supporting 7702, dapps can't leverage 7702 features.
First, let's differentiate between **standalone wallets** like @MetaMask @CoinbaseWallet, and **wallet services** like @privy\_io @dynamic\_xyz @turnkeyhq @magic\_labs. Standalone wallets and wallet services will face different incentives in adopting 7702. In this section we talk only about **standalone wallets**.
Standalone wallets have a few options when it comes to adopting 7702:
* They can embrace it fully by 1) implementing support for 7702 and 2) enabling it **by default** for all their users.
* They can embrace it partially by 1) implementing support for 7702, but 2) keeping it disabled by default and requiring users to **opt into** 7702.
* They can take a wait-and-see approach with 7702 and not implement support for it until competition forces them to do so.
My prediction is that the long tail of wallet companies will go with option 3 (wait-and-see), for the simple reason that adopting 7702 is a lot of work so most wallet companies may simply not have the time and resources to implement it quickly. **HOWEVER, the most important wallets, such as MetaMask and Coinbase, will go with option 2, i.e. quickly implementing 7702 support but requiring users to opt into it.** There will also be new standalone wallets that go with option 1 (enabling 7702 by default), but since wallets are such a competitive space and difficult for new players to enter, realistically most users will be using existing wallets that go with option 2 or 3.
### Why top wallets will quickly support 7702
So why do I think that top wallets will implement 7702 support quickly? Because:
* I know from personal connections that these top wallet companies have been paying very close attention to the development of 7702, so they genuinely understand the benefits of 7702.
* These projects are some of the most well-funded companies in the space, and therefore have the resources and capabilities to implement support for 7702.
* Wallets are a hyper-competitive space and the top wallets have the most to lose, so the fear of missing out on a big paradigm shift will drive them to quickly adopt 7702 so they don't get disrupted by competitors.
Now, why do I believe that these wallets won't enable 7702 by default, but rather require users to opt in?
### Why top wallets will require users to opt into 7702
In one word, **security**.
The topic of security with 7702 is a very nuanced one and deserves its own post, but I will quickly go over the basics here.
In short, it's incorrect to say either 1) that 7702 improves wallet security, or 2) that it hurts wallet security. This is because security is a multi-facet thing, and 7702 improves security in some aspects while hurting security in others.
7702 improves security because:
* With [session keys](/smart-accounts/permissions/session-keys) (otherwise known as "privilege de-escalation" or "subkeys"), you can interact with DApps in a "sandboxed" way, so that even a malicious dapp cannot steal everything from you. This significantly reduces the probability and harm of phishing attacks.
7702 doesn't improve security and possibly even hurts security in some ways because:
* Since a 7702 account is simultaneously a EOA and a smart account, it doesn't relieve you from the need to secure your EOA private key (seed phrase). This is the main reason why, **despite 7702, long-term it would still be best for the space to transition towards full smart accounts**, because only full smart accounts can fully eliminate the need for seed phrases, which are terribly hard to secure.
* Since 7702 accounts are smart accounts, their security are now dependent on the security of the smart account implementation. No matter how many times smart accounts are audited, there's always a non-zero chance that it has bugs.
Therefore, it's really anyone's judgement as to whether a 7702 account is more or less secure than a EOA account, and also whether the UX benefits are worth the security tradeoffs.
Since the most important property of a wallet is security, existing top wallets won't risk user security by enabling 7702 by default. Rather, they will offload the decision to users and let users decide whether they want to use 7702 or not.
### Will users opt into 7702?
Given that top wallets will offer 7702 as an optional feature, the natural question becomes: will users opt in?
The answer is actually very simple: **users will enable 7702 if if they really want to use a dapp/feature that requires 7702, and otherwise they won't**. Therefore, this leads us to the second part of the analysis -- how will dapps adopt 7702?
### How dapps will adopt 7702
For dapps, 7702 (and AA in general) has four main value propositions:
* Gas sponsorship
* Transaction batching
* Transaction automation (via session keys)
* Chain abstraction (enabling CA with AA is a new area of research that [we are very excited about](https://x.com/decentrek/status/1833548246389547223))
Together, these value props yield significant UX benefits that will differentiate a dapp from its competitors, so dapps do have a strong incentive to leverage AA. The reason why you haven't seen too much dapp adoption for AA so far is that, with ERC-4337, dapps have to opt into an entirely new account model (smart accounts) that doesn't work with 99% of users out there (EOA users), but with 7702 a dapp can offer these UX benefits without turning away EOA users, so the cost/benefit calculus for dapps to adopt AA becomes much more favorable with 7702.
**But here we see a chicken-and-egg problem -- dapps don't want to spend the time and resources into supporting 7702 if very few users will be using 7702-enabled wallets, but users also won't enable 7702 unless there are dapps that support 7702.** How do we break this chicken-and-egg?
This leads us to examining another part of the Web3 stack -- wallet services aka "embedded wallets."
### How embedded wallets will adopt 7702
Just like standalone wallets, embedded wallets providers won't enable 7702 by default, but rather provide that as an option to their customers (dapp developers). However, unlike standalone wallets where the choice to enable 7702 is on the user (as it would be terribly insecure if a dapp could enable 7702 for your MetaMask), **the choice to enable 7702 for embedded wallets will rest with the dapp developer**, as embedded wallets are by definition new wallets that developers create for their users.
**So, if a dapp developer wants to leverage AA features, they won't need to wait for their users to opt into 7702 -- they can just use 7702-enabled embedded wallets.**
Now, you might say that developers have been able to leverage ERC-4337 through embedded wallets as well, but it hasn’t led to massive AA adoption. The key difference with 7702, however, is that **developers do not have to exclude EOA users when they build with 7702-enabled embedded wallets**. Rather, the apps can support both embedded wallets and EOA users. EOA users who want to experience AA features with the app can just turn on 7702 for their EOA.
Therefore, embedded wallets will play a key role in driving the adoption of 7702, by allowing developers to offer AA features without waiting for users to enable 7702 for their standalone wallets.
### Putting everything together
We have now examined how four different groups -- wallets, users, dapps, and embedded wallets -- will likely adopt 7702. Let's now put everything together.
* Standalone wallets (e.g. MetaMask) will implement support for 7702 but require users to opt in.
* Embedded wallets (e.g. privy/dynamic) will also implement support for 7702, but require developers to opt in.
* Innovative dapps will implement AA features using 7702-enabled embedded wallets.
* Adventurous EOA users will try these dapps by turn on 7702 for their standalone wallets.
* Seeing more users turning on 7702 and more dapps adopting 7702, the slower-moving dapps will start leveraging 7702/AA too.
* As the number of AA-enabled dapps grow, the slower-moving users will enable 7702 too, in order to not miss out on all the new apps and new experiences.
* As more and more users enable 7702, the long-tail of wallets who are yet to support 7702 will be forced to add support or risk fading into irrelevancy.
Hopefully, **this virtuous cycle of wallets => dapps => users => wallets will drive the entire space to adopt 7702/AA**, which will bring a 10x improvement to Web3 UX as we know it today, and sets the stage for native AA, whenever that happens.
In the next article, we will dive deeper into the technical side and examine how exactly wallets and dapps will implement support for 7702.
*Update: we have released a tutorial for [using the ZeroDev SDK with EIP-7702](/smart-accounts/eip-7702/quickstart).*
## What does EIP-7702 mean for YOU? Part 2 -- DApp Developers
::authors
[This article was originally published on X.](https://x.com/decentrek/status/1900231172640432580)
In [part one](https://x.com/decentrek/status/1846216581979734156) of this series, we explored how the adoption of EIP-7702 will play out.
In part two, I’d like to zoom in on how EIP-7702 will impact *DApps*, and what you can do as a DApp developer to take advantage of EIP-7702.
## Quick overview of EIP-7702
First, a quick recap. EIP-7702 is one of the EIPs slated to go live with Ethereum's next upgrade (Pectra), scheduled for April 2025.
With EIP-7702, an EOA can "upgrade" itself into a smart account, while simultaneously remaining an EOA and keeping the same address.
Once the account has been upgraded, the user can then experience most of the benefits of AA such as gas sponsorship, transaction batching, passkeys, etc.
## Two types of DApps
For the purpose of this article, we will differentiate between two types of dapps, which I call “open dapps” and “closed dapps.”
* “Open dapps” are dapps where users bring their own wallets. This is the type of dapps we are most used to.
* Examples include Uniswap, AAVE, etc.
* “Closed dapps” are dapps that work primarily (or exclusively) through an embedded wallet. In a sense, a closed dapp is a wallet with a DApp-specific UI, but I refer to them as dapps to distinguish them from general-purpose wallets like MetaMask.
* Examples from ZeroDev customers include Infinex, DeFi.app, and Nekodex
## EIP-7702 for Open DApps
Recently, MetaMask publicly [committed to supporting EIP-7702](https://metamask.io/news/metamask-roadmap-2025), and it’s only reasonable to expect that other major wallets will soon follow. Therefore, developers of open dapps must adjust to a new reality: **the wallet your user connects to your dapp MAY be a smart wallet, and increasingly more likely so**.
This leads to two questions:
* How do you know if a connected wallet is a smart wallet?
* If your user connects with a smart wallet, what do you do?
#### Detecting a smart wallet
Detecting a smart wallet is simple — [ERC-5792](https://eips.ethereum.org/EIPS/eip-5792) defines a standard RPC `wallet_getCapabilities` which returns a list of “capabilities” that the wallet supports. For example, a wallet might respond with the following:
```tsx
{
"0x0": {
"permissions": {
"supported": true
}
},
"0x2105": {
"paymasterService": {
"supported": true
},
},
}
```
Here, the special value `0x0` indicates that the wallet supports the capability `permissions` (transaction delegation) on all networks, whereas it supports `paymasterService` (gas sponsorship) only on chain ID `0x2105` (Base).
Therefore, if your DApp intends to use smart wallet features, it should call [`wallet_getCapabilities`](https://eips.ethereum.org/EIPS/eip-5792#wallet_getcapabilities) after wallet connection (or use [ERC-7846](https://github.com/ethereum/ERCs/blob/abd1c9f4eda2d6ad06ade0e3af314637a27d1ee7/ERCS/erc-7846.md) to batch wallet connection with capabilities discovery), so it knows which capabilities the connected wallet supports.
Luckily, [Viem](https://viem.sh/experimental/eip5792/getCapabilities) and [Wagmi](https://wagmi.sh/core/api/actions/getCapabilities) already support `wallet_getCapabilities`, so you are just one function/hook away from using this RPC.
#### Using a smart wallet
Once you discover the capabilities of the smart wallet, you need to decide whether to *use* the capabilities.
Generally, you should decide whether a capability is *required* or *optional* for your dapp.
* *Required* means your dapp cannot function without the capability:
* For example, if you are building an AI agent that automates trading for the user, you might *require* that the user’s wallet supports the `permissions` capability, which allows the user to delegate transactions for the AI agent to execute. Without this capability, your dapp can’t function as intended, so your dapp simply *refuses to work* if the connected wallet does not support `permissions`.
* *Optional* means your dapp can function without the capability:
* For example, if you are building a Web3 game, you might decide that you’d like to sponsor gas for users whose wallet supports gas sponsorship (the `paymasterService` capability). But if a user’s wallet does NOT support gas sponsorship, they will just pay for their own gas as usual.
Whether you want to require a capability, or keep it optional, is ultimately a product decision. Is the capability *essential* to your app experience? Do you have the *engineering bandwidth* to build a *fallback* in case the capability is not supported? These are all questions that will determine how you handle capabilities (or the lack thereof).
#### How to use capabilities
Since smart accounts are smart contracts, they are infinitely flexible and can in theory support an infinite number of capabilities. **In practice, capabilities follow a 80-20 rule where a few capabilities are able to satisfy most use cases**. In our experience at ZeroDev, the most useful capabilities are:
* Transaction batching
* Gas sponsorship
* Permissions (sometimes known as “session keys”)
* Chain abstraction
For each of these capabilities, there is or will be a standard wallet interface for DApp developers to use.
Right now, the interface for transaction batching has been standardized with [ERC-5792](https://eips.ethereum.org/EIPS/eip-5792)
For gas sponsorship, [ERC-7677](https://eips.ethereum.org/EIPS/eip-7677) has defined an interface for using ERC-4337 paymasters, though there are other possible approaches to sponsoring gas that don’t depend on ERC-4337.
For permissions, standardization is much harder because there are so many possible approaches, including session keys, session accounts ([ERC-7710](https://eips.ethereum.org/EIPS/eip-7710)), and sub accounts ([ERC-7895](https://github.com/ethereum/ERCs/blob/3d950152b5e3765208b0d63aa5c92f70a07a0cc7/ERCS/erc-7895.md)). One attempt at unifying these approaches is [ERC-7715](https://eips.ethereum.org/EIPS/eip-7715) but it’s an ongoing effort.
“Chain abstraction” is a rapidly developing area with even more competing approaches, but the good news is that it doesn’t require any complicated wallet interface, which makes standardization easier. Right now there are at least two ERCs ([ERC-7682](https://eips.ethereum.org/EIPS/eip-7682) and [ERC-7811](https://github.com/ethereum/ERCs/blob/dcb49741ca3e036f32549a67dac8bcedb46a5f41/ERCS/erc-7811.md)) that address chain abstraction, but they are still at an early stage of adoption.
## Do I need to know 100 different ERCs to use EIP-7702?
If you have read this far, you may be thinking to yourself — I sure wish I don’t need to learn about 100 different ERCs just to use EIP-7702!
Well, good news and bad news. The bad news is that there will indeed be a bunch of different ERCs specifying different capabilities for smart wallets. The good news is that, with the right tooling, you won’t have to know about most of these ERCs — the library will just take care of it for you. And you guessed it — ZeroDev is one such library! We do the hard work of staying at the cutting edge of wallet standardization efforts so you don’t have to.
Now let’s move on to “closed dapps,” where the story is much simpler.
## EIP-7702 for Closed DApps
A “closed dapp” is a dapp that works primarily or exclusively through an embedded wallet. Most AA applications today are closed dapps, because only embedded wallets support smart accounts, not standalone wallets. As mentioned above, that will change once existing standalone wallets become smart wallets by adopting EIP-7702.
The story of EIP-7702 for closed dapps is quite a bit simpler, because the dapp doesn’t need to deal with a myriad of wallets with different capabilities. Rather, the dapp is programmed against a single wallet — the embedded wallet — and has full control over the capabilities that the wallet offers.
Therefore, the only decision a closed dapp has to make is this: should the embedded wallet be using a regular smart account, or a EIP-7702 account (smart EOA)?
#### Smart EOAs vs regular smart accounts
A regular smart account — that is, a smart account that is only a smart contract and NOT a EOA — has a number of advantages over a smart EOA:
* A regular smart account can use a non-ECDSA key, e.g. a passkey, as the primary key. Therefore, the smart account does not need to depend on the user securing a seed phrase or using a third-party key storage system (such as an MPC system). Rather, the key can be secured through consumer security enclaves such as the iPhone.
* Since a regular smart account is NOT tied to a ECDSA key, it can revoke/rotate keys. In contrast, with a EIP-7702 account, it’s impossible to revoke/rotate the root ECDSA key — it will ALWAYS has root access to the account.
On the other hand, a smart EOA also has a number of advantages:
* Not dependent on smart account infra: Since a EIP-7702 account is also a EOA, it can send transactions without relying on any “smart account infrastructure” such as ERC-4337 bundlers. This is especially important if you want your account to work on new networks, which may only support regular node RPCs but not bundler RPCs.
* No lock-in with any smart account implementation.
* A regular smart account is typically deployed through `CREATE2` via a particular contract factory. Therefore, even if the account was later updated to using another implementation, it will always be deployed with the original implementation on a new network. Keystores would solve this problem, but they are not production-ready yet.
* On the other hand, since the address of a smart EOA is derived solely from its private key, the address is not tied to any specific smart account implementation. Rather, you can easily re-delegate a smart EOA to a different smart account implementation.
* Interoperability with EOA wallets: since a smart EOA is just a EOA, the user can import it into any EOA wallets by importing the private key. In contrast, a regular smart account cannot be easily imported into existing wallets.
To sum up, regular smart accounts and smart EOAs (EIP-7702 accounts) both have their advantages. To choose between them, follow these general guidelines:
* You will likely want to build on regular smart accounts if:
* You want to build exclusively on passkeys because 1) you want to save users from having to manage seed phrases, or 2) you do not want to pay for a third-party MPC system to manage EOA keys for users.
* You want your users to have the ability to revoke/rotate all their keys.
* You will likely want to build on EIP-7702 accounts if:
* You do NOT want to be tied to any specific smart account implementation.
* You want your DApp to work on new networks that may or may not have smart account infra (e.g. bundlers).
* You expect your users to send a lot of regular transactions without using any smart account features (batching, sponsorship, permissions, etc.).
* You want your users to be able to import their accounts to other wallets.
## Conclusion
EIP-7702 holds incredible promise for DApp developers to build Web3 experiences that were not possible before. However, it comes with a unique set of challenges, notably *capability fragmentation* — many capabilities have not been sufficiently standardized, so DApps may have to write different code for different smart wallets.
However, with the right tools, it won’t be so hard to build on EIP-7702 as a DApp developer.
* ZeroDev is partnering with all leading embedded wallet providers (e.g. Privy/Dynamic/Turnkey) so you can turn your embedded wallets into EIP-7702 smart EOAs with just a few lines of code.
* With the ZeroDev SDK, you can easily build on any capabilities, from the basics such as transaction batching and gas sponsorship, to the advanced such as permissions and chain abstraction. The ZeroDev SDK will always be compatible with the latest standards, so you can rest assured that the code you write today will continue to work tomorrow, as more and more wallets become smart.
If you are ready to get your feet wet with EIP-7702, head to [this tutorial](https://docs.zerodev.app/sdk/getting-started/quickstart-7702) now!
## ERC-4337 — Misconceptions and Valid Concerns
::authors
At ZeroDev, it’s our job to help devs learn and adopt AA, so naturally we have come across a lot of questions, concerns, and objections.
In this post, I’d like to summarize some common pushbacks against ERC-4337 and AA in general, and I will group them into three categories:
* **Misconceptions**: things that are just not true.
* **Yes and no**: somewhat true, but the reality is nuanced.
* **Valid concerns**: real issues that need to be addressed.
Let’s dive in!
## Misconceptions
#### AA is no big deal because SCW has been around for years
Without AA, smart contract wallets like Safe/Argent are not “first class citizens” on the blockchain, meaning that you cannot initiate transactions directly from them. Rather, you have to do one of the following:
* Call the SCW from a EOA, so you STILL have to own a dumb wallet before you can own a smart one.
* Rely on a centralized relaying service to relay your transactions, which exposes you to risks like censorship, downtime, etc.
With AA however, you can directly send transactions from a SCW, the same way you can directly send transactions from MetaMask. This makes it possible to use a SCW as your only wallet, which is precisely what the next billion Web3 users will do.
#### You still need a EOA to own an AA wallet
This common point of confusion stems from the fact that most AA wallets today are owned by a private key (just like EOA wallets), but it’s misguided because:
* Private key ≠ EOA. While it’s true that each private key has a corresponding EOA, the key itself is just that — a key that can sign things. A typical AA wallet will store and safeguard a private key just like MetaMask does, and use the key to sign transactions for the smart contract account. The corresponding EOA, to the extent that it exists, is only used as a public key for validating signatures.
* Since AA enables transactions to be validated with a smart contract, the validation logic can be arbitrary, so you don’t technically even need a private key. [Here’s a proof of concept using fingerprints instead of private keys.](https://twitter.com/plusminushalf/status/1631821839466123272)
#### We don’t need AA if we have MPC
The best way to think about MPC vs AA is:
* MPC improves the key management experience.
* AA improves the transaction experience.
With MPC, you effectively have a “virtual private key” without ever having to store it somewhere, which is a huge improvement over the status quo of having to write down a 12-word seed phrase.
AA is about what happens when you send a transaction — who pays gas? What tokens are used to pay for gas? Who signs the transaction? All of these can be abstracted away with AA.
As you can see, MPC and AA actually complement each other nicely — MPC saves the user from having to deal with keys, while AA makes transactions smooth. In fact, it’s precisely by combining MPC with AA that we are able to offer [social AA wallets](https://docs.zerodev.app/create-wallets/social/overview).
## Yes and No
#### AA transactions are more expensive
Since AA uses smart contract wallets, each transaction necessarily has some overheads comparing to the equivalent EOA transaction. There’s also the cost of deploying the smart contract wallet on-chain.
However, multiple factors lower the transaction cost in AA’s favor:
* SCW has the ability to batch transactions, so what normally takes multiple transactions with EOA, may only take one transaction with a SCW. A classic example is when you interact with a DeFi protocol, where each action typically involves multiple transactions (e.g. approve → swap → deposit). In AA, all these can be done in one atomic transaction, thus saving gas.
* ERC-4337 supports signature aggregation, so that multiple AA transactions can effectively “share” a signature, thus lowering the cost for each transaction. [Here are some numbers from Vitalik.](https://twitter.com/VitalikButerin/status/1554983955182809088)
* ERC-4337 does not deploy the smart contract account until the user’s first transaction. Before then, the account exists “counterfactually” — it has an address even though it’s not really deployed. So your users can receive assets even without paying any deployment cost.
As a result, whether AA transactions or normal transactions cost more gas actually depend on the workload. For some applications (notably DeFi), AA transactions might wound up being cheaper!
#### AA is not ready for production
There’s no doubt that anyone building something on AA/ERC-4337 today is a trailblazer — there are not many prior examples to look to or patterns to borrow from. In that sense, building something on AA certainly involves more technical risks than building a classic DApp.
However, everything you need to build a full AA application, notably ERC-4337 itself, is already running in production/mainnet. **We are at an inflection point where you are either building one of the last non-AA applications, or one of the first AA applications.** The choice is yours.
#### AA is not compatible with existing DApps
Before AA, there was “meta transactions” that could remove gas (or pay gas in ERC20s) by using relayers that submit transactions on users’ behalf. The main problem, however, was that DApp contracts had to [use a helper function like `_msgSender()`](https://docs.opengsn.org/#recipient-contract-sees-the-original-sender-and-executes-the-original-transaction) instead of the more intuitive `msg.sender` to get the address of the transaction sender. Needless to say, most DApps did not do that, so the compatibility of meta transactions were severely limited.
AA does not have this problem, however, which makes it compatible with the vast majority of DApps. Where the compatibility breaks down, however, is when the DApp asks the wallet to sign a message. It turns out that EOA signatures and smart contract wallet signatures cannot be verified the same way, so there’s a standard [ERC-1271](https://eips.ethereum.org/EIPS/eip-1271) that DApps are supposed to implement to be compatible with smart contract wallets. [Here’s an incomplete and likely outdated list of DApps grouped by whether they support ERC-1271.](https://eip1271.io/)
If a DApp requires message signing but doesn’t support ERC-1271, then AA indeed won’t work with the DApp. Fortunately, the space is [completely aligned](https://twitter.com/VitalikButerin/status/1576267880542633984?lang=en) that ERC-1271 needs to be supported, and new DApps being written today typically support ERC-1271 by default if they use libraries like OpenZeppelin.
#### ERC-4337 is not real AA. We should wait for real AA
When someone says that ERC-4337 is not “real” AA, they are typically referring to the fact that ERC-4337 is NOT integrated into the blockchain protocol itself. In contrast, new networks like zksync and StarkNet have “enshrined” AA as a part of their protocols.
The reason why Ethereum and most other EVM chains have not enshrined AA is two-fold:
* Enshrining AA will be protocol-breaking, and therefore require a hard fork.
* There’s no consensus over the best approach to implement AA, so it’s not even clear what we should be enshrining.
Enshrining AA into the protocol itself also means that **every** EVM chain has to implement this breaking change, which can take a very very long time. In contrast, since ERC-4337 is implemented as smart contracts, deploying to a new chain is literally a matter of deploying a few smart contracts. That’s why ERC-4337 is already running on all EVM chains today.
In any case, the distinction between “real AA” and “ERC-4337 AA” matters little to the end users. From their perspective, their transactions “just work” either way. Therefore, given the level of community buy-in for ERC-4337, it’s our best hope for achieving AA on EVM blockchains in the near term.
## Valid Concerns
#### ERC-4337 is fairly centralized right now
In theory, ERC-4337 is designed such that anyone can spin up relayers (aka “bundlers”), unlike previous relayer networks that are typically run by a single entity.
In practice, however, most bundler implementations except for StackUp are not production-ready, so most ERC-4337 traffic is going through StackUp today. This is not unlike how [most Ethereum traffic is going through Geth](https://clientdiversity.org/). Hopefully, this will change as other bundlers go into production.
#### ERC-4337 may still change
While ERC-4337 has been deployed on mainnet, it’s not technically finalized. [The EIP is still in draft status](https://eips.ethereum.org/EIPS/eip-4337), and the core team has acknowledged that the EIP and the smart contracts could still change.
Fortunately, it’s expected that any changes to the EIP and core smart contracts won’t affect the core account interface, so wallets that are compatible with ERC-4337 today will most likely still be compatible with ERC-4337 in the future.
#### ERC-4337 has not been formally verified
While ERC-4337 [has been audited](https://blog.openzeppelin.com/eip-4337-ethereum-account-abstraction-incremental-audit/), it has NOT been [formally verified](https://ethereum.org/en/developers/docs/smart-contracts/formal-verification/), so one cannot completely rule out the possibility that there are some critical security issues.
Fortunately, there are teams working on the formal verification of ERC-4337 (with our very own [taek](https://twitter.com/leekt216) being a major contributor). When ERC-4337 has been formally verified, that’s when we expect to see it finalized.
## The Bottom Line
Anyone building on AA today is a trailblazer taking on technical risks, no doubt about it. But with risk comes reward — if properly executed, your project will dwarf your competition in terms of usability.
At ZeroDev, we’ve developed an AA framework that dramatically shortens the time — and reduces the risks — for devs to build wallets and DApps on AA. [Check out ZeroDev](https://docs.zerodev.app/) and start building the future of Web3 today!
## What is ERC-6492 and why it’s important for Account Abstraction
::authors
Unless you check new ERCs everyday (in which case, good for you), you probably haven’t noticed this new ERC known as [ERC-6492](https://eips.ethereum.org/EIPS/eip-6492), innocuously named "Signature Validation for Predeploy Contracts.” As this post is going to argue, ERC-6492 is critical to the wide adoption of account abstraction and smart contract wallets in general.
We will now explain the issue that ERC-6492 addresses, briefly touch on the technicalities of how ERC-6492 solves the problem, and end by explaining why it’s critical for key ecosystem projects such as Ethers and SIWE to adopt this new standard.
## Terminology
For brevity, I will be using the following pairs of terms interchangeably, even though it’s not technically accurate:
* “AA” and “ERC-4337”
* “AA wallets” and “smart contract wallets”
* “Wallets” and “accounts”
## The Context
As I explained in [a previous post](https://docs.zerodev.app/blog#aa-is-not-compatible-with-existing-dapps), AA wallets are mostly compatible with existing DApps since AA transactions look no different than normal transactions from the perspective of the DApps, except for some edge cases.
Signature validation is a different story, however. As you know, many DApps require some form of signing; OpenSea for instance requires the user to sign a message before they can “log into” the DApp.
Since smart contract wallets have the flexibility to support different signing schemes, there isn’t a universal way to validate signatures by a smart contract wallet. Instead, there’s a standard [ERC-1271](https://eips.ethereum.org/EIPS/eip-1271) which defines a standard function `isValidSignature` on a smart contract wallet so that the verifier (e.g. OpenSea) can call the function to validate the signature, without needing to know specifically what signing scheme the wallet uses.
This is all fine and good, and in fact ERC-1271 as a standard enjoys wide adoption. Most popular DApps today, including OpenSea, already support it.
## The Issue
With the rise of ERC-4337, smart contract wallets are becoming increasingly commonplace. One key optimization that ERC-4337 implements is *counterfactual deployment* — namely, that we can compute the address of the account before the underlying smart contract is actually deployed. As a result, a user can “create” a ERC-4337 wallet without paying the deployment cost, so they can start receiving assets, signing into DApps, etc. Only when the user sends their first transaction that the contract is actually deployed.
While counterfactual deployment is normally very desirable, it becomes an issue when the user needs to sign messages. To understand why, recall that in order to validate a signature from a smart contract wallet, the verifier needs to call `isValidSignature` on the wallet contract. However, since the wallet contract is not actually deployed, it’s impossible to call that function! As a result, an attempt to validate that signature will fail.
## Consequences
So what does this mean for the users? It means that it’s impossible to validate signatures from ERC-4337 wallets until they are deployed. Therefore, for a new ERC-4337 wallet that has not sent any transactions, it’s impossible to, say, sign into OpenSea or any DApp that uses [SIWE](https://login.xyz/).
This is very bad because users who are new to Web3 want to sign into DApps and look around before they spend any money on gas. Forcing a user to pay some gas to deploy their wallets before they can see a DApp would be a major step backwards comparing to the EOA experience today, where you can sign into DApps even from an empty account.
## Solution
ZeroDev first encountered this problem when we were developing our WalletConnect integration and realized that we couldn’t sign into OpenSea until we deployed the wallet, which led to [a lengthy discussion](https://github.com/eth-infinitism/account-abstraction/issues/188) with many smart people in the 4337 ecosystem. Eventually, [Ivo from Ambire](https://twitter.com/Ivshti) came up with a great solution that turned into ERC-6492.
On a high level, ERC-6492 works by using a [`UniversalSigValidator` contract](https://eips.ethereum.org/EIPS/eip-6492#reference-implementation) that validates a signature as such:
* Check if the signature ends with a sequence of *magic bytes*, which indicate that the signature is for a not-yet-deployed contract.
* If so, the signature itself contains all the data necessary for deploying the contract, which comes down to an *account factory* address and the *calldata* for the factory.
* `UniversalSigValidator` would then proceed to deploy the contract and calls `isValidSignature` on it to validate the signature.
* If the magic bytes are not detected, then proceed as normal, which means:
* Check if there’s contract code at the address. If so, proceed with ERC-1271.
* Otherwise, assume that the account is an EOA and perform a `ecrecover`.
But wait! You might say. The signature verifier has to *deploy* the contract if it doesn’t exist? Isn’t that incurring a lot of cost for the verifier?
The answer is no because the verifier will be using [`eth_call`](https://docs.alchemy.com/reference/eth-call), which essentially simulates the transaction without actually executing it on-chain.
## Next Steps
So who needs to implement ERC-6492? In short, it’s whoever that needs to verify signatures, which is mostly DApps.
However, DApps don’t write everything from scratch. In fact, there are a few libraries that most DApps use for handling signatures, so if these libraries adopt ERC-6492, DApps would get to support ERC-6492 “for free.” Some of these key libraries are:
* Ethers: Ivo from Ambire has helpfully created [a PR for supporting ERC-1271 validation](https://github.com/ethers-io/ethers.js/pull/3904), which will be a stepping stone for ERC-6492.
* SIWE: SIWE already supports ERC-1271, so we have created [a PR that extends the support to ERC-6492](https://github.com/spruceid/siwe/pull/153), using [Ivo’s library](https://github.com/AmbireTech/signature-validator).
If you want to see the space move towards AA and smart contract wallets, there are a few things you can do:
* Upvote these PRs
* Make your own PRs to libraries that validate signatures
* And of course, if you are building a DApp, make sure that it can handle SCW signatures! DApps that work seamlessly with SCW will have an inherent advantage comparing to those that don’t, since more and more traffic are moving to SCW everyday.
## The Gas Sponsorship Paradox: Why Web3’s Biggest Technical Hurdle is Actually Your Biggest Growth Hack
::authors
### The Single Biggest Hurdle to Web3 Adoption Isn't Gas Price — It’s User Churn
#### The Fatal Onboarding Flow
Imagine launching an incredible new SaaS product, only to demand that every single user first open a separate, complex bank account, buy a small amount of a specific, volatile foreign currency, and then manually transfer that currency into your platform just to click the first button.
That is the experience of using virtually every decentralized application today. This is **Gas Friction**, and it is the silent killer of Web3 growth.
The requirement for users to hold a chain's native token to pay for every transaction creates critical points of failure that erode your user base:
* **The 5-Minute Drop-Off:** New users are forced to leave your application to navigate an exchange, buy crypto for gas, and manage transfers. This is a major churn event.
* **The Empty Wallet Trap:** An active user runs out of the native gas token, instantly halting all activity. They don't leave because they hate your product; they leave because they ran out of $0.50 worth of ETH.
* **Multi-Chain Nightmare:** For sophisticated users, managing separate gas inventories across multiple L2s and sidechains is a logistical burden no successful product should impose.
The solution isn't to make gas cheaper; it's to **eliminate the concept of gas for the user entirely**.
### Introducing Gas Sponsorship: The Engine That Delivers Web2 UX
The key to eliminating this native token friction lies in [**account abstraction**](https://docs.zerodev.app/smart-wallet/quickstart-core), specifically the Paymaster component defined in the groundbreaking [**ERC-4337 standard**](https://docs.erc4337.io/core-standards/erc-4337.html).
Gas Sponsorship transforms the classic transaction flow:
**CategoryStandard Web3 TransactionWeb2-Grade (Gas Sponsorship) TransactionPayment**User’s Wallet holds and pays the native gas fee (ETH, MATIC).User’s Wallet signs a transaction without worrying about gas.**UX Requirement**User must always possess the chain's native token.**Zero** exposure to native gas tokens.
#### The Gas Sponsorship’s Logic: A Promise to Pay
1. **User Creates a Transaction (UserOp):** The user signs a request to interact with your dApp.
2. **Gas Sponsorship Verification:** ZeroDev’s Gas Sponsorship service (e.g., Ultra Relay) receives and validates the request, checks your predetermined policy (e.g., "Sponsor this type of transaction"), and if approved, it adds a cryptographic signature. This is a promise to cover the gas fee.
3. **Execution & Reimbursement:** A Bundler submits the request, paying the native gas fee upfront. Crucially, the Entry Point contract then charges the fee back to the Gas Sponsorship contract wallet.
### ZeroDev’s Dual Strategy: Removing Barriers and Maximizing Revenue
[**ZeroDev**](https://docs.zerodev.app/sdk/core-api/create-account) leverages this powerful mechanism to offer two distinct, growth-accelerating models that eliminate gas friction to help redefine your business model:
#### Model 1: True Gasless Experience (The Ultimate Onboarding Hack)
This is the most potent solution for initial onboarding and crucial, high-priority user actions.
* **What the User Sees:** The experience is entirely seamless. They sign, and the transaction executes instantly. They never pay.
* **What the Product Sees:** ZeroDev’s infrastructure completely handles native gas fee. You simply manage your usage via a predictable billing system or by pre-purchasing gas credits. This allows you to create an instant onboarding ramp.
#### Model 2: Pay in Any ERC-20 (The Business Model Unlock)
This is the killer feature that allows you to define the currency of interaction, not the blockchain. Instead of forcing users to hold ETH, you can allow them to pay transaction fees using a stablecoin like USDC or even your project's own governance token (e.g., $XYZ).
##### How the Magic Happens:
* The Gas Sponsorship still covers the native gas fee (ETH/MATIC) with its own funds.
* Simultaneously, the Gas Sponsorship contract is configured to withdraw an equivalent fee amount of your specified ERC-20 token (USDC, $XYZ) from the user's smart account.
This helps align your transaction economics with your product ecosystem. Users can pay with the tokens they already hold and use within your dApp.
### Technical Integration: A Single Line of Code for a Revolutionized UX
The biggest advantage of using ZeroDev’s [**Kernel**](https://docs.zerodev.app/sdk/core-api/create-account) is the simplicity of implementing this advanced logic. In general, integrating gas sponsorship or ERC-20 payment requires minimal code changes via the SDK.
You simply configure the Gas Sponsorship parameter when initializing your client:
\*\*GoalGas Sponsorship ConfigurationGasless (Sponsorship)\*\*Set the Gas Sponsorship type to SPONSOR or use the Ultra Relay endpoint.**Pay with ERC-20**Use the createZeroDevGas SponsorshipClient helper and set the Gas SponsorshipContext to specify the desired ERC-20 token address.
This one small configuration change can be the difference between a niche crypto app and a seamless, Web2-grade product capable of achieving genuine mass adoption.
### Stop Losing Users. Start Growing.
The age of demanding users buy gas just to use your dApp is over. Gas Sponsorship helps transform your application into a product where UX drives growth, not complexity.
Stop losing users to gas friction. Master Gas Sponsorship and offer your users true gas abstraction today.
> [**Read the Docs and Code Examples for Gas Sponsorship and ERC-20 Payments here.**](https://docs.zerodev.app/sdk/core-api/sponsor-gas)
## How Gemini Built a Universal Smart Wallet Using the ZeroDev WebAuthn Validator
At ZeroDev, we believe in the power of open standards and modular architecture. That's why we built [Kernel](https://github.com/zerodevapp/kernel), our flagship smart account, on top of [ERC-7579](https://erc7579.com/) - the modular smart account standard that's rapidly becoming the foundation for next-generation wallets across the Ethereum ecosystem.
ERC-7579 defines a standardized way to build modular smart accounts with interchangeable components - validators for signature verification, executors for transaction execution, hooks for custom logic, and more. This modularity means that innovations in one component can benefit the entire ecosystem. When we build a new validator, any ERC-7579-compatible wallet can use it. When someone improves an executor, every Kernel account can leverage that improvement.
This philosophy of open, composable infrastructure is what enabled Gemini to rapidly develop their new smart wallet. Instead of building custom signature verification from scratch, Gemini could simply derive security from ZeroDev's open-source and audited WebAuthn validator plugin.
### Gemini's Challenge: One Wallet, Every Chain
When Gemini set out to build their next-generation smart wallet, they had ambitious requirements:
* **Universal address** - Users should have the same address on every EVM chain
* **Biometric authentication** - Leverage WebAuthn for Face ID, Touch ID, and Windows Hello
* **Optimal gas costs** - Take advantage of chain-specific optimizations where available
And here's how ZeroDev WebAuthn Validator achieved all three:
### The Secret Sauce: ZeroDev's WebAuthn Validator
[The ZeroDev WebAuthn validator](https://github.com/zerodevapp/kernel-7579-plugins/tree/master/validators/webauthn), implements an innovative "duo mode" passkey verification:
```solidity
address constant DAIMO_VERIFIER = 0xc2b78104907F722DABAc4C69f826a522B2754De4;
address constant PRECOMPILED_VERIFIER = 0x0000000000000000000000000000000000000100;
```
To put it simply, the validator verifies passkey signatures with native RIP-7212 (more on this later) when available, and falls back to [Daimo's passkey implementation](https://github.com/daimo-eth/daimo) if RIP-7212 is not available. Here's how it looks like in code:
```solidity
function verifySignatureAllowMalleability(
bytes32 message_hash,
uint256 r,
uint256 s,
uint256 x,
uint256 y,
bool usePrecompiled
) internal view returns (bool) {
bytes memory args = abi.encode(message_hash, r, s, x, y);
if (usePrecompiled) {
// Use RIP-7212 precompiled for gas-efficient verification
(bool success, bytes memory ret) = PRECOMPILED_VERIFIER.staticcall(args);
if (success == false || ret.length == 0) {
return false;
}
return abi.decode(ret, (uint256)) == 1;
} else {
// Fall back to Daimo verifier for universal compatibility
(, bytes memory ret) = DAIMO_VERIFIER.staticcall(args);
return abi.decode(ret, (uint256)) == 1;
}
}
```
### WebAuthn + RIP-7212: The Perfect Combination
RIP-7212 is a "rollup improvement proposal" implemented by most rollups today. On chains supporting RIP-7212, the precompiled contract at `0x0100` provides:
* **10-100x gas savings** over Solidity implementations
* **Native performance** for P256 operations
* **Standardized interface** across chains
Thanks to the "duo mode" implemented by the ZeroDev WebAuthn Validator, Gemini wallets will work on every chain, but they will enjoy the improved performance from RIP-7212 when the underlying chain supports it. Furthermore, a wallet can be deployed on a chain with no support for 7212, and it will automatically start saving gas when the underlying chain adds support for RIP-7212.
### Universal address with duo-mode validator
Since the ZeroDev WebAuthn Validator implements both validation modes inside the same codebase with smart fallbacks, Gemini wallets can use the same exact plugin on both chains that support RIP-7212 and those who don't. As a result, these wallets share a universal address across all EVM chains, ensuring that Gemini users get the best interoperability and UX whether they are on an "old chain" like Ethereum or newer rollups.
### Getting Started with ZeroDev
Inspired by Gemini's smart wallets? [Start building with ZeroDev's modular smart accounts today](https://docs.zerodev.app), with a whole ecosystem of powerful smart account plugins at your disposal.
## The Performance Leap: ZeroDev Unlocks Go-Native Account Abstraction for Mission-Critical Web3 Scale.
::authors
### The Performance Leap: ZeroDev Unlocks Go-Native Account Abstraction for Mission-Critical Web3 Scale
The **long-awaited native Account Abstraction solution** for mission-critical, Go-powered infrastructure is finally here.
For decades, **Go** has been the uncompromised backbone of high-performance, concurrent, and scalable enterprise infrastructure. Today, that unmatched performance and reliability arrive in web3. Elite engineering teams have long been forced to work around a developer tool ecosystem that has exclusively focused on TypeScript and JavaScript, creating a crippling bottleneck for Go-powered systems.
ZeroDev changes the game.
We are thrilled to announce the launch of the **ZeroDev Go SDK** and a dedicated, new **User Operation Builder API**. This launch makes ZeroDev the first smart account provider to offer native, high-integrity support for sending **UserOps** directly from a **Go backend**. This is more than just a library. This is a massive, performance-driven opportunity for enterprise clients to deploy sophisticated, gasless, and batched transaction experiences at **Go speed** within their existing infrastructure.
***
#### The Go-Native AA Powerhouse: Reliability Through Dual Architecture
We’ve engineered a new, two-part architecture designed specifically for backend scale, reliability, and EIP-4337/7702 compliance.
* **ZeroDev Go SDK:** A lightweight, idiomatic Go library for secure UserOp creation, signing, and lifecycle management. It feels like Go, because it is Go.
* **UserOp Builder API (The Resilience Layer):** A dedicated, resilient, and dockerized backend service that handles the heavy lifting of UserOp construction, gas estimation, and the complexities of the EIP-4337/7702 standards. This offloads all mission-critical AA infrastructure complexity from your core application.
The `/build-userop` API is now live and accessible at: [https://build-userop-api.zerodev.app](https://build-userop-api.zerodev.app). The Go SDK source code can be found on GitHub: [https://github.com/zerodevapp/go-sdk](https://github.com/zerodevapp/go-sdk).
***
#### The Strategic Impact: Why Go-Native AA Matters for Your Business 💡
For CTOs and VPs of Engineering, this launch provides a clear competitive advantage by eliminating the last engineering trade-off in web3 integration.
* **Maximum Uptime & Reliability:** Offload the complexity of EIP-4337/7702 standards to a dedicated, resilient, and optionally self-hostable backend service.
* **Unmatched Transaction Throughput:** Leverage **Go's native concurrency** to process UserOps with significantly lower latency and higher transaction volume than comparable non-Go solutions.
* **De-Risking the Roadmap:** The solution is built on a Standards-First principle, ensuring your backend is **EIP-7702 Native** and future-proofed for the next generation of smart accounts.
* **Superior User Experience:** Seamlessly deliver features like **Gas Sponsorship Integration** and **batching** multiple complex blockchain calls into a single, atomic UserOp.
***
#### Code Meets Scale: Sending Your First Go UserOp
Integrating the SDK is straightforward, letting your developers start building a scalable backend in minutes.
First, install the SDK using Go modules:
```bash
go get github.com/zerodevapp/sdk-go
```
Here is an illustrative, streamlined example of how the SDK enables you to leverage ZeroDev's hosted API to build and send an EIP-7782 UserOp:
```Go
package main
import (
"context"
"fmt"
"github.com/zerodevapp/sdk-go"
)
func main() {
// 1. Initialize the ZeroDev Client
baseURL := "https://build-userop-api.zerodev.app"
projectID := "YOUR_PROJECT_ID" // From ZeroDev Dashboard
privateKey := "YOUR_PRIVATE_KEY" // Signing key for the smart account
client, err := zerodev.NewClient(baseURL, projectID, privateKey)
if err != nil {
panic(err)
}
// 2. Define the transaction call(s)
call := zerodev.Call{
To: "0xTargetContractAddress",
Data: []byte{ /* encoded transaction data */ },
Value: 0,
}
// 3. Build and Send the UserOp
userOpHash, err := client.SendUserOperation(context.Background(), []zerodev.Call{call})
if err != nil {
panic(err)
}
fmt.Printf("UserOperation sent! Hash: %s\n", userOpHash)
// 4. Poll for the receipt for guaranteed transaction finality
receipt, err := client.WaitForUserOperationReceipt(context.Background(), userOpHash)
if err != nil {
panic(err)
}
fmt.Printf("UserOperation executed in transaction: %s\n", receipt.TransactionHash)
}
```
***
### The ZeroDev Enterprise Advantage: Performance is Exclusive
The ZeroDev Go SDK and hosted UserOp Builder API are powerful, mission-critical tools exclusively available for users on a **ZeroDev Enterprise plan**.
This exclusivity ensures our highest-volume clients receive the dedicated performance, throughput, and tier-1 support needed for the most demanding applications. For organizations requiring absolute data control, flexibility, and maximum concurrency, the User Operation Builder API is also accessible for **self-hosting via Docker**.
**Your Path to Mission-Critical Infrastructure Starts Now.**
Don't just integrate AA — deploy it at Go-speed and enterprise scale.
***
[Contact Sales for a Dedicated Go-SDK Technical Deep-Dive & Architecture Review](https://calendly.com/zerodev/30min)
* Access Full Documentation: [https://docs.zerodev.app/sdk/advanced/go-sdk](https://docs.zerodev.app/sdk/advanced/go-sdk)
* If you are an existing Enterprise client, contact your account representative directly for immediate access.
## SDKs are dead; long live capabilities
::authors
Building with AA is great… or is it? While the benefits of AA are well-known, people who have actually tried to build with AA know that the developer experience is far from optimal.
Luckily, a paradigm shift is coming, and it will forever change the developer experience of AA for the better. In this blog post, I will explain:
* The issues with using AA right now.
* How the new paradigm, aka “capabilities,” will vastly improve the developer experience.
* What you as a developer can do today to get ready for this paradigm shift.
## Why building with AA sucks right now
Today, to build with AA means doing the following two things:
* Creating an embedded AA wallet inside your application for the user.
* Interacting with the embedded AA wallet through vendor-specific APIs.
If you have never built with AA before, this might sound like insanity — and it is. Embedded wallets are nice, but why do you HAVE TO use them? And why do you HAVE TO use them through vendor-specific APIs?
The reason is that, up until this point, **it had not been possible for DApps to communicate with AA wallets through standardized APIs**. Instead, if a DApp wants to leverage AA wallet features such as gas sponsorship, it can’t just do it with any AA wallet that the user might bring. Instead, the DApp MUST control the wallet itself — by embedding it inside the DApp.
To make matters worse, DApps also become tightly coupled with these embedded AA wallets, since each AA wallet speaks different APIs. This coupling happens at multiple levels:
* Smart accounts have different execution interfaces, as well as different module interfaces. [7579 and 6900](https://docs.zerodev.app/blog/who-when-what) solve this problem — except that they are not compatible with each other. And some smart accounts don’t conform to either standard.
* Paymasters use different APIs, so even the simple act of sponsoring gas involves using a vendor-specific paymaster interface.
* Bundlers are probably the most standardized part of the stack, but even then there are common features like estimating gas prices that cannot be done via standardized APIs.
**The upshot is that, as a DApp developer, using AA today means being coupled with multiple AA vendors at different layers of the stack.** Imagine what it would be like if wallets today (e.g. MetaMask, Rabby, etc.) speak different APIs, and so do infra providers (e.g. Infura, Alchemy, etc.). Your DApp would have to commit to a specific wallet, say MetaMask, and a specific infra provider, say Infura. Now, your DApp can’t work for users using other wallets, and you cannot switch to another infra provider. That would be insanity — and yet that’s the state of AA today.
There are some solutions that address this issue. ZeroDev aggregates multiple bundler/paymaster providers, so when you use ZeroDev you can switch the underlying provider without changing your code. However, you are still limited to the infra providers that we integrate with. Permissionless provides integrations with leading smart accounts and bundlers/paymasters, but again you are limited to what Permissionless integrates with. Furthermore, none of these solution lets your user just *bring* an arbitrary AA wallet to your DApp — you still must use AA through an embedded wallet.
## Bye-bye SDKs, Hello Capabilities
Back in 2022 (!!), [Moody Salem](https://x.com/sendmoodz) (who was then working at Uniswap) proposed an innocuous ERC that is [ERC-5792](https://eips.ethereum.org/EIPS/eip-5792). The [original ERC](https://github.com/ethereum/EIPs/pull/5792/files) was barely recognizable from what it is today — it was specifically meant to provide a transaction batching API, anticipating that wallets will soon acquire the ability to batch transactions from 4337 and 3074. The ERC then became stagnant, seeing that 4337 hasn’t led to a proliferation of standalone smart wallets, and [3074 is dead in the water](https://docs.zerodev.app/blog/3074-governance).
In the last several months, however, 5792 has taken on a new life thanks to contributions from many projects, notably Base and WalletConnect. They decided to expand 5792 from simply focusing on batching, to becoming a general “capabilities ERC.” Through 5792, a DApp can discover the “capabilities” of the connected wallet through a new RPC `wallet_getCapabilities`. Then, the DApp can use those capabilities through a new `wallet_sendCalls` RPC.
But what exactly are capabilities? And why are they only becoming a thing now?
## What are capabilities?
Simply put, **capabilities are smart wallet features that DApps can use through standardized APIs**. Each capability is identified by a unique key. So far, the following capabilities have been proposed:
* `atomicBatch` aka “transaction batching”, which is defined in [5792 itself](https://eips.ethereum.org/EIPS/eip-5792#atomicbatch-capability).
* `paymasterService` aka “sponsoring paymasters” [(ERC-7677](https://www.erc7677.xyz/)), which allows DApps to sponsor gas for users.
* `auxiliaryFunds` aka “magic spend” ([ERC-7682](https://github.com/ethereum/ERCs/blob/c6f316599b97dcb180d415fe734b40d04ee26b0e/ERCS/erc-7682.md)). This capability indicates to DApps that the wallet has the ability to pull funds “just-in-time” from other sources like the user’s Coinbase account, and therefore the DApp should not block transactions even if the wallet does not appear to have sufficient balance, a common practice among DApps.
* `permissions` aka “session keys” ([ERC-7715](https://github.com/ethereum/ERCs/pull/436)). This capability allows DApps to request permissions from users in order to execute specific transactions, even without an active wallet connection (thus enabling use cases such as subscriptions and automated trading).
But there are many AA features that haven’t been standardized as capabilities yet. Just looking at [ZeroDev docs](https://docs.zerodev.app/), you can identify many examples such as delegatecall and cross-chain txns. Over the next few months, we anticipate many more capabilities to be standardized.
Note that **not all smart wallet features are capabilities**, because they may not be features that DApps can use. For example, if a smart wallet uses [passkeys](https://docs.zerodev.app/sdk/advanced/passkeys) for transaction signing, that’s not really a “capability” in this context because the DApp doesn’t and shouldn’t care about how their users sign transactions with their wallets. Multisig would fall under that catogory as well.
Therefore, capabilities are only a subset of smart wallet features — the wallet features that *DApps can use*.
## How do you use capabilities?
So how exactly does a DApp use capabilities? Luckily, it’s only a two step process:
* Step 1: Discovering the capabilities that the connected wallet supports, with `wallet_getCapabilities`.
For example, a wallet might return a response like this:
```tsx
{
"0x1": {
"atomicBatch": {
"supported": true
}
},
"0x2105": {
"atomicBatch": {
"supported": true
}
"paymasterService": {
"supported": true
}
}
}
```
Essentially, the wallet returns the capabilities it supports on each chain. In this example, the wallet supports the `atomicBatch` capability on Ethereum (`0x1`), and both `atomicBatch` and `paymasterService` on Base (`0x2105`).
* Step 2: Sending transactions with `wallet_sendCalls`, while indicating the capabilities you want to use.
For example, let’s say you want to use a session key to send a batch of transactions, while sponsoring gas for your users. You would include both the `paymasterService` and `permissions` capabilities in the `capabilities` field of the request. The `atomicBatch` capability is implicitly implied with `wallet_sendCalls`. Here’s an example request:
```tsx
provider.request({
method: 'wallet_sendCalls',
params: [{
version: '1.0',
chainId: '0x01',
from: '0xd46e8dd67c5d32be8058bb8eb970870f07244567',
calls: [
{
to: '0xd46e8dd67c5d32be8058bb8eb970870f07244567',
value: '0x9184e72a',
data: '0xd46e8dd67c5d32be8d46e8dd67c5d32be8058bb8eb970870f072445675058bb8eb970870f072445675'
},
{
to: '0xd46e8dd67c5d32be8058bb8eb970870f07244567',
value: '0x182183',
data: '0xfbadbaf01'
}
],
capabilities: {
paymasterService: {
url: "",
},
permissions: {
context: "",
},
}
}]
})
```
## Why capabilities are great
**With capabilities, DApps no longer have to be tightly coupled with specific AA wallets or infra**. Instead, they can leverage AA wallet features through standardized APIs. That way, whether the user uses an embedded AA wallet or brings their own wallet to the DApp, the DApp would communicate with the wallet through the exact same API, maintaining a single code path while being compatible with all AA wallets.
The capabilities paradigm is all the more important because, with the upcoming Pectra upgrade, EOA wallets will gain smart wallet features thanks to [EIP-7702](https://github.com/ethereum/EIPs/blob/master/EIPS/eip-7702.md) (the successor of EIP-3074), so it will be more and more common for users to bring a wallet that supports capabilities. DApps that can leverage capabilities will therefore have a significant edge over those who can’t — and the biggest winner will be users who enjoy improved UX.
## Why capabilities now?
It’s been over a year since ERC-4337 launched, so you might be wondering why capabilities have only become a thing now. In my opinion, it comes down to a few factors:
* It took time for AA builders to understand what the most important “AA features” really are. While there are in theory an unlimited number of possible [modules](https://eips.ethereum.org/EIPS/eip-7579) thanks to the programmability of smart accounts, in practice most AA use cases have been dominated by just three features: gas sponsorship, transaction batching, and permissions (session keys). So with this understanding, it’s now possible to create standards for these most popular features.
* Coinbase and WalletConnect, the two principle drivers behind this new paradigm, had enough weight in the space to break the local maximum of everyone building for their own ecosystem. While we have also worked on many interoperability standards, notably for [modular accounts](https://eips.ethereum.org/EIPS/eip-7579) and [permissions](https://github.com/ethereum/ERCs/pull/436), we were not necessarily able to get all AA companies to fall in line the same way that Coinbase and WalletConnect did. Kudos to them.
## What does this mean for ZeroDev?
At ZeroDev, we have always embraced what’s good for the space over what’s good for ourselves. That’s why we created [a modular account standard](https://eips.ethereum.org/EIPS/eip-7579) when we could’ve gone the other way and locked in our users with [Kernel](https://github.com/zerodevapp/kernel), the most widely used smart account. That’s also why we [standardized permissions](https://github.com/ethereum/ERCs/pull/436) when we have [the most powerful session keys implementation](https://docs.zerodev.app/smart-wallet/permissions/intro). Call us naive, but we truly believe that if we keep doing what’s good for the space, the business side will take care of itself. And so far, that’s proven to be the case — ZeroDev is now one of the most widely used and trusted AA solutions on the market.
So, again, we find ourselves tearing down the moat we’ve built in favor of interoperability. But we are doing it because we believe only bad products need to lock people in — good products will win by providing the most value to users, and that’s what we will continue to do with capabilities.
As of today, [ZeroDev has been fully updated with the capabilities API](https://docs.zerodev.app/smart-wallet/quickstart-capabilities). This means two things:
* If you are building a wallet with ZeroDev, your wallet can offer the capability API through our EIP-1193 provider or our WalletConnect integration. In either case, DApps will be able to communicate with your wallet through the capabilities API.
* If you are building a DApp and using ZeroDev as an embedded wallet, you can now interact with ZeroDev through the capabilities API using Viem and Wagmi. By using the capabilities API, you ensure that your DApp will work with any smart wallets your users might bring, not just the embedded ZeroDev [wallet.](http://wallet.You)
To learn more about ZeroDev’s capabilities support, [read this doc](https://docs.zerodev.app/smart-wallet/quickstart-capabilities).
## Conclusion
DApps today communicate with smart wallets through vendor-specific SDKs, but that will become a thing of the past. **With the capabilities API, DApps can now leverage smart wallet features without being locked-in with any specific smart wallet or AA infra provider**. This is a win for developers and users, and will do wonders for the wide adoption of smart wallets.
By integrating with the capabilities API, DApps can not only improve UX for users of smart wallets today, but also set themselves up for a future where there will be more and more smart wallets thanks to ERC-4337, and even EOA wallets will become smart thanks to EIP-7702. The fact that capabilities are now supported in Viem and Wagmi makes integrating with them a no-brainer.
If you want to get started with capabilities today, try [using ZeroDev with Wagmi](https://docs.zerodev.app/smart-wallet/quickstart-capabilities)!
*If you enjoyed this blog post, you can [amplify it here](https://x.com/decentrek/status/1795425083625976308).*
## ZeroDev Blog
::blog-posts
## Introducing Orchestra — Multi-chain Contract Deployment Made Easy
::authors
At ZeroDev, we deploy a lot of contracts. Every release of [Kernel](https://github.com/zerodevapp/kernel) or [a plugin](https://docs.zerodev.app/use-wallets/overview) involves deploying contracts on 10+ networks, including both mainnets and testnets. This is a super tedious process because we have to acquire gas tokens on all these networks; testnet tokens, in particular, can be hard to acquire due to faucet limits.
This issue is not unique to ZeroDev, of course. All multi-chain Web3 projects need to tackle multi-chain deployment. The issue is even more pronounced in larger teams, since the developer deploying contracts may not be the person with access to the company’s treasury, so a complicated reimbursement process follows each deployment, where the developer tries to figure out how much $$$ they should be reimbursed from spending 10+ tokens.
TLDR: multi-chain contract deployment has been a headache — until now. We’ve created [Orchestra](https://github.com/zerodevapp/orchestra), a CLI for deploying contracts on multiple chains without needing tokens on each chain. Here you can see it in action:
## How it works
How is Orchestra able to deploy contracts on multiple chains without requiring tokens for each chain? You guessed it — ERC-4337 paymasters.
When you set up Orchestra, it creates a Kernel smart account owned by your private key. This smart account is then used to deploy contracts. Since it’s a smart account, we can sponsor gas for it using ERC-4337 paymasters, saving the account itself from having to own any tokens.
As the contract deployer, you would pay for the gas through your paymaster subscription. For instance, if you use ZeroDev as the paymaster, you would [sign up at ZeroDev](https://dashboard.zerodev.app/) and pay with your credit card. In other words, you can now deploy contracts on any chain with just a credit card.
## Limitations
We have successfully employed Orchestra to deploy multiple plugins, cutting the deployment time from hours to minutes. However, the tool can still be improved:
* Orchestra currently uses only ZeroDev infra, but it can in principle work with any AA infra. We welcome PRs to add support for other infra providers such as StackUp, Pimlico, Alchemy, etc.
* Orchestra currently only supports deterministic deployment using `CREATE2`, through the widely-used [deterministic deployment proxy](https://github.com/Arachnid/deterministic-deployment-proxy) which ensures that your contract will have the same address on every chain. For most projects this is exactly what they want, but we welcome PRs for non-deterministic deployments.
## Get Started
[See instructions here](https://github.com/zerodevapp/orchestra) to get started!
## Introducing Kernel — Minimal & Extensible Smart Contract Account for ERC-4337 Wallets
::authors
With the launch of ERC-4337, we are seeing tremendous excitement from Web3 developers to build the next generation of crypto wallets using account abstraction.
Whereas traditional wallets like MetaMask are powered by *externally owned accounts* (EOA), account abstraction wallets are powered by *smart contract accounts* (CA). These wallets will be able to sponsor gas for users, batch transactions, support automatic payments (subscriptions)… overall enabling a Web3 experience hitherto unimaginable.
While some wallet developers want to control the entire tech stack end-to-end, most wallet developers we’ve met would rather focus on the end-user experience, by building *product features* such as DeFi integrations, cross-chain transfers, etc. Actually coding a smart contract account in Solidity, and making sure it’s compatible with ERC-4337 and supports all the essential functionalities such as validating signatures (ERC-1271) and bundling transactions, is time-consuming and hard to get right for most wallet developers.
## Introducing *Kernel*, a minimal smart contract account designed to be extended
Seeing this need, ZeroDev has developed an *account abstraction wallet kernel*. The term *kernel* comes from the lingo of operating systems. The Linux kernel, for example, is used by a wide range of operating systems such as Android, Raspberry Pi, etc. The reason why the Linux kernel exists is so that different operations systems do not have to build the basic OS functionalities (e.g. file systems and networking) from scratch. Rather, operating systems builders can focus on building the OS *features* that make the OS unique, whether it’s great UI, integration with popular apps, or whatnot.
Similarly, the goal of the ZeroDev Kernel is so wallet developers do not have to build the basic wallet functionalities from scratch. Specifically, the kernel includes the following basic features that we consider essential to any AA wallet:
* Compatibility with ERC-4337
* Validating signatures with ERC-1271
* Batching transactions
* Delegating calls
However, we recognize that wallet developers may also want to build additional on-chain functionalities, and oftentimes these needs cannot even be anticipated when the wallet was first built. For example, you might decide, after launching your wallet, that a lot of your users are using the wallet with Web3 games, so you’d like to support session keys (temporary keys with restricted permissions). It would be very painful if you had to ask your users to *upgrade* their on-chain smart contract accounts in order to support the new use case.
Therefore, we have built a *plugin framework* for developers to add functionalities on top of the kernel, without needing to upgrade the account itself.
## Kernel *plugins* — ERC-4337-native Solidity modules that modify validation logic
So what exactly is a plugin? It’s a Solidity contract that the kernel can *delegate* to to modify the validation logic of the account.
That was a mouthful, so let’s look at an example. Let’s say, as a trivial example, that you want to allow someone to manage your USDC and DAI balances. You can create a contract like this (in pseudo-solidity):
```solidity
contract StableCoinPlugin {
function validateUserOp(UserOp op) returns bool {
return op.to == USDC_CONTRACT || op.to == DAI_CONTRACT;
}
}
```
Essentially, this plugin authorizes transactions that interact with the USDC and DAI contracts.
Once this plugin has been deployed, you can sign an off-chain message *authorizing* this plugin. You can then share the signed message with the person or app that wants to manage your USDC/DAI. They will be able to send transactions *on your behalf*, but only if those transactions interact with the USDC and DAI contracts.
We will be diving deep into the plugin framework in a future blog post.
## Kernel makes it easy for users to *migrate* between wallets
Most smart contract wallets are deployed as [proxies](https://docs.openzeppelin.com/upgrades-plugins/1.x/proxies), since proxies are a lot cheaper to deploy than the underlying contract, but also because proxies allow smart contract wallets to be upgraded.
One consequence of smart contract wallets being upgradable is that users are free to switch between *account implementations*. For example, a user might be onboarded to Web3 with a simple in-game wallet. The user might have accumulated some valuable NFTs in the game, and instead of transferring the NFTs to a real wallet, the user can simply *upgrade* its wallet implementation to a real wallet, while keeping the same address.
While the idea is very appealing, in practice migrating between wallets can be hard and unsafe. This is due to the issue with storage layouts. Consider these two wallet implementations (in pseudo-solidity):
```solidity
contract WalletA {
address owner;
uint256 nonce;
// ...more code
}
contract WalletB {
uint256 nonce;
address owner;
// ...more code
}
```
If a user starts with WalletA, then migrates to WalletB, its storage will be corrupted because the original `owner` now sits on the slot of the `nonce`, and vice versa. So in reality, before the migration, the user would need to wipe its own storage, which is tricky and hard to get right.
ZeroDev Kernel is designed with migration in mind. To that end, Kernel uses *[diamond storage](https://dev.to/mudgen/how-diamond-storage-works-90e)* — a technique that ensures that one wallet’s data storage won’t collide with another wallet’s. Therefore, it’s perfectly safe to migrate either *from* or *to* a wallet built on the kernel.
Note that Diamond storage is different than Diamond proxies (ERC-2535), which is a much more ambitious and complex design. Here, we simply ensure that storage layouts between different wallets don’t collide.
The fact that ZeroDev is perfectly migrate-able makes it perfect for building *onboarding wallets*. Your users can onboard with ZeroDev and rest assured that when they find an AA wallet they like, they can seamlessly migrate to that wallet without having to change address. This is a 100x improvement over the status quo of “exporting seed phrases,” which involves trusting some centralized server to NOT store a copy of your seed phrase and hoping that the seed phrase isn’t leaked somewhere along the process.
## Kernel vs Safe
During beta testing, the most common question we got was understandably this: why are you building a new smart contract account when you can just use Gnosis Safe?
In fact, ZeroDev *started* with Safe. We contributed heavily to the [reference Safe 4337 implementation](https://github.com/eth-infinitism/account-abstraction/tree/develop/contracts/samples/gnosis), and used it all throughout our beta. However, we ran into some major issues with Safe that blocked us from achieving our product objectives:
* Safe is complex. By all accounts, Safe is one of the largest smart contract codebases ever. Many features have been added over the years to satisfy a variety of organizational needs, and truthfully most of them are completely irrelevant for the kind of single-user AA use case that ZeroDev sets out to address.
* Safe is inefficient as an ERC-4337 wallet. As the reference implementation shows, the only way to make Safe compatible with ERC-4337 was to do it through Safe’s “fallbacks” and “modules” mechanisms. This leads to a large amount of context switching and therefore high gas costs for even the most simple operations.
Ultimately, Safe was designed for a different use case — organizational multisig. This is about as far from the single-user, single-sig use case that ZeroDev is designed for. Therefore, we ultimately decided to bite the bullet and implement a smart contract account optimized for retail AA users.
With Kernel, we now have a much simpler, much more efficient, and highly extensible smart contract account, and our users couldn’t be happier.
## Kernel, ERC-6900, and Interoperability
One main goal with Kernel was to foster a thriving plugin ecosystem, but some may be concerned that a plugin developed for Kernel will *only* work with Kernel.
As if anticipating that concern, our friends at Alchemy recently drafted [ERC-6900](https://github.com/ethereum/EIPs/pull/6900/files), titled “Modular Smart Contract Accounts and Plugins.” The goal of the EIP is to define a common interface between smart contract accounts (e.g. Kernel) and plugins.
We are very happy to see this development and we will be contributing to the ERC. We are also glad to see that we’ve made many of the same design decisions that the ERC authors did. As of today, Kernel is the *closest* thing to an implementation of ERC-6900 that we know of, and we will be making Kernel fully compatible with ERC-6900 once it’s finalized. That way, plugin and wallet developers building on ZeroDev can rest assured that they are building on top of an open standard and will enjoy great interoperability for their products.
## Start building on Kernel now
Today, we are excited to announce that [Kernel](https://github.com/zerodevapp/zerodev-wallet-kernel) has been open-sourced and audited, and it’s now available for anyone to use. Being an open-source project, Kernel is free for anyone to fork and extend. You can use [ZeroDev](https://docs.zerodev.app) to quickly spin up Kernel-based AA wallets, and then extend the wallet’s functionalities using our [plugin framework](https://docs.zerodev.app/extend-wallets/build-a-plugin). We are already building some of the most commonly asked-for plugins including [session keys](https://docs.zerodev.app/use-wallets/use-session-keys), which we will dive into in a future blog post.
We are confident that Kernel will dramatically lower the barrier for building wallets powered by account abstraction. We can’t wait to see what you build with Kernel!
## Kernel v2 and the Lessons We Learned
::authors
Ever since releasing [Kernel v1](https://twitter.com/zerodev_app/status/1650936162436128769), we have seen a flurry of activities from developers building novel plugins on Kernel. However, developers soon ran into significant limitations that exposed some of the shortcomings of Kernel, which prompted us to start working on Kernel v2.
In this blog post, we will dive into some of the issues with Kernel v1 and how we addressed them in v2.
A fair warning: this blog is written for a technical audience who want to understand the inner workings of Kernel, especially plugin developers. Most users of ZeroDev do not need to understand what’s described in this blog.
### Issues with Kernel v1
#### Validation and execution are closely coupled
In Kernel v1, plugins modify how transactions are validated. Once validated, the transactions are executed through a hardcoded `execute` function.
However, certain use cases turned out to require not just custom validation, but also custom execution. For example, the default `execution` function allows both `call` and `delegatecall`, and the latter makes it very hard to reason about the security of a plugin. Therefore, some plugin developers wanted to disable `delegatecall` altogether, but that was hard to do with Kernel v1.
#### Inability to add custom functions
While the default `execute` function is meant to be flexible enough to execute arbitrary transactions, sometimes there are legit needs to implement custom functions. For example, let’s say there is a new ERC like ERC-1271 that requires the implementation of new functions. With Kernel v1, there’s no way to dynamically extend the contract to implement the new interface.
#### Inability to change the default validation function
Plugins in Kernel v1 introduce new “paths” for transactions to be validated, but there wasn’t a way to update the “default path” — which validates ECDSA signatures from the wallet owner. In other words, the wallet owner can always execute transactions, regardless of plugins.
While this is normally desired, there are cases where the “default path” needs to be modified or even outright blocked. For example, if you want to build a 2FA account, it’s not enough to build a 2FA plugin — you also need to make sure that the default ECDSA validation function is no longer effective, or it would defeat the point of 2FA.
#### Overlapping storage between Kernel and plugins
In Kernel v1, plugins are invoked through `delegatecall`. To prevent storage collision between plugins and the kernel, plugins are required to use unstructured storage, sometimes known as “diamond storage.”
However, this requirement cannot be enforced, and a plugin needs to be carefully audited to ensure that it’s in fact not using any storage outside of its area. This places heavy burden on the user of the plugin as well as auditors.
### Design Decisions for Kernel v2
Kernel v2 draws on the lessons we learnt from real-world applications building on Kernel v1. At the core of Kernel v2’s architecture is two key design decisions:
* Separation of plugin storage from kernel storage.
* Separation of validation from execution.
#### Separation of Plugin Storage from Kernel Storage
In Kernel v1, plugins are invoked through `delegatecall`, which means plugins and Kernel ultimately share the same storage. Therefore, plugin authors need to take care to not “touch” the storage area of the Kernel, by using “[diamond storage](https://dev.to/mudgen/how-diamond-storage-works-90e).” This places burden on the plugin author, the plugin auditor, as well as the user to ensure that the plugin correctly handles storage.
In Kernel v2, validator plugins are invoked through `call`. Therefore, validator plugins have no access to the Kernel’s storage, vastly reducing the surface of attack.
#### Separation of Validation from Execution
Whereas there are only “validation plugins” in Kernel v1, there are now two classes of plugins in Kernel v2: `validators` and `executors`.
##### Validators
Validators are plugins that modify how transactions are validated. These plugins are akin to the plugins in Kernel v1.
One notable difference is that in v2, it’s possible to replace the “default” validator. For example, if you want to set up an account as 2FA, you would set the default validator to the 2FA plugin, therefore replacing the default ECDSA plugin. This makes it impossible to send transactions without going through 2FA.
##### Executors
Executors are plugins that add custom functions to Kernel. In particular, each custom function is tied to a validator, meaning that a call to a custom function is “routed” to a particular validator.
The ability to route each function to a different validator makes it possible to implement ultra-fine-grained security policy. For example, you might want to add a custom function to Kernel, but you ONLY want that function to be called if the user goes through 2FA. With Kernel, you can set up routing so that the custom function (executor) is routed through 2FA (validator).
### How Kernel v2 Works
In ERC-4337, a transaction (aka “UserOp”) is processed in two phases: a validation phase and an execution phase. To understand how Kernel v2 works, let’s walk through the lifecycle of a UserOp as processed by Kernel.
#### Validation Phase
In the validation phase, the `EntryPoint` calls the `validateUserOp` function on Kernel. Transactions to Kernel can be executed in one of three "modes," as indicated by the first few bytes of the UserOp's `signature` field.
* Sudo mode (0x0)
In sudo mode, Kernel's "default validator" is invoked. The default validator is a plugin that determines how transactions are validated by default (that is, if the transaction is not handled by another plugin). In ZeroDev, the default validator is normally set to the [ECDSA validator](https://github.com/zerodevapp/kernel/blob/main/src/validator/ECDSAValidator.sol), which approves a transaction if it's signed by the owner through ECDSA -- just like a regular transaction.
* Plugin mode (0x1)
In plugin mode, Kernel "looks up" the validator to use by the function selector from the `calldata`. The mapping between function selectors and validators are set through the "enable mode," which will be explained later.
In any case, once a validator has been looked up, it's used to validate the transaction.
* Enable mode (0x2)
In enable mode, Kernel "enables" a validator, and it does so by associating the current function selector with the validator. The validator's address (keep in mind that plugins are smart contracts) is encoded inside the `signature` itself.
Once enabled, the validator will be used to validate this and every subsequent invocation of the same function in plugin mode.
#### Execution Phase
In enable mode, Kernel actually associates with the function selector not just the validator, but also the executor. Executors are smart contracts that actually implement the function that corresponds to the selector. That is, when you call the function `kernel.someFunction()`, the `someFunction` is actually implemented in an executor, not the `kernel` itself.
When EntryPoint calls the function, Kernel uses a [fallback function](https://docs.soliditylang.org/en/v0.8.20/contracts.html#fallback-function) to look up the executor associated with the function selector, then `delegatecall`s the executor to execute the function. If you are familiar with EIP-2535 aka "Diamond Proxies," you can think of executors as "facets."
### Next Steps
Today we are happy to announce that Kernel v2 has passed the initial audit and therefore entered public beta. Here are some more resources for learning more about Kernel:
* [Documentation for building plugins](https://docs.zerodev.app/extend-wallets/overview).
* [Code for Kernel v2](https://github.com/zerodevapp/kernel).
* [Raw notes by Taek](https://hackmd.io/joe9mwzPRCCA5Mw0JVWzBw) which this blog is based off of.
* If you want to build some plugins, join our [Discord](https://discord.gg/KS9MRaTSjx) and head to #plugin-devs where our community can help!
## Scaling the Future of Account Abstraction: Introducing ZeroDev Credits
::authors
We have an exciting update to share about how ZeroDev is evolving to support the next generation of our platform!
For our existing customers on paid plans, let us be perfectly clear: **if you are a current customer, your current pricing and included usage are NOT changing. You will be billed according to the new system, but your pricing will stay the same.** This update is a seamless transition to a unified measurement system, ensuring you continue to get the same great value as we grow.
At ZeroDev, we believe in building infrastructure that doesn't just solve today's problems but anticipates tomorrow's growth. As our platform expands, we need a system as elegant and unified as the solutions we provide.
Today, we're excited to introduce ZeroDev Credits, a unified pricing framework designed to simplify your experience and unlock the next stage of our platform.
#### The Big Picture: Why Credits?
The shift from measuring usage in User Operations ("UserOps") to "Credits" is about more than just a name change. It’s a strategic move to create a single, consistent framework for all products.
Instead of introducing separate, confusing pricing models for our features, everything now draws from a single pool of Credits. This keeps your billing clear, predictable, and fully aligned with ZeroDev’s commitment to simplicity.
#### New ZeroDev Plan Details
Our new plans are designed to scale with your ambition, focusing on the *value* unlocked at each level.
The new pricing will go live on **December 1st**.
| | Developer | Growth | Scale | Enterprise |
| :--------------------------------- | :-------------------------------------------------- | :------------------------------------------------ | :--------------------------------------------------------------------------------------- | :-------------------------------------------------------------------------------- |
| **Monthly Fee** | $0/Month | $69/Month | $399/Month | Custom |
| **Included Credits** | 10,000 Testnet Credits per month | 100,000 Credits per month | 1,000,000 Credits per month | Custom |
| **Included Gas Sponsorship Limit** | — | Up to $250/month | Up to $1,000/month | Custom |
| **Gas Sponsorship Premium** | — | 8% Premium | 8% Premium | Custom |
| **Core Service: Bundler** | Included | Included | Included | Included |
| **Core Service: Gas Sponsorship** | — | Included | Included | Included |
| **Included** | Core Product Offering, Peer-to-Peer Support Channel | Full Product Features, Team Access, Higher Limits | Advanced Product Features, Priority Onboarding, Team Access, Advantageous Unit Economics | SLA Add-On Available, Custom Product Features and Integrations, Dedicated Support |
#### **Important Note on Overage Rates**
The table above focuses on included value, but we also ensure predictable scaling:
* **Credit Overage Rate:** For Growth and Scale plans, overages will be priced at:
* Growth: $0.0020 per credit ($0.04 per UserOp)
* Scale: $0.0010 per credit ($0.02 per UserOp)
Please [contact our Sales team](https://calendly.com/zerodev/30min) for Enterprise overage costs.
#### How ZeroDev Credits Work
Credits are consumed by the actions you take on the platform. This model accounts for the compute and infrastructure costs of that specific action, providing transparent pricing whether you're using our products, now and in the future.
| Action | Credit Cost | Notes |
| :---------- | :---------- | :----------------------------------------- |
| Send UserOp | 20 credits | Using your own signer, bundled by ZeroDev. |
#### What This Means for Existing Customers
We want this transition to be seamless, and above all, beneficial.
**Your current pricing and included usage are NOT changing.**
* You will retain your existing limits and pricing for all products and services you are currently using.
* We are simply translating your existing UserOp usage and overage rates into the new Credit system.
* **No action is required from you.** Your account will automatically transition to reflect usage in Credits. *Please note: Usage tracking will continue to be visible in UserOps on the Statistics page for historical continuity.*
This update is a testament to our growth — and as an existing user, you’re already part of that journey.
Have questions or want to discuss how this unlocks new capabilities for your app? Please [get in touch with our Sales team here](https://calendly.com/zerodev/30min) — we're happy to walk you through the change and the exciting upgrades we're implementing.
## Session Keys are the JWTs of Web3
::authors
Web3 UX today faces many challenges. High gas costs, long transaction times, and difficulties managing seed phrases are some of the most common issues that many projects, including ZeroDev, strive to fix.
However, there’s one problem that lies at the heart of why Web3 just “doesn’t feel right” to regular users, and yet is rarely discussed. The problem is that **authorization is broken on Web3**.
## Authentication vs Authorization
Before we delve deeper, let's clarify the difference between authentication and authorization.
* Authentication is the process of proving *who you are*. For instance, if you arrive at an NFT drop that you've been whitelisted for, how do you prove that you have indeed been whitelisted? Typically, the NFT drop will request you to sign a message. By cryptographically signing this message, you are *authenticating* to prove ownership of the whitelisted wallet.
* Authorization, on the other hand, is proving *what you can do*. When you swap tokens on Uniswap, for example, it asks for your "approval" of the tokens you are swapping. By doing so, you are *authorizing* Uniswap to swap tokens on your behalf.
## Authorization on Web2
In Web2, authorization is usually managed with JSON Web Tokens (JWTs), primarily in the context of OAuth.
Consider when we log into Zoom using Google. An OAuth sequence prompts you to grant certain permissions, such as creating calendar events. Once approved, Google generates a JWT containing these specific authorizations.
The JWT, bearing Google's digital signature for verification, then allows Zoom to request corresponding services from Google's API on your behalf. As a result, Zoom can automate actions for you like calendar event creation, but it can't do anything else, like accessing your emails.
This process is so commonplace that people seldom pause to think about it. However, when newcomers to Web3 start using DApps, they quickly realize a daunting issue — authorization in Web3 is fundamentally flawed.
## Authorization is broken on Web3
The central idea of the JWT experience is that on Web2, it's possible to *authorize*
a third-party app (e.g., Zoom) to interact with a service (e.g., Google) on your behalf.
In Web3, however, there’s no *common standard* for authorization. As a result, each application (or ERC) has to implement its own method for authorization.
For example, for ERC20 tokens, the `approve(spender, amount)` function authorizes a `spender` to spend up to `amount` of your tokens. On the other hand, ERC721 tokens use the `setApprovalForAll(operator, approved)` function to authorize an `operator` to transfer all your NFTs in this collection.
More importantly, handling authorization at the contract level is deeply limiting. For example, in the case of an NFT (ERC721) contract, what if you want to authorize a third party to mint NFTs for you too? That would be helpful if you wanna set up a bot that mints when an NFT collection is dropped. Since the `setApprovalForAll` function only concerns with transferring NFTs, however, you are out of luck.
What we need is a Web3 equivalent of JWTs — a universal standard for authorizing third parties to perform actions on your behalf. This standard should be flexible and widely interoperable, enabling DApps to "speak" this authorization language with minimal modifications.
However, expecting all contracts to conform to the same authorization standard is a significant challenge. As already mentioned, ERC20 and ERC721 contracts handle authorizations differently, and most other contracts don't handle authorizations at all.
## Use the wallet, duh
Turns out the best way to make authorization works for *all* contracts it to not worry about contracts at all — rather, we do it with the *wallet*.
After all, the most obvious way to authorize someone to do something for you is to, well, give them your seed phrase. That way, they can interact with *any* contract on your behalf. Problem solved?
Of course, we all know that’s a terrible idea, since there’s no limit to what the third party can do with your seed phrase. This is the equivalent of giving someone key to your house when they ask to use your bathroom — it’s overkill and unsafe.
So what if there was a way to give someone access to your wallet, but in such a way that they could only send a *limited set* of transactions for you?
## Session Keys are the JWTs of Web3
Enter session keys — a feature of ZeroDev AA wallets wherein you can create keys that are scoped to only certain transactions, with an expiration time.
**Session keys are the JWTs of Web3**. Much like JWTs, session keys are cryptographically signed — in this case, with your master key. Like JWTs, session keys encode "scopes" within themselves that specify the actions they can perform. Also, both JWTs and session keys can be created with an expiration time to limit the consequences of keys being leaked.
While JWTs and session keys share many similarities, session keys are fundamentally more powerful, because they are *programmable*, whereas JWTs are defined by a standard that by definition doesn’t change. In that sense, session keys can be thought of as programmable JWTs.
The table below summarizes how JWTs and session keys compare across key dimensions.
| Feature | JWTs (Web2) | Session Keys (Web3) |
| -------------------- | --------------------------------------------------------------------------------------------------------------------------------------------------------------------------------------------------------------------------------------------------------------------------------------- | ------------------------------------------------------------------------------------------------------------------------------------------------------------------------------------------------------------------------------------------------------------------------------------------ |
| Granular Permissions | Provides permissions for specific actions on the platform. | Provides permissions for specific actions across different contracts, while setting parameters for actions, like a maximum gas amount, maximum transaction volume, etc. |
| Expiration Time | JWTs have an expiration time, requiring token refresh or user re-authentication. | Session keys also have an expiration time, ensuring temporary permissions. |
| User Experience | Allows users to stay logged in across sessions and share sessions across devices. | Enables users to interact with a DApp within pre-set rules without the need to sign every transaction. |
| Security | If someone gains access to a JWT, they would potentially have the same permissions as the user until the token expires. The impact depends on the scope of the permissions granted by the JWT, and could include unauthorized access to user data or actions performed on their behalf. | If a session key is compromised, the potential damage is limited by the specific rules and parameters set for that key. For instance, a malicious actor might be limited in the amount of tokens they can transact, the gas they can spend, or the duration they can interact with a DApp. |
| Adoption | Widely adopted in Web2. | A relatively new concept in Web3, but already used (with mostly proprietary implementations) by several gaming projects including Loot Realms, Briq, Topology, Cartridge, MatchboxDAO, and more. |
| Decentralization | JWTs are issued and verified by a centralized server. | Session keys are issued and verified by the user's wallet, and are entirely decentralized. |
| Interoperability | Limited to platforms that support JWTs. | Universally compatible with DApps on any blockchain that supports AA wallets |
| Trust | Trust in the central server is required for issuance and verification. | Trust is not required as rules are set by the user and signed with the user’s master key |
## Empowering DApps with session keys
It’s hard to overstate the impact of a flexible and interoperable means of authorization. By taking advantage of session keys, DApps can create experiences that are simply impossible to create otherwise.
In essence, session keys allow transactions that seem "automatic" from the user's perspective. This can occur in two forms:
* **Skipping confirmations while the user is online**. This is most useful in social and gaming applications, where frequent, small transactions are common. Each time a user has to sign a transaction, it disrupts the gaming experience. Using session keys, the user can pre-authorize a range of transactions, allowing them to enjoy the game uninterrupted.
* **Executing transactions when the user is offline**. Consider a user who wants to ensure that they don't miss out on an NFT drop while they're asleep. The user can create a session key authorizing the purchase of the NFT at the drop time, even if they're not online. As another example, DeFi applications can use session keys to automatically exit risky positions for users so they don’t get liquidated.
## Use session keys with ZeroDev today
At ZeroDev, we recognized the potential of session keys early on. After many iterations, we now have what we believe to be the most advanced implementation of session keys in the ecosystem.
We'll save the implementation details for a future blog post, but here's a brief overview of what makes ZeroDev's session keys special:
* ZeroDev session keys can be created *off-chain*. This means that creating a new session key does NOT require an on-chain transaction, enabling your applications to generate a large number of session keys without paying any gas.
* ZeroDev session keys can define the scope of transactions based on various parameters such as contract addresses, function names, and ERC-165 interfaces (e.g., ERC20/ERC721), among others.
* ZeroDev session keys can be authorized using only a public key. Thus, a client can create a public-private key pair and send just the public key to the master signer for authorization. This approach ensures that the private part of the session key never needs to be shared, minimizing the risk of leakage.
Session keys are available with ZeroDev today. **[Get started here](https://docs.zerodev.app/sdk/permissions/intro)** and build some groundbreaking DApps!
## **The Road Ahead**
The quest to fix Web3 UX is a long one, but session keys are a significant step towards this goal, offering a practical and secure solution to a major issue — the lack of authorizations — that has been largely overlooked until now.
The widespread adoption of session keys will require collaboration across the ecosystem. Wallet providers will need to support account abstraction (AA), and DApps will need to be built to take advantage of session keys. However, the benefits of dramatically improved user experience and security make the effort worthwhile.
As more projects adopt session keys and AA in general, we will see the gap between Web2 and Web3 experiences begin to close. [ZeroDev](https://docs.zerodev.app/) is proud to be a part of this journey, and we hope our contributions will make your users smile!
## Towards the Most Optimized AA Wallet
::authors
At ZeroDev, we are obsessed with smart contract wallets (SCW), as we believe they are [necessary for realizing the full potential of Web3](https://vitalik.eth.limo/general/2023/06/09/three_transitions.html). One practical roadblock towards a wider adoption of SCW and AA, however, is the fact that SCWs cost gas to deploy. In contrast, to create an EOA, it costs nothing — the account simply *exists* once you generate a private key.
The deployment cost of SCWs is why AA is unlikely to be widely used on L1s in the near term. Luckily, more and more traffic are moving towards L2 anyways, but even then we have come across high-volume use cases where the small costs of creating SCWs add up over time.
Beyond deployment, SCWs also necessarily introduce some overhead for each transaction, since the validation logic is implemented with smart contracts (as opposed to being a part of the protocol itself, which is the case for EOAs). While the overhead is small, they can still add up to a meaningful amount over time.
At the moment, [Kernel](https://github.com/zerodevapp/kernel) is the [most widely deployed SCW for AA](https://twitter.com/0xKofi/status/1686618729247834112), so we consider it a serious responsibility for us to optimize the gas efficiency of Kernel. But how?
## Optimizing Kernel
When we first measured the gas efficiency of Kernel (v2), we were disappointed to find that it lagged behind some other implementations out there. The main reason, we quickly realized, was that there was a tension between performance and modularity. By [supporting plugins in Kernel](https://docs.zerodev.app/extend-wallets/overview), we also sacrificed some gas efficiency since the code that dispatches to plugins necessarily introduces some gas overhead. That’s why Kernel used more gas than simpler SCW implementations that don’t support plugins.
But we didn’t want to make any excuses, so we went ahead and squeezed more performance out of Kernel. **We are now happy to share that Kernel v2.1, the latest version, is now the most optimized AA wallets out there!** . This is despite the fact that **we are also the most modular**. Here are the numbers:
| | Creation | Native transfer | ERC20 transfer | Total |
| ---------------- | -------- | --------------- | -------------- | ------ |
| SimpleAccount | 410061 | 97690 | 86754 | 594505 |
| Biconomy | 296892 | 100780 | 89577 | 487249 |
| Etherspot | 305769 | 100091 | 89172 | 495032 |
| Kernel v2.0 | 366662 | 106800 | 95877 | 569339 |
| Kernel v2.1 | 291413 | 103240 | 92289 | 486942 |
| Kernel v2.1-lite | 256965 | 97331 | 86121 | 440417 |
So how did we do it? It would be too long to go over every little optimization we did, so let’s highlight the main ones.
#### Optimizing the Proxy
You might know that most SCWs are actually [proxies](https://medium.com/coinmonks/proxy-pattern-and-upgradeable-smart-contracts-45d68d6f15da) — lightweight smart contracts that point to an underlying “implementation contract” which contains the actual SCW logic. This is for two reasons:
* Proxies are cheaper to deploy, since the proxy contract itself contains minimal logic.
* Proxies are typically upgradable, so the user can switch from one SCW implementation to another.
Since Kernel is also deployed as a proxy, there are two things we can optimize:
* The bytecode size of the proxy itself.
* The “dispatch function” — how the proxy dispatches to the underlying implementation contract.
While Kernel originally used OpenZeppelin’s standard ERC-1967 proxy contract (and so did most other SCWs we looked at), we switched to the proxy offered by [Solady](https://github.com/Vectorized/solady), an audited set of hyper-optimized contracts. That brought us 118 less gas per UserOp and 82 less bytes per deployment.
However, we realized that we could further optimize on Solady because Solady implements an “admin” feature that allows the user to upgrade the implementation contract for the proxy. However, in the context of Kernel, this is actually unnecessary, because Kernel itself already knows how to handle proxy upgrades. Therefore, we were able to remove the admin feature, which removed another SSTORE that costs around 20000 gas on deployment!
#### Optimizing ECDSA Signature Validation
Kernel, being a modular wallet, can handle different kinds of signature schemes, but the most commonly used is still ECDSA which replicates the signing behavior of EOA wallets. Therefore, optimizing the ECDSA verification flow can be very impactful.
The first thing we did was to leverage Solady’s ECDSA recovery procedure, which saves 282 gas comparing to OpenZeppelin. But we realized that there’s a much bigger gain — again, since Kernel is so modular, even ECDSA verification is implemented as a module (that way, it can be easily swapped for another signature scheme such as multisig or RSA). However, by far the majority of ZeroDev users use ECDSA for signatures, so they are paying for the plugin dispatch cost for no reason.
That’s why we built Kernel Lite — a version of Kernel that hardcodes the ECDSA validation logic. If you look at the benchmark numbers again, you will see that Kernel Lite has by far the best numbers. We are currently auditing Kernel Lite and will be releasing it to our SDK soon.
## Open-sourcing the Benchmark
As much as we love Kernel, we want all SCWs to improve in gas efficiency so users can enjoy cheaper transactions no matter which SCW they use. Therefore, we are happy to [open-source our benchmark](https://github.com/zerodevapp/aa-benchmark) in the hopes that it will help other SCW implementations improve their performance.
We have taken great care to make the benchmark easy to use. To benchmark a SCW implementation, you just need to create a test class that inherits from `TestBase.sol` and implement a few functions. If you do so, please open a PR so we can add your SCW to the list. Together, let’s make SCWs more efficient and save gas for everyone!
***
*[ZeroDev is hiring](https://www.notion.so/Senior-Engineer-ZeroDev-729ff99d05854a93924ce6414bf08951?pvs=21)! If what we wrote here sounds interesting to you, drop us a note :)*
## Account abstraction beyond ERC-4337 -- how intents (ERC-7683) can make AA cheaper & faster
::authors
[This article was originally published on X.](https://x.com/decentrek/status/1879575439011979563)
ERC-4337 has been in production for over two years. Over that time, we at ZeroDev have helped hundreds of teams go live with smart accounts, and we have witnessed firsthand the challenges they faced.
Of these challenges, two major ones stand out:
### ERC-4337 is expensive
AA transactions (aka "UserOps") are more expensive than regular transactions. In fact, UserOps are so expensive that they are basically impractical on Ethereum L1, which is why practically all AA adoption has happened on L2s.
On L2s, UserOps are on average 2x as expensive as regular transactions, but since the base number is small (e.g. $0.01 vs $0.005), users don't notice it as much. However, for DApps that sponsor a lot of UserOps, the gas overhead adds up very quickly. Our larger customers "lose" thousands and sometimes tens of thousands of dollars every month due to the overhead.
### ERC-4337 is slow
Today, more than 98% of all UserOps are sponsored through paymasters. However, the interactions between bundlers, paymasters, and users are very complex. In practice, a user needs to perform 4 API calls before they can send a sponsored transaction, sometimes causing the UserOp to miss a block.
On fast L2s like Arbitrum/Base, the latency difference between regular transactions and UserOps is very noticeable. A transaction that takes 3s to execute on Base usually takes 5-6 secs when sent as a UserOp.
### The root cause of ERC-4337's inefficiencies
ERC-4337 is authored by some of the brightest minds in Web3, including Vitalik himself. So why couldn't they make ERC-4337 more efficient?
The reason is that ERC-4337 was designed with a specific goal in mind: to enable a decentralized & trustless mempool of UserOps. To quote Vitalik from this thread ([https://x.com/VitalikButerin/status/1576199517434949634](https://x.com/VitalikButerin/status/1576199517434949634)):
"You should be able to send an op into a public mempool, and if it pays enough fees, reliably expect it to get included. This should NOT depend on ANY centralized actors...
This is the gold standard that the existing public mempool provides. And we absolutely need to provide the same guarantees for smart contract wallets, or else we risk worsening centralization and censorship."
In other words, ERC-4337's primary goal is to ensure that smart account transactions, aka UserOps, can be included on-chain in a way that doesn't require any trust assumptions between wallets, relayers (aka "bundlers"), and gas sponsors (aka "paymasters").
To achieve this trust minification, ERC-4337 processes UserOps through a global contract known as the "EntryPoint," which performs fine-grained gas metering to ensure that different entities can't grief each other. This gas metering is at the source of ERC-4337's inefficiencies, because it both makes UserOps very large (higher L1 cost), and makes processing UserOps very computationally expensive (higher L2 cost).
So, if we want to be more efficient than ERC-4337, the right question to ask is not "how can we optimize ERC-4337," but rather "can we gain efficiency by introducing some trust?"
### Introducing UltraRelay -- Optimized Relay for Sponsored Transactions
ERC-4337 is a general-purpose AA protocol. In practice, however, most AA use cases today follow a very specific pattern: DApps sponsoring gas for embedded wallets.
UltraRelay is our attempt at building an optimized relay protocol for sponsored transactions. It achieves significant gas savings & lower latency comparing to ERC-4337, by leveraging a few trust assumptions that already exist in today's sponsorship flow.
Today, a DApp sets up gas sponsorship by first configuring its embedded wallet to use a specific smart account implementation (ZeroDev Kernel). Then, the DApp sponsors gas by forwarding transactions to bundlers & paymasters through ZeroDev.
With this pattern, there's already a high degree of trust between various components of the system:
* We know that users won't be using malicious smart accounts, because their embedded wallets are created through the ZeroDev SDK.
* We know that both the bundlers and the paymasters are managed by the same entity (ZeroDev).
Given these two trust assumptions, how does UltraRelay optimize the transactions?
### Trusting the account -- merging validation with execution
One core idea of ERC-4337 is "validation-execution separation," which means that UserOps are processed in two phases -- validation and execution. This prevents malicious accounts from causing bundlers to lose gas, but it adds to the size of the UserOp (since it must include gas limits for both validation and execution), as well as making processing the UserOp more computationally expensive.
But since we can trust the smart account, we can remove all the gas limits related to the validation phase (less L1 cost), as well as the logic for processing the validation phase (less L2 cost).
### Trusting the sponsor -- merging bundlers & paymasters
Similarly, ERC-4337 separates the bundlers and paymasters and performs complex gas metering to make sure they can't grief one another, but as we see, in our case the relayers and sponsors are actually the same entity.
Therefore, if we merge the relayer (bundler) and the sponsor (paymaster), we can remove all gas limits related to paymasters (less L1 cost), as well as the logic for handling the interactions between bundlers and paymasters (less L2 cost).
Importantly, since the wallet no longer needs to talk to both the bundler and the paymaster, but rather simply talks to a single relayer, the number of RPC calls that the wallet has to make is reduced from 4 to 2, thereby reducing latency.
### Building on ERC-7683 intents
For all it's flaws, ERC-4337 is supported by all AA infra providers, making it seamless for developers to move between infra providers. Using a custom relay loses out on this interoperablity.
As a remedy, we decided to build UltraRelay on top of ERC-7683, an intent framework first proposed by
Across and Uniswap. In other words, UltraRelay is a ERC-7683 filler, so any ERC-7683 fillers can technically relay transactions for smart accounts that support UltraRelay.
Most importantly, a developer doesn't have to choose between ERC-4337 and UltraRelay. By using ZeroDev, the smart account will be compatible with both, so the developer can still use a ERC-4337 bundler when it needs interoperability, but use UltraRelay when it needs efficiency.
### One more thing... cross-chain transactions
Since UltraRelay is a ERC-7683 filler, it also naturally supports cross-chain transactions. Using UltraRelay, your users will be able to spend tokens across chains, without bridging!
### Benchmarks
We have built a simple demo to showcase the latency & gas savings of UltraRelay comparing to ERC-4337: [https://ultra-relay-demo.zerodev.app](https://ultra-relay-demo.zerodev.app)
As you can see, UltraRelay boasts significant improvements for both latency and gas -- around 40% faster and 30% cheaper on
Base.
Note that the gas savings are largely constant regardless of the workload, so the percentage would be lower if the workload itself is more expensive.
In practice, this means that for our highest-usage customers, UltraRelay will save them anywhere from $1k to $10k per month -- a great deal for just changing a few lines of code!
### The role of 4337
ERC-4337 remains the gold standard for interoperable & trustless account abstraction. We see ERC-4337 serving the same function that the Ethereum public mempool serves today -- something that you can rely on when nothing else works.
However, just like how a large part of the Ethereum traffic are flowing through private mempools these days, we think a sizable part of the smart account traffic will also flow through non-standard mempools such as UltraRelay, for use cases that prioritize other factors (such as gas savings) over trust minification.
### Getting started with UltraRelay
UltraRelay works with all modular ERC-4337 accounts. By simply installing a plugin, your account will be able to send transactions through UltraRelay and start saving on gas & latency.
Today, UltraRelay is available in private beta. To get started:
* If you are already a ZeroDev user, ping us and we will get you set up.
* If you are not a ZeroDev user, what are you waiting for? Start building amazing Web3 experiences with the most powerful smart account platform today: [https://docs.zerodev.app](https://docs.zerodev.app)
## What Can You Do with Account Abstraction?
::authors
As the saying goes, the only constant in Web3 is change. If you are building a Web3 product, you need to stay on top of technological trends, in order to identify new opportunities to grow and improve your product.
One emerging trend that you might have noticed is “account abstraction” (AA). While there have been [many](https://www.argent.xyz/blog/wtf-is-account-abstraction/) [great](https://www.argent.xyz/blog/part-2-wtf-is-account-abstraction/) [technical](https://www.argent.xyz/blog/part-3-wtf-is-account-abstraction/) [write-ups](https://eips.ethereum.org/EIPS/eip-4337) [on](https://medium.com/infinitism/erc-4337-account-abstraction-without-ethereum-protocol-changes-d75c9d94dc4a) [account](https://notes.ethereum.org/@vbuterin/account_abstraction_roadmap) [abstraction](https://hackmd.io/@s0lness/BJUb16Yo9), I would like to explain in this blog post the practical benefits of account abstraction, or in other words, how you can leverage account abstraction to improve your app.
#### Account abstraction in simple terms
First thing first: what does account abstraction actually mean?
On most blockchains today, transactions can only be sent from an "externally owned account" (EOA), which is a fancy term to refer to wallets like MetaMask that are created from a seed phrase. In other words, EOAs are the wallets everyone has been using so far.
Account abstraction describes the ability for **smart contracts** to send and verify transactions. The difference between a smart contract and an EOA is like the difference between a computer and an abacus. Whereas an abacus can only be used in a specific way, a computer can be programmed to perform arbitrary functions. Similarly, whereas EOAs work in a pre-defined way, smart contract wallets (SCW) can be programmed. This opens up exciting opportunities for you as a developer to improve user experience (UX) and implement new product features, which we will detail below.
#### Side note on smart contract wallets
Some of you might be wondering: how is this different than smart contract wallets like Gnosis Safe? Hasn't that been around for a while?
Yes, but the key breakthrough with account abstraction is that SCWs can finally originate transactions. With Gnosis Safe, for example, the user still has to use an EOA like MetaMask to issue transactions, which are then "routed through" Gnosis Safe. Think controlling a computer with an abacus. This introduces a significant barrier to using SCWs, which is why to this date SCWs like Gnosis Safe are only used in high-security enterprise settings, and not in day-to-day Web3 usage.
#### Gas sucks; AA fixes it
One of the biggest UX issues with EOA wallets is that users have to pay gas in ETH (or whatever the native token is). This can be a significant hurdle, especially for new users who are not familiar with cryptocurrencies and may not even own any ETH.
As a classic example, let's say you are doing a "free mint" and you would like your users to mint an NFT. While minting is free, gas is not. Someone new to crypto would have to first acquire some ETH, which probably involves a KYC process. More likely than not, they will simply give up, instead of engaging with your app.
Another example is NFT games, where a user may have won or received some NFTs, but can't do anything with them (such as trading or transferring the NFTs) since they don't have the ETH to pay for gas.
Account abstraction addresses these issues by allowing users to skip gas entirely, if a third party is willing to sponsor gas for them. In these examples, you (the developer) can enable gas-less experiences for your users by sponsoring their gas.
Account abstraction-enabled wallets can also pay gas in any ERC-20 tokens. For DeFi applications, it's very common for a user to primarily be investing in ERC-20 tokens such as UNI or USDC. With an EOA, the user would still have to own a little bit of ETH (which they have to top up every now and then) in order to pay gas for transactions. With account abstraction, the user can pay gas in the tokens they already own!
#### Seed phrases are a nightmare
One of the biggest UX issues with EOA wallets is the need to safe-keep a seed phrase. This is an incredibly difficult task for most people: seed phrases are difficult to remember, and can be easily lost or stolen.
With smart contract wallets, there are many ways to solve this problem. One idea is social recovery: a user can authorize a list of their friends or family members to recover their account if they lose access. It's much easier to remember who your best friends are than to remember 12 random words!
The flexibility of smart contract wallets also means that it can work with MPC, so your users can simply login with a social account (e.g. Google) or email/password.
#### Batch transactions for fewer confirmations
Another issue with EOA wallets is that each transaction is verified and executed separately, which means long wait times and high gas fees. We have all had the terrible experience of trying to do something simple, say swapping one token for another, and yet having to confirm and wait for multiple transactions (e.g. an "approve" into a "swap").
With account abstraction, however, multiple transactions can be batched together into a single transaction. This significantly reduces the cost and wait time associated with interacting with your app — your users can get things done in one click.
Batching also makes your app safer by ensuring “atomicity” — that a multi-step process either finishes or completely reverts, instead of getting stuck in a “half-completed” state, e.g. “approve” succeeding but “swap” failing. The lack of atomicity can lead to very tricky bugs in DApps, but it won’t be an issue with AA.
#### Build interactive apps with session keys
What if you are building a highly interactive application such as a game, where prompting the user for confirmation would really disrupt their flow? Enter session keys, which are temporary keys that can be used to send transactions for a limited amount of time, with a limited scope of permissions.
Combining session keys with batching, your app can be sending far fewer transactions, while skipping most approvals, making your UX approach that of traditional Web2 applications.
#### Transaction Guards
Sometimes you want to protect your wallets against misuse. With an AA wallet, you can set up "transaction guards" – smart contracts that check transactions that go through your wallet.
One example is spending limits. You might want to limit your daily spending to $100, and for anything more than that you require a second signer (e.g. ledger). This not only helps you rein in your NFT impulse buys, but also is a good way to defend against hackers. With AA, spending limits can be easily implemented as a transaction guard.
#### Delegate assets
When you put crypto into a centralized product, you typically have no visibility into what they are doing with your funds, which can result in disastrous consequences (cough FTX cough). When you hold crypto in a self-custody wallet, there's perfect visibility, but you need to personally initiate and sign every transaction, which limits the potential of your crypto.
What if there's a third way? What if you can self-custody your funds, while authorizing a third party to perform *limited* actions on your behalf?
A great example is collateralized loans like Compound and Aave. When you put down collateral and take out a loan from these protocols, you need to continuously monitor your loan and top up your collateral if necessary, in case the price of your collateral token drops and your collateral gets liquidated. This is a lot of work and stress.
With account abstraction, you can build applications such that your users can *delegate* certain transactions for you to perform. If you were building a lending app with account abstraction, for instance, your app could automatically close your user's position when their collateral is in danger — all without them having to give away custody of their assets. This works because the permissions are enforced by smart contract wallets — the third party (e.g. your app) can only perform the delegated transactions, and nothing else (such as stealing user assets).
#### Subscriptions
As a particular use case of delegating assets, it's worth mentioning subscriptions. With AA, your users can easily authorize you (the app) to pull money from their accounts, but only up to a certain amount, at a given frequency.
#### State of account abstraction today
By now, hopefully I have convinced you that account abstraction can vastly improve the UX and functionality of your app. But is it ready today? Can you actually build real products on account abstraction right now?
The answer is a resounding yes. New rollups such as [StarkNet](https://docs.openzeppelin.com/contracts-cairo/0.4.0/accounts) and [zksync](https://v2-docs.zksync.io/dev/developer-guides/aa.html) natively support account abstraction, while [ERC-4337](https://eips.ethereum.org/EIPS/eip-4337) has brought account abstraction to all EVM blockchains, including Ethereum, Polygon, Arbitrum, Optimism, Avalanche, and more.
In a future blog post, I will dive deeper into ERC-4337 and explain how account abstraction actually works. For now, my team at ZeroDev has created an SDK that you can use today to enable account abstraction in your app. [Give it a try now](https://zerodev.app/), or [join our new Discord](https://discord.gg/KS9MRaTSjx) and say hi!
## Who, when, what — a framework for thinking about plugins, and 7579 vs 6900
::authors
In our [last blog post](https://docs.zerodev.app/blog/why-7579-over-6900), we argued in favor of ERC-7579 over ERC-6900 as a standard for modular smart accounts. The blog generated a lot of healthy debate, including [a detailed response](https://mirror.xyz/probablynoam.eth/ZM8k-YoVbC-ih13zPMPZ5q4iZ7wEHuWEcRbQNrRiURU) from Noam at Alchemy.
But you might wonder, *why* do 7579 and 6900 differ at all? That is, why would two groups of rational and intelligent people disagree so strongly on a technical issue? Shouldn’t everyone be arriving at the same, *correct* conclusion?
In this post, we will show that 7579 and 6900 differ due to a fundamental difference in *philosophy*. That is, there’s no strict right and wrong — it’s a matter of your perspective. Yes, just like most things in life.
To begin, let’s examine the most fundamental question: what does a smart account plugin even do?
## Who, when, what
Every use case of smart account plugins must answer three questions: who, when, and what.
* *Who* is authorized to perform this action?
* *When* (i.e. under what condition) can they perform this action?
* *What* exactly is this action?
Here are some examples of viewing use cases through this lens:
* NFT subscription: the DApp (who) can mint an NFT for me (what) once every month (when).
* Limit orders: the DApp (who) can send a trade for me (what) when the price reaches a given point (when).
* Social recovery: a set of guardians (who) can change the account signer for me (what) at any time (when).
In modular smart account parlance, *who* is the *validator*, *when* is the *hook* (we also call it “policy” in Kernel), and *what* is the *executor*. Though note that the line is not cleanly defined — for example, a validator could be implemented in such a way that it answers both *who* and *when.* But generally we believe that a well-designed plugin will answer only one of these three questions, to keep the scope small and clean.
## Who puts the pieces together?
This leads us to ask: if a plugin only answers one of these three questions, who is responsible for putting three plugins together to solve a use case?
Therein lies the key difference between 7579’s and 6900’s design philosophy:
* ERC-6900 believes that it’s the plugin developer’s responsibility to decide how plugins fit together.
* ERC-7579 believes that it’s the plugin user’s responsibility to decide how plugins fit together.
When you develop a plugin in 6900, you specify a “manifest” that lists the dependencies between plugins. For example, if you are developing a social recovery plugin, you might specify in the manifest that the executor that updates the account signer (what) must be validated through the guardians plugin (who).
In 7579, no such dependencies need to be specified when plugins are developed. So the plugin developer would develop the executor (what), and another developer may develop the validator (who), and it’s only when the user installs the plugins that they specify that the executor must be validated through the validator. Note that when we say “plugin user” here, we don’t mean the end user (human) — in practice it’s usually the DApp that is the “plugin user” that puts different plugins together for the user to install onto their account.
That’s why you might hear the statement that “ERC-6900 is ERC-7579 plus permissions,” which is not far from the truth. The “permissions” part refers to how plugins are tied together, i.e. how execution plugins are associated with validation plugins. ERC-6900 is opinionated about permissions, whereas ERC-7579 leaves permissions out of scope.
## Which approach is reasonable?
It depends on what you prioritize. When each plugin specifies its own dependencies, you achieve higher portability because the DApp doesn’t need to decide how plugins fit together. However, plugins become less composable, since you can’t mix-and-match different “who,” “when,” and “what” plugins given their hardcoded dependencies.
With Kernel, we opt for composable plugins, because we believe that:
* It makes plugin developers’s lives easier since they can develop smaller, simpler plugins.
* It gives more power to users & DApps because they can mix-and-match plugins to solve use cases **that the original plugin developers may not have thought of**.
For example, consider Kernel’s [signers](https://github.com/zerodevapp/kernel/tree/dev/src/validator/modularPermission/signers) (who) and [policies](https://github.com/zerodevapp/kernel/tree/dev/src/validator/modularPermission/policies) (when) plugins. You can match whichever signer with whichever policies, so the number of use cases that you can enable is exponential. E.g.:
* Use a ECDSA signer with a gas policy.
* Use a WebAuthn signer with a gas policy.
* Use a ECDSA signer with a gas policy + contract policy.
* Use a WebAuthn signer with a execution policy.
* …
By not hardcoding any dependencies between plugins, we allow DApp & wallet developers to compose plugins at will. Using the ZeroDev SDK, the code looks like this:
```tsx
const account = await toKernelAccount({
signer: webauthnSigner,
policies: [contractPolicy, gasPolicy]
})
```
In other words, with Kernel & ERC-7579, you get to compose plugins at “run time” (when plugins are used), as opposed to at “compile time” (when plugins were built).
## Last words
It’s important to note that both ERC-6900 and ERC-7579 are actively evolving, so some of the details in this article may be outdated by the time you read it. That said, we do believe that the difference in philosophy will likely persist, which will drive the design decisions that each side makes as they continue to improve the standards.
In a way, this very debate proves the point that the “proper” way to design smart accounts is far from settled, so there is a sense in which it’s not even clear whether enforcing a standard at this point is helpful at all. That’s why we push for smaller standards like ERC-7579 over bigger standards such as ERC-6900, so that we preserve room for projects to experiment and innovate, which ultimately will result in better smart accounts for the next billion Web3 users.
## Why we are building Kernel on ERC-7579 (and not ERC-6900)
::authors
(Update: we published [a follow-up blog post](https://docs.zerodev.app/blog/who-when-what). Noam from Alchemy published [a response](https://mirror.xyz/probablynoam.eth/ZM8k-YoVbC-ih13zPMPZ5q4iZ7wEHuWEcRbQNrRiURU).)
Account abstraction as a space has largely embraced the idea of "modular smart accounts" -- smart accounts whose logic can be customized dynamically using plugins. To date, [more than 90% of all smart accounts ever deployed are modular](https://www.bundlebear.com/factories/all), with Kernel being the most popular choice.
However, the fact that different modular smart accounts are not compatible poses a great challenge for developers. For example, if you are building a DApp and wants to use [session keys](https://docs.zerodev.app/blog/session-keys-are-the-jwts-of-web3), you need to choose a *specific* session key implementation that works only with a *specific* smart account implementation. If you use, say, OpenFort's session keys, your DApp won't work with Kernel-based wallets, and vice-versa. This is a big reason why AA so far has mostly only found PMF within the context of embedded wallets, where the DApp can tightly control what account implementation their users use.
To meet this challenge, Alchemy proposed [ERC-6900](https://eips.ethereum.org/EIPS/eip-6900) as a modular account standard back in April 2023. We were initially very enthusiastic about this effort and [intended to support it](https://twitter.com/zerodev_app/status/1650936175396552704). However, over time we have become pessimistic about the direction 6900 is headed, so we coauthored [ERC-7579](https://eips.ethereum.org/EIPS/eip-7579) with [Rhinestone](https://twitter.com/rhinestonewtf), [Biconomy](https://twitter.com/biconomy), and [OKX](https://twitter.com/okx), a standard that we believe better exemplifies the spirit of openness, interoperability, and innovation that we've come to associate with Web3.
In this post, we describe the issues we had with ERC-6900 and why we decided to build on ERC-7579 instead.
### TLDR
If you don't have time, here's the takeaway:
**ERC-6900 is an implementation pretending to be a standard.** Adopting ERC-6900 means adopting a number of *implementation decisions* made by Alchemy that are way beyond the scope of ensuring module compatibility.
On the other hand, **ERC-7579 is a minimal *interface* that solves one problem only: modules should be compatible across smart accounts.** Beyond that, smart accounts are free to make their own design decisions.
If you don't believe us, simply compare the lengths of both [ERC-6900](https://eips.ethereum.org/EIPS/eip-6900) and [ERC-7579](https://eips.ethereum.org/EIPS/eip-7579).
A good analogy may be Mac OS vs Linux. While Mac OS is a great OS, it shouldn't be a standard. A standard should be minimal like Linux, so people can build different OS-es on top of it (including Mac OS), while remaining compatible with each other.
Now let's look at the issues we had with ERC-6900.
### Technical Issues
#### Module Composability
One key goal with Kernel is to make it simple to develop modules *securely*. In other words, it should be as hard as possible for the module developer to screw up.
That's why Kernel is designed with module composability in mind. Module composability is the idea that a UserOp should be able to invoke multiple modules. As a result, module developers can keep their modules very simple, and achieve complex validation logic by putting simple modules together.
This is not possible with ERC-6900, however, due to the fact that each execution function has to be tied to a single validation module. Therefore, whereas with Kernel you can develop plugin A and plugin B, and to achieve A+B you just need to use A and B together, with ERC-6900 you have to develop a new plugin that combines the logic of A and B. This results in redundant code and complex, monolithic modules that are hard to audit.
#### Enabling modules off-chain
One “killer feature” of Kernel is the ability to enable modules off-chain. For example, you can create a session key by just signing a message. No gas cost is actually paid to enable the session key until and unless the session key is actually used. This is critical for use cases like limit orders. For example, when I create a session key for a protocol to execute a limit order for me, it’s not clear that the order will ever be executed (e.g. if the price never hits my desired number). Therefore, the ability to NOT pay gas upfront, but only pay gas when the order is executed, is critical to the user experience.
To enable modules off-chain, ZeroDev packs both the “approval” for the module and the signature data for the module itself inside the `signature` field of the first UserOp used by the module. However, this is not possible with ERC-6900, since it stipulates that the UserOp must be passed as is to the module. As a result, unless the module is explicitly programmed to ignore a part of the signature, it will fail to parse it. But doing so would introduce a dependency between the module and the smart account implementation, which is precisely the thing that a modular account standard is supposed to avoid.
That’s why session keys in ERC-6900 must be enabled explicitly on-chain, thus invalidating a large number of use cases that require session keys be created without guarantees of transaction execution.
#### Aggregators
"Aggregators" is a lesser-known feature in ERC-4337 for validating aggregate signatures, such as BLS. Generally, it's useful for any validation process that involves global storage; for example, we've been working on a ZK-based recovery process that leverages aggregators, where validating the ZK proofs involves accessing some global storage.
ERC-6900 however bans aggregators outright. The reasoning is not clear to us, but in any case if someone had issues with aggregators, you would think that the more reasonable approach is to propose a spec change to ERC-4337 itself, as opposed to proposing an account standard that bans a part of ERC-4337.
### Non-technical Issues
#### ERC-7579 was driven by real experience; ERC-6900 was not
It shouldn't be a surprise that ERC-7579 is a more well-designed standard than ERC-6900, if we examine how these two standards came about.
ERC-6900 was the brainchild of the Alchemy team, who are great engineers that we have a lot of respect for. Nevertheless, it was conceived at a time when there was minimal traction for AA in general and modular smart accounts specifically. And while Alchemy has been engaging other people for the design of 6900, the overall architecture remains consistent with the initial design set by the Alchemy team.
On the other hand, ERC-7579 was conceived almost 8 months after ERC-6900. At that time, over two million modular smart accounts have been deployed, so the authors of ERC-7579 were able to draw from the actual experience of both module developers and smart account developers.
Importantly, the authors of ERC-7579 include authors of Kernel (ZeroDev), Biconomy, and OKX, which are three of the most widely-used modular accounts today. As a result, the standard incorporates a diverse set of opinions.
#### Decisions regarding ERC-6900 are dominated by Alchemy
If we had so many issues with ERC-6900, you might ask, why didn't we try to contribute to the standard instead of making a new one?
In fact, we have. We provided a lot of feedback to Alchemy in the early days of the standard, and the response we got tended to be in the form of "that's a good point -- we will discuss it internally." In other words, it was clear that Alchemy sees themselves as the ultimate arbitrator of the account standard.
Now, we totally respect other teams for having different opinions for how smart accounts should be built. And that's precisely the point of a standard -- it should enable interoperability while respecting different design decisions. And yet, we felt that our opinions were simple overruled, while the standard evolved in a direction that incorporated a specific set of design decisions made by a specific team. We don't think that's the right way to build a standard.
As much as it pains us to say it, it's unfortunately a common practice in Web3 to push a "standard" that really just enshrines a particular product. While we are inclined to think that that's not the intention of ERC-6900, what we have seen doesn't give us strong confidence.
### The future for ERC-6900
Again, we respect ERC-6900 as an implementation -- it makes a set of design decisions that, while we don't agree with all of them, are generally sound and logical. It just shouldn't be a standard.
If ERC-6900 is to stay as a standard, we hope to see it become an extension on top of ERC-7579 (note how this is possible, but not vice versa). That way, developers aligned with ERC-6900's specific design decisions can adopt it, but to achieve module compatibility it would be enough to adopt ERC-7579.
### Last words
Standardization is a balancing act — one must seek to improve interoperability between different products, while allowing products to differentiate and innovate. The latter is particularly important because, all things considered, it’s still just the very early days of account abstraction. That’s why we are building our product on a minimal interoperability standard that is ERC-7579, so that we can continue shipping awesome products to the end users, which, ultimately, is all that matters.
## Offchain Labs acquires ZeroDev
::authors
Today we are excited to share that ZeroDev has been acquired by [Offchain Labs](https://www.offchainlabs.com/), the creator of Arbitrum.
### The history of ZeroDev
ZeroDev was founded in 2022 to bring account abstraction to Ethereum. We played a major role in bringing ERC-4337 into production, culminating in the launch of ZeroDev at ETHDenver 2023, which made us the very first AA solution to go live on Ethereum mainnet.
Since then, ZeroDev has pioneered many of the smart account technologies that people take for granted today, such as modular smart accounts, session keys, chain-abstracted accounts, and more.
Today, ZeroDev powers more than 5 million smart accounts across EVM chains. Our customers include some of the most successful projects in Web3, such as Infinex, DeFi.app, DIMO, Crossmint, Yellow, Rodeo, and more.
### The road to acquisition
As the wallet ecosystem matured, it became clear to us that account abstraction is no longer the bottleneck for Web3 adoption. Rather, we should view Web3 UX holistically: it's not just about the account, but also the wallet UI, the bridges, the on/offramps, and even the chains themselves. Therefore, we faced a choice: should we expand our product suite as an independent team, or join a larger team that shares the same vision with us?
ZeroDev is blessed to have received many acquisition inquiries over the years, but we've always decided to continue building as an independent team. However, that changed when we connected with Offchain Labs (OCL) earlier this year. The team at OCL not only shares with us the same vision of tackling Web3 UX through a single unifying stack, but they also possess the R\&D ability to actually bring this ambitious vision to life, as evident from Arbitrum, Orbit, Stylus, Prysm, and other amazing projects OCL has developed.
Therefore, we are incredibly excited to be joining forces with Offchain Labs. With the help of OCL, we will bring ZeroDev to new heights and provide you with the best developer solutions for building amazing Web3 experiences.
### FAQs
Here we address some questions that our customers are likely to have:
#### What does it mean for ZeroDev users?
Expect everything to get better. We are integrating with OCL across all functions such as engineering, support, SRE, marketing, etc., so you can expect not just more features but also better support, higher uptime, more tweets, etc.
#### Will this affect the product?
Yes -- but only positively. ZeroDev will expand its product suite under the OCL umbrella, offering not just smart accounts but other technologies for developers to build a compelling Web3 experience.
#### Does it mean ZeroDev will only support Arbitrum?
Of course not! While we love Arbitrum, we understand that a wallet product is only valuable if it supports as many chains as possible. ZeroDev already supports 50+ chains today and will continue to expand to more chains, only at a faster pace.
#### What new features are coming to ZeroDev?
Stay tuned! The rest of 2025 is going to be a wild ride.
## Case Study: How Glider Uses ZeroDev to Automate Cross-Chain Portfolio Management
::authors
*This post is a collaboration with Glider.*
Stepping into the world of crypto for the first time can be daunting. The process of setting up a wallet, securing private keys, and paying unpredictable gas fees is often a barrier that stops users from experimenting with blockchain technology before they even begin.
[Glider](https://glider.fi/) sees this friction as an existential problem. If users are forced to start their crypto journey by manually funding their wallets and navigating through confusing gas settings; they may never be able to experience the product’s value: automated portfolio management that just works.
Glider knew that they needed to make the crypto onboarding process as smooth as opening an account on a traditional financial application, without compromising on decentralization.
### What is Glider?
Glider is a cross-chain portfolio manager that is designed for a new generation of investors. Using Glider, anyone will have the ability to create, automate and share onchain portfolios without having to go through the tedious process of setting up a wallet, figuring out gas tokens and bridging across different chains.
The app is designed to look and feel like a consumer-grade fintech product, while remaining completely non-custodial at its core.
### Working with ZeroDev
[ZeroDev](https://zerodev.app/) is a core foundation for Glider’s seamless experience. Handling wallet infrastructure, permissions (session keys), and gas abstraction, ZeroDev allows Glider to remove two of DeFi’s biggest barriers: onboarding and execution. Its permissions framework (session keys) underpins Glider’s ability to automate actions on behalf of users
Under the hood, portfolios created on Glider are powered by a non-custodial smart wallet that is generated by [ZeroDev’s Kernel](https://github.com/zerodevapp/kernel). Users do not need to go through a setup process, and no key management is required; just a clean, modern signup flow.
After creating these smart wallets, Glider users sign a ZeroDev session key, granting a slim set of permissions on those wallets. For example, Glider will be able to submit trades through white-listed DEX aggregators, withdraw fees up to a permissioned cap, and lend to specific vaults.
Throughout this process, users remain fully non-custodial and can revoke permissions at any time. These session keys are created for each portfolio on Glider, meaning they can be customized individually and without the user granting any permissions at the EOA level.
Through integrations with [ZeroDev’s Paymaster](https://docs.zerodev.app/meta-infra/rpcs), Glider can then sponsor transaction fees on behalf of its users. In combination with the session keys, trades and rebalancing all happen in the background: no gas tokens or bridging is required between different chains.
According to the Glider team, partnering with ZeroDev was a no-brainer. Its account abstraction stack offered the infrastructure it needed to be operable on day one, and was far more efficient than building a custom solution in-house.
“ZeroDev was the clear choice. Kernel provided the account abstraction architecture Glider required, with infrastructure mature enough to be trusted at scale. Alternatives either lacked coverage of the features we needed or would have required months of engineering investment to replicate in-house. ZeroDev gave us production-ready infrastructure from day one,” - Brian Huang, co-founder of Glider.
### Impact
Integrating with ZeroDev solved Glider’s desired user experience. The app allows users to treat a portfolio as a programmable account, which means that as long as the user defines their intent, Glider can handle execution thanks to ZeroDev permissions.
For the Glider team, this meant months of engineering time freed up that would otherwise have been spent on wallet infrastructure. It also gave the team more time to focus on building what matters the most: a powerful portfolio editor, DEX and lending integrations and collaborative features.
For users, it means instantaneous wallet creation, automation, and invisible gas. Cross-chain actions are consistent and effortless. Users no longer have to manually sign transactions over and over again. The complexity of DeFi truly fades into the background.
“Every new application should be designed using ZeroDev’s tools. We are no longer in a time when users should have to manually sign every transaction or be required to know what gas is. Thanks to these abstractions, DeFi can go mainstream,” said Brian Huang, co-founder of Glider.
Glider's experience with ZeroDev shows that account abstraction plays an important role in shaping user experience. For teams that want to build consumer-grade crypto products, it is not necessary to reinvent the wallet or permission layers, as this is a problem that has already been solved by ZeroDev.
### What’s Next?
Glider has recently launched. The team is exploring ways for its users to build collaborative portfolios, connect more directly with DeFi protocols and bring Glider’s technology to other applications using APIs. Each of these directions continue to build on the strength of ZeroDev’s smart wallets, permissions, and gas infrastructure.
Disclosure: The references and information regarding Glider and its offerings are provided solely for informational purposes. This article is not, and should not be construed as, an endorsement or recommendation of such projects nor its offerings.
## Case Study: Combining Smart Accounts with Secure Automation
::authors
*This post is a collaboration with Lit Protocol.*
[Lit Protocol](https://www.litprotocol.com/) is a decentralized [network for signing and encryption](https://naga.developer.litprotocol.com/learning-lit/security), functioning as a [trustless cryptographic layer for applications](https://x.com/LitProtocol/status/1978854326320906298) that need signatures onchain or encryptions offchain. It currently secures almost [half a billion dollars](https://dune.com/lit_protocol/tvm-in-lit-protocol-mainnets) in assets, powering [hundreds](https://developer.litprotocol.com/ecosystem/projects) of teams building decentralized finance, identity and AI-powered applications.
The team recently partnered with ZeroDev, the leading smart account infrastructure provider, and is bringing automation and intelligence to every wallet. By integrating Lit Protocol’s programmable key layer into ZeroDev smart accounts, all ZeroDev-enabled wallets can now support scoped, cross-chain, and cross-protocol signing automation. Developers can build AI-powered autonomous DeFi agents that execute strategies, including yield optimization or portfolio rebalancing, directly from the user's wallet.
### An Opportunity that Couldn’t be Missed
Prior to integrating with ZeroDev, applications in Lit Protocol depended on decentralized, programmable [Externally Owned Accounts (EOAs)](https://developer.litprotocol.com/resources/glossary#externally-owned-account-eoa). Users and developers had to manage gas with pre-funding, making the onboarding process extremely complicated and hindering the automation experience that Lit Protocol wanted to deliver.
Lit Protocol wanted to enable a world where users could automate secure transitions without needing to manually sign every action. Not only did this make DeFi agent-based systems safer (by minimizing human error), but it also allowed them to operate faster and made for a better user experience. Its decision to integrate its [Vincent Smart Account Signer](https://github.com/LIT-Protocol/vincent-smart-account-signer) with the [ZeroDev SDK](https://docs.zerodev.app/smart-wallet/quickstart-core) resolved these issues.
With the integration, ZeroDev-based wallets were able to instantly connect to Lit Protocol’s programmable key network, giving users the power to execute secure, automated transactions within predefined, cross-chain and onchain guardrails. These automations are cryptographically enforced by Lit Protocol’s distributed key network, and every action stays within approved actions, like spending limits, across protocols and chains.
According to [Chris Cassano](https://x.com/chriscassano), CTO at Lit Protocol, the integration process itself was smooth and efficient, with clear documentation that enabled the engineering team to seamlessly implement without major challenges.
### Why ZeroDev?
Lit Protocol decided to integrate with ZeroDev because it offered the most reliable, production-ready smart account infrastructure available today.
“ZeroDev is the most widely used production-grade ERC-7579 smart account infrastructure, so integration with ZD as the smart account of choice was an easy decision,” [David Sneider](https://www.linkedin.com/in/dsneider/), Co-founder and Project Lead at Lit Protocol, said.
Building a similar account abstraction layer in-house would have required significant engineering effort and slowed innovation in Lit Protocol’s primary focus area: cryptographic key management and automation. Additionally, compared to other solutions in the market, ZeroDev’s maturity, flexibility and developer experience made it an attractive choice for Lit Protocol.
“ZeroDev and Lit Protocol have been integrated for years, with Lit as an auth provider for its smart accounts. With this new integration, reusable guardrails for cross-network delegation and automation are now in place.”
### What’s Next For Lit Protocol?
Looking ahead, Lit Protocol is launching its V1 network and $LITKEY network token on Oct. 30 at 00:00 UTC and expanding its automation capabilities to all wallet types. This means a focus on broader wallet integrations, improved DeFi automation and ecosystem-wide adoption of autonomous smart wallets powered by Lit Protocol’s programmable key layer.
From a technical perspective, ZeroDev manages the smart account layer, handling wallet creation, transaction bundling and gas abstraction, while Lit Protocol is responsible for the automation layer through scoped signing keys and policy enforcement across distributed nodes.
Working together with ZeroDev, Lit Protocol is redefining the standard for a new generation of self-operating wallets, where operation and security work hand in hand.
## Export Wallet \[Let users export their seed phrase or private key]
:::danger[IMPORTANT]
**USE FOR INTERNAL TESTING PURPOSES ONLY.** You may use these features solely for internal evaluation purposes on supported testnets. DO NOT use for production use or share with your users. Wallets created during this preview ("Alpha Wallets") will be discontinued. Any tokens remaining within Alpha Wallets will be permanently lost upon discontinuance. Any mainnet tokens sent to an Alpha Wallet will not be deposited and will be permanently lost when discontinued. We are unable to help recover any lost funds from Alpha Wallets. We provide all previews on an "as is" basis without warranty of any kind, and we may terminate or suspend the availability of any preview at any time.
:::
The SDK supports exporting the user's wallet as a seed phrase or private key. The key material is displayed inside a secure iframe and never touches your application code.
### Hooks
* [`useExportWallet`](/wallets/hooks/use-export-wallet) — Export the wallet seed phrase
* [`useExportPrivateKey`](/wallets/hooks/use-export-private-key) — Export a single private key
### Example
```tsx
import { useState } from 'react'
import { useExportWallet, useExportPrivateKey } from '@zerodev/wallet-react'
function ExportModal() {
const [showExport, setShowExport] = useState(false)
const exportWallet = useExportWallet()
const exportPrivateKey = useExportPrivateKey()
return (
{showExport && (
Export Options
{/* Container where the export iframe will render */}
)}
)
}
```
### How it works
1. You provide a container element ID where the secure iframe will be rendered.
2. The SDK initiates a secure export session.
3. The seed phrase or private key is rendered inside a secure iframe.
4. The key material is displayed directly to the user — it never passes through your application.
### Iframe styling
Customize the iframe appearance with `iframeStyles`:
```tsx
exportWallet.mutateAsync({
iframeContainerId: 'export-container',
iframeStyles: {
width: '100%',
height: '250px',
border: '1px solid #ccc',
borderRadius: '8px',
padding: '16px',
},
})
```
### Private key formats
`useExportPrivateKey` supports two key formats:
| Format | Description |
| --------------- | ------------------------------------------ |
| `'Hexadecimal'` | Standard hex-encoded private key (default) |
| `'Solana'` | Solana-compatible key format |
## ZeroDev Wallet \[Smart embedded wallet for your app]
:::danger[IMPORTANT]
**USE FOR INTERNAL TESTING PURPOSES ONLY.** You may use these features solely for internal evaluation purposes on supported testnets. DO NOT use for production use or share with your users. Wallets created during this preview ("Alpha Wallets") will be discontinued. Any tokens remaining within Alpha Wallets will be permanently lost upon discontinuance. Any mainnet tokens sent to an Alpha Wallet will not be deposited and will be permanently lost when discontinued. We are unable to help recover any lost funds from Alpha Wallets. We provide all previews on an "as is" basis without warranty of any kind, and we may terminate or suspend the availability of any preview at any time.
:::
ZeroDev Wallet is the first **smart embedded wallet** -- an embedded wallet optimized for smart accounts.
### Demo
Check out [this demo](https://zerodev-signer-demo.vercel.app/) for a self-custodial wallet powered by social logins and gas sponsorship.
### Why ZeroDev Wallet
#### Smart by Default
Most embedded wallets use EOAs by default, and only support smart accounts as a secondary option. On the other hand, ZeroDev Wallet uses smart accounts *by default* through EIP-7702 and ERC-4337.
As a result, smart account features such as gas sponsorship, transaction batching, transaction automation, and chain abstraction are available as native APIs with ZeroDev Wallet, while other embedded wallets typically only support a subset of these features.
#### Get the best of on-chain & off-chain
ZeroDev Wallet combines the best of off-chain and on-chain tech: TEE (trusted execution environment) for off-chain key management, and smart accounts for on-chain account management. This enables ZeroDev wallet to offer powerful wallet features that are difficult if not impossible with other solutions, including:
* A hybrid on-chain / off-chain policy engine
* Resource-lock chain abstraction
* Fully counterfactual session keys
### ZeroDev Wallet vs ZeroDev SDK
[ZeroDev SDK](https://docs.zerodev.app/) is a *smart account SDK* that can be used to create smart accounts from any key management system of your choice, including local private keys and other WaaS solutions such as Privy, Dynamic, and Turnkey.
On the other hand, ZeroDev Wallet is a complete embedded wallet solution that bundles key management with smart accounts.
### Getting Started
Check out [the quickstart](/wallets/quickstart) to get started!
## Quickstart \[Get up and running in 5 minutes]
:::danger[IMPORTANT]
**USE FOR INTERNAL TESTING PURPOSES ONLY.** You may use these features solely for internal evaluation purposes on supported testnets. DO NOT use for production use or share with your users. Wallets created during this preview ("Alpha Wallets") will be discontinued. Any tokens remaining within Alpha Wallets will be permanently lost upon discontinuance. Any mainnet tokens sent to an Alpha Wallet will not be deposited and will be permanently lost when discontinued. We are unable to help recover any lost funds from Alpha Wallets. We provide all previews on an "as is" basis without warranty of any kind, and we may terminate or suspend the availability of any preview at any time.
:::
### Installation
:::code-group
```bash [npm]
npm i @zerodev/wallet-react @zerodev/sdk wagmi viem @tanstack/react-query
```
```bash [yarn]
yarn add @zerodev/wallet-react @zerodev/sdk wagmi viem @tanstack/react-query
```
```bash [pnpm]
pnpm i @zerodev/wallet-react @zerodev/sdk wagmi viem @tanstack/react-query
```
```bash [bun]
bun add @zerodev/wallet-react @zerodev/sdk wagmi viem @tanstack/react-query
```
:::
### 1. Configure Wagmi
Create a Wagmi config with the `zeroDevWallet` connector:
```tsx
import { createConfig, http } from 'wagmi'
import { sepolia } from 'wagmi/chains'
import { zeroDevWallet } from '@zerodev/wallet-react'
export const config = createConfig({
chains: [sepolia],
connectors: [
zeroDevWallet({
projectId: 'YOUR_ZERODEV_PROJECT_ID',
chains: [sepolia],
}),
],
transports: {
[sepolia.id]: http(),
},
})
```
Get your project ID from the [ZeroDev Dashboard](https://dashboard.zerodev.app/).
### 2. Wrap your app
Wrap your application with `WagmiProvider` and `QueryClientProvider`:
```tsx
import { WagmiProvider } from 'wagmi'
import { QueryClient, QueryClientProvider } from '@tanstack/react-query'
import { config } from './wagmi-config'
const queryClient = new QueryClient()
export default function App({ children }: { children: React.ReactNode }) {
return (
{children}
)
}
```
### 3. Add authentication
Here's a basic example with passkey registration and login:
```tsx
import { useAccount, useDisconnect } from 'wagmi'
import { useRegisterPasskey, useLoginPasskey } from '@zerodev/wallet-react'
function AuthPage() {
const { address, isConnected } = useAccount()
const { disconnectAsync } = useDisconnect()
const registerPasskey = useRegisterPasskey()
const loginPasskey = useLoginPasskey()
if (isConnected) {
return (
Connected: {address}
)
}
return (
)
}
```
After authentication, the user's wallet is available through standard Wagmi hooks like `useAccount`, `useSendTransaction`, and `useSignMessage`.
### Next Steps
* [Passkey Authentication](/wallets/auth/passkeys) — Full passkey guide
* [Email OTP](/wallets/auth/email-otp) — Authenticate with email codes
* [Google OAuth](/wallets/auth/google-oauth) — Social login with Google
* [Send Transactions](/wallets/wallet-api/send-transaction) — Send gasless transactions
* [Sign Messages](/wallets/wallet-api/sign-message) — Sign messages with the wallet
* [Session Management](/wallets/session-management) — Session lifecycle and refresh
## Session Management \[Understand and control the session lifecycle]
:::danger[IMPORTANT]
**USE FOR INTERNAL TESTING PURPOSES ONLY.** You may use these features solely for internal evaluation purposes on supported testnets. DO NOT use for production use or share with your users. Wallets created during this preview ("Alpha Wallets") will be discontinued. Any tokens remaining within Alpha Wallets will be permanently lost upon discontinuance. Any mainnet tokens sent to an Alpha Wallet will not be deposited and will be permanently lost when discontinued. We are unable to help recover any lost funds from Alpha Wallets. We provide all previews on an "as is" basis without warranty of any kind, and we may terminate or suspend the availability of any preview at any time.
:::
The ZeroDev Wallet SDK manages sessions automatically. Sessions are created during authentication and persist across page reloads.
### Session lifecycle
```
Authenticate → Session Created → Auto-refresh → Expiry → Re-authenticate
```
1. **Created**: A session is created when the user authenticates (passkey, OTP, OAuth, or magic link). The session contains a credential that allows the SDK to sign transactions.
2. **Persisted**: Sessions are stored in `localStorage` by default (configurable via `sessionStorage` connector option). On page reload, the connector checks for an existing session and reconnects automatically.
3. **Auto-refresh**: When `autoRefreshSession` is enabled (default), the SDK refreshes the session before it expires. The refresh happens `sessionWarningThreshold` milliseconds before expiry (default: 60 seconds).
4. **Expiry**: If a session expires without being refreshed, the Wagmi connector disconnects and the user needs to re-authenticate.
### Refreshing sessions
Use the [`useRefreshSession`](/wallets/hooks/use-refresh-session) hook to manually refresh the current session:
```tsx
import { useRefreshSession } from '@zerodev/wallet-react'
function SessionControls() {
const refreshSession = useRefreshSession()
return (
)
}
```
### Auto-refresh configuration
Configure auto-refresh via the connector options:
```tsx
zeroDevWallet({
projectId: 'YOUR_PROJECT_ID',
chains: [sepolia],
autoRefreshSession: true, // default: true
sessionWarningThreshold: 120_000, // refresh 2 minutes before expiry
})
```
Set `autoRefreshSession: false` to disable auto-refresh and handle session expiry manually.
### Custom storage
By default, sessions are stored in `localStorage`. Provide a custom `StorageAdapter` for alternative storage:
```tsx
import { type StorageAdapter } from '@zerodev/wallet-core'
const customStorage: StorageAdapter = {
getItem: async (key: string) => { /* ... */ },
setItem: async (key: string, value: string) => { /* ... */ },
removeItem: async (key: string) => { /* ... */ },
}
zeroDevWallet({
projectId: 'YOUR_PROJECT_ID',
chains: [sepolia],
sessionStorage: customStorage,
})
```
This is useful for React Native apps where `localStorage` is not available.
### Detecting session expiry
When a session expires, the Wagmi connector disconnects. You can detect this using the Wagmi `useAccount` hook:
```tsx
import { useAccount } from 'wagmi'
function SessionStatus() {
const { status, isConnected } = useAccount()
if (status === 'disconnected') {
return
Session expired — please sign in again
}
if (isConnected) {
return
Connected
}
return null
}
```
## Batching Transactions
:::info
Impatient? Check out [complete examples here](https://github.com/zerodevapp/zerodev-examples/tree/main/batch-transactions).
:::
Smart accounts like Kernel support *batching* transactions -- rolling multiple transactions into one. This is very useful for simplifying Web3 interactions for your users. For instance, instead of doing `approve()` followed by `transfer()`, your user can do both in one transaction.
Batching transactions has a number of important benefits:
* Your user waits for only 1 transaction instead of multiple.
* Your user pays less gas.
* If any transaction in the batch reverts, the entire batch reverts. This ensures that your user won't be stuck in an inconsistent state.
* This is known as "atomicity."
### API
There are two ways to send batched transactions. `sendTransaction` is a simple API that's good enough for most use cases. If you need fine-grained control over your UserOp, you can use `sendUserOperation`.
#### `sendTransaction`
```typescript
const txHash = await kernelClient.sendTransaction({
calls: [
{
to: "0xADDRESS",
value: value,
data: "0xDATA",
},
{
to: "0xADDRESS",
value: value,
data: "0xDATA",
},
],
})
```
#### `sendUserOperation`
You can learn more about the `sendUserOperation` API [here](/smart-accounts/send-transactions#sending-raw-userops).
To send a UserOp with batching, simply pass an array of calls into `encodeCalls`.
```typescript
const userOpHash = await kernelClient.sendUserOperation({
callData: account.encodeCalls([
{
to,
value,
data,
},
{
to,
value,
data,
},
]),
// other UserOp params
})
```
#### Execute a batch without reverting if some of the calls fail
By default, batching is atomic -- if any of the calls fails, the whole batch will fail.
If you want to execute the batch such that even if some of the calls fail, the other calls will still execute, you can execute it with the `TRY` mode:
```typescript
import {
EXEC_TYPE,
} from "@zerodev/sdk/constants"
const userOpHash = await kernelClient.sendUserOperation({
callData: await kernelClient.account.encodeCalls([
// ... your calls
], "call", EXEC_TYPE.TRY_EXEC),
})
```
## Creating a Smart Account
:::info
Impatient? Check out [a complete example here](https://github.com/zerodevapp/zerodev-examples/blob/main/create-account/main.ts).
:::
At the core of account abstraction is the *smart account* -- an account powered by a smart contract. ZeroDev is built on [Kernel](https://github.com/zerodevapp/kernel), a *modular smart account* that can be customized with plugins.
When you create a Kernel account, you set it up with a *validator*, which is a type of plugin that handles how the account validates UserOps. In this tutorial, we will be using the ECDSA validator, which works like a normal EOA by validating signatures from a ECDSA private key. ZeroDev supports other validators such as [passkeys](/smart-accounts/use-plugins/passkeys/overview) and [multisig](/smart-accounts/use-plugins/multisig).
We will be using a local private key, but the ECDSA validator also works with [third-party auth providers](/smart-accounts/use-plugins/signers-intro).
### Installation
:::code-group
```bash [npm]
npm i @zerodev/sdk @zerodev/ecdsa-validator
```
```bash [yarn]
yarn add @zerodev/sdk @zerodev/ecdsa-validator
```
```bash [pnpm]
pnpm i @zerodev/sdk @zerodev/ecdsa-validator
```
```bash [bun]
bun add @zerodev/sdk @zerodev/ecdsa-validator
```
:::
### API
#### Picking an EntryPoint
Currently there are two versions of ERC-4337 that are used in production. They are referred to as "EntryPoint 0.6" and "EntryPoint 0.7", where "EntryPoint" refers to the singleton ERC-4337 contract.
If you are building a new application, we recommend using EntryPoint 0.7 (Kernel v3), which gives you the latest and greatest features and optimizations. If you already have an application using EntryPoint 0.6 (Kernel v2), just stick with it -- it will be supported indefinitely.
In this tutorial, we will use EntryPoint 0.7. Start by selecting an EntryPoint:
```ts
const entryPoint = getEntryPoint("0.7")
```
#### Picking a Kernel version
[Kernel](https://github.com/zerodevapp/kernel) is the smart account that ZeroDev builds on. ZeroDev SDK used to implicitly use the latest version of Kernel, which has caused some compatibility issues when people upgrade the SDK. Therefore, starting from ZeroDev SDK v5.3, we require that you explicitly specify the Kernel version. This is how you generally should choose:
* If you had already been in production with ZeroDev SDK v4 or lower, use Kernel version 2.4 with EntryPoint 0.6.
* If you had already been in production with ZeroDev SDK v5, use Kernel version 3.0 with EntryPoint 0.7.
* If you are still in development or starting a new project, use Kernel version 3.1 with EntryPoint 0.7.
```ts
import { KERNEL_V3_1 } from "@zerodev/sdk/constants"
const kernelVersion = KERNEL_V3_1
```
#### Creating a public client
In Viem, a [public client](https://viem.sh/docs/clients/public.html) is an interface to a JSON-RPC API such as Infura or Alchemy.
```typescript
import { createPublicClient, http } from "viem"
import { base } from 'viem/chains'
const publicClient = createPublicClient({
// In production, you will want to set your RPC provider here (e.g. Infura/Alchemy).
transport: http(),
chain: base,
})
```
#### Creating a signer
As aforementioned, a Kernel account using a ECDSA validator is "owned" by a signer, which is anything that can sign messages with a private key.
Since Kernel is built on top of Viem, we can use any [Viem account](https://viem.sh/docs/accounts/local/toAccount) as the signer. In this example, we create a signer from a private key:
```typescript
import { Hex } from "viem"
import { privateKeyToAccount } from "viem/accounts"
const signer = privateKeyToAccount("PRIVATE_KEY" as Hex)
```
Replace `PRIVATE_KEY` with an actual private key. You can [generate a random one here](https://privatekeys.pw/keys/ethereum/random).
#### Creating a ECDSA validator
Then create a ECDSA validator from the signer:
```typescript
import { signerToEcdsaValidator } from "@zerodev/ecdsa-validator"
const ecdsaValidator = await signerToEcdsaValidator(publicClient, {
signer,
entryPoint,
kernelVersion
})
```
#### Create a Kernel account
Next, create a Kernel account with the ECDSA validator:
```typescript
import { createKernelAccount } from "@zerodev/sdk"
const account = await createKernelAccount(publicClient, {
plugins: {
sudo: ecdsaValidator,
},
entryPoint,
kernelVersion
})
```
#### Create an account client
Now that we have an account, we can finally construct an "account client," which is the equivalent of a [wallet client in Viem](https://viem.sh/docs/clients/wallet.html) that allows you to send UserOps to bundlers.
```typescript
import { createKernelAccountClient } from "@zerodev/sdk"
import { http } from "viem"
import { base } from 'viem/chains'
const kernelClient = createKernelAccountClient({
account,
// Replace with your chain
chain: base,
// Find the RPC in your ZeroDev dashboard
bundlerTransport: http('ZERODEV_RPC'),
// Required - the public client
client: publicClient,
// Optional -- only if you want to use a paymaster
paymaster: {
getPaymasterData(userOperation) {
return paymasterClient.sponsorUserOperation({userOperation})
}
},
})
```
Note that:
* You need to replace the `ZERODEV_RPC` with the RPC found on your ZeroDev dashboard.
* You need to make sure to set the right `chain`.
* `paymaster` only needs to be specified if you want to [use a paymaster](/smart-accounts/sponsor-gas/evm).
Now you are ready to do things with your smart account, like [sending UserOps](/smart-accounts/send-transactions)!
### FAQs
#### When I create an account, is it deployed on-chain?
No. If your account hasn't been deployed yet, we simply use [`CREATE2`](https://eips.ethereum.org/EIPS/eip-1014) to compute the address that the account *would* be deployed to. Your account is deployed automatically with the first UserOp it sends.
In other words, "creating" accounts with the SDK is free -- you can create an infinite number of such account objects without paying any gas. It's only when you send the first UserOp that the account is deployed automatically.
#### Can I create multiple accounts from the same EOA signer?
Yes, you can do so by providing an `index` when you create the account object.
```typescript
import { createKernelAccount } from "@zerodev/sdk"
const account = createKernelAccount(publicClient, {
// other options...
// optionally specify the index; different indexes will yield different accounts
index: 1,
})
```
#### How do I get the smart account address from the EOA signer address?
Sometimes you only know the address of the EOA signer but you don't have the signer itself. In that case, you can still compute the address of the smart account with this helper function:
```ts
import { getKernelAddressFromECDSA } from "@zerodev/ecdsa-validator"
// index is 0 by default
const smartAccountAddress = await getKernelAddressFromECDSA(publicClient, eoaAddress, index)
```
#### How do I get the EOA signer address from the smart account address?
You can query it on-chain like this:
```ts
import { getValidatorAddress } from "@zerodev/ecdsa-validator"
const ecdsaValidatorContract = getContract({
abi: [
{
type: "function",
name: "ecdsaValidatorStorage",
inputs: [{ name: "", type: "address", internalType: "address" }],
outputs: [{ name: "owner", type: "address", internalType: "address" }],
stateMutability: "view",
},
],
address: getValidatorAddress(entryPoint, kernelVersion),
client: publicClient,
})
const owner = await ecdsaValidatorContract.read.ecdsaValidatorStorage([
account.address,
])
```
#### How do I create a Kernel account object with a specific address?
Normally, you don't need to manually specify an address because the smart account address is computed from your signer data. However, if you have changed the signer, then you may need to manually specify the smart account address.
You can do it like this:
```ts
const account = await createKernelAccount(publicClient, {
address: "address",
// ...other args
})
```
## Paying Gas with ERC20s
:::info
Impatient? Check out [complete examples here](https://github.com/zerodevapp/zerodev-examples/tree/main/pay-gas-with-erc20).
:::
:::warning
**Important:** ZeroDev supports USDC for gas payments by default. If you'd like to use a different token, you can set up a custom paymaster per instructions below.
:::
A smart account can pay gas with ERC20 tokens. As a result, your users don't have to own any native gas tokens (e.g. ETH) in order to use Web3. Instead, they can just use stablecoins or even your project's own tokens. When your users pay gas with ERC20 tokens, we add a 5% premium to the exchange rate to make a profit. The premium can be negotiated for enterprise customers.
On a high level, you need to do two things to enable a smart account to pay gas in a particular ERC20 token:
* Set up the Kernel client with the ERC20 paymaster.
* Ensure that enough ERC20 tokens have been approved for the ERC20 paymaster.
* This step is necessary because the ERC20 paymaster needs to withdraw ERC20 tokens from the smart account.
Let's go through these two steps next.
#### Set up Kernel Client
When you [set up an account](/smart-accounts/create-a-smart-account#create-an-account-client), do this:
```typescript
import {
createZeroDevPaymasterClient,
createKernelAccountClient,
gasTokenAddresses,
} from "@zerodev/sdk"
import {
getEntryPoint
} from "@zerodev/sdk/constants"
import { mainnet } from "viem/chains"
// use whatever chain you want
const chain = mainnet.id
const entryPoint = getEntryPoint("0.7")
const paymasterClient = createZeroDevPaymasterClient({
chain,
transport: http('ZERODEV_PAYMASTER_RPC'), // get the RPC on ZeroDev dashboard
})
const kernelClient = createKernelAccountClient({
// other options...
paymaster: paymasterClient,
paymasterContext: { token: gasTokenAddresses[chain.id]['USDC'] }
})
```
#### Approve ERC20 tokens for paymaster
Use the `getERC20PaymasterApproveCall` function to construct a call that approves the paymaster with the ERC20 tokens:
```typescript
import { getERC20PaymasterApproveCall } from "@zerodev/sdk"
const userOpHash = await kernelClient.sendUserOperation({
callData: await kernelClient.account.encodeCalls([
await getERC20PaymasterApproveCall(paymasterClient, {
gasToken: gasTokenAddresses[chain.id]['USDC'],
approveAmount: parseEther('0.1'),
entryPoint,
}),
]),
})
```
Thanks to [batching](/smart-accounts/batch-transactions), it's possible to batch the approval with the UserOp you want to send:
```typescript
const userOpHash = await kernelClient.sendUserOperation({
callData: await account.encodeCalls([
// The approval
await getERC20PaymasterApproveCall(paymasterClient, {
gasToken: gasTokenAddresses[chain.id]['USDC'],
approveAmount: parseEther('0.1'),
entryPoint,
}),
// The actual call
{
to: '0x...'
data: "0x...",
value: BigInt(0),
},
]),
})
```
Note that you only have to approve once, as long as the approval amount is sufficient for many UserOps. The [paymaster contract by Pimlico](https://github.com/pimlicolabs/erc20-paymaster/blob/main/src/ERC20PaymasterV07.sol) has been audited, it's widely used and generally considered safe.
#### Estimate Gas in ERC20s
If you need to estimate gas in terms of a ERC20 token, do this:
```ts
const userOperation = await kernelClient.prepareUserOperation({
// replace this with your actual calldata
callData: await account.encodeCalls([{
to: zeroAddress,
value: BigInt(0),
data: "0x"
}])
})
const erc20Amount = await paymasterClient.estimateGasInERC20({
userOperation,
// replace this with the token you want
gasTokenAddress: gasTokenAddresses[chain.id]["USDC"]
})
```
You can also see [a code example for estimating gas here](https://github.com/zerodevapp/zerodev-examples/blob/main/pay-gas-with-erc20/estimate-gas.ts).
#### Supported Tokens
Currently, our ERC20 Paymaster supports USDC on the following networks:
* **Ethereum Mainnet**
* **Polygon**
* **Base**
* **Optimism**
* **Arbitrum**
If you want to use a different token or support a new network, you can deploy your own self-funded ERC20 Paymaster, per instructions below.
#### Deploy Your Own ERC20 Paymaster
If you want to support a custom ERC20 token, you can deploy and manage your own ERC20 paymaster contract. To do this:
1. Visit the ZeroDev dashboard to deploy a self-funded ERC20 paymaster contract
2. Fund the contract with the native currency (e.g., ETH)
3. Add a supported ERC20 token by entering its contract address on the dashboard. The address must be a valid ERC20 token contract on the selected chain — the dashboard verifies the contract on-chain (reads `name`, `symbol`, and `decimals`) and will reject the entry with an error if no ERC20 contract is found at that address.
4. Choose how the token's exchange rate against the native gas token is sourced. Three price sources are available:
* **CoinGecko** — The paymaster fetches the *real-time* price from CoinGecko each time a UserOp is submitted. Auto-selected when the token is supported by CoinGecko on the chosen chain. Not available on testnets, since CoinGecko prices reflect real market liquidity that testnets don't have — use a custom price feed or static rate when developing on a testnet.
* **Custom price feed** — Provide a public HTTPS endpoint that returns JSON of the form `{ "rate": }`, where `rate` is how many ERC20 tokens equal one native token. The paymaster calls this endpoint when computing gas in tokens. Useful for tokens that aren't on CoinGecko or when you want to use your own pricing source.
* **Static exchange rate** — Set a fixed conversion rate manually. The simplest option, but you'll need to update it as the token's price moves.
Once deployed, you can use your custom paymaster by copying the paymaster URL from the dashboard and using it as the `transport` parameter when creating the paymaster client:
```typescript
const paymasterClient = createZeroDevPaymasterClient({
chain,
transport: http('YOUR_CUSTOM_PAYMASTER_URL'), // from the self-funded paymaster page on the dashboard
})
```
The rest of the integration remains the same as described above.
## Sending Transactions
:::info
Impatient? Check out [complete examples here](https://github.com/zerodevapp/zerodev-examples/tree/main/send-transactions).
:::
In ERC-4337, a transaction is known as a "UserOp." A UserOp looks mostly like a regular transaction, but it contains some extra information specific to AA, such as whether the UserOp should be sponsored.
There are two ways to send UserOps:
* Sending raw UserOps
* Sending regular transactions through the Viem API, which ZeroDev then "translates" into UserOps
The former enables the highest degree of flexibility, whereas the latter is more interoperable with existing libraries like Viem that deal only with transactions and not UserOps.
We will now describe both approaches. We assume that you have already [created a Kernel account](/smart-accounts/create-a-smart-account).
### Using the Viem API
Since the Kernel account client implements [Viem's wallet client interface](https://viem.sh/docs/clients/wallet.html), you can send UserOps with standard Viem methods.
#### Sending Transactions
```typescript
const txnHash = await kernelClient.sendTransaction({
to: "TO_ADDRESS",
value: VALUE, // default to 0
data: "0xDATA", // default to 0x
})
```
This function returns the transaction hash of the ERC-4337 bundle that contains the UserOp. Due to the way that ERC-4337 works, by the time we get the transaction hash, the ERC-4337 bundle (and therefore the UserOps includeded within) will have already been mined, meaning that you don't have to [wait with the hash](https://viem.sh/docs/actions/public/waitForTransactionReceipt.html).
If you need to separate the sending from the waiting of the UserOp, try [sending raw UserOps](#sending-raw-userops).
#### Interacting with Contracts
First, construct a [Viem contract instance](https://viem.sh/docs/contract/getContract.html) by passing the Kernel account client as the `walletClient`:
```typescript
import { getContract } from 'viem'
const contract = getContract({
address: '0xADDRESS',
abi: abi,
publicClient: publicClient,
walletClient: kernelClient,
})
```
Then, interact with the contract like how you normally would:
```typescript
// Example code from Viem
const balance = await contract.read.balanceOf([
'0xa5cc3c03994DB5b0d9A5eEdD10CabaB0813678AC',
])
const hash = await contract.write.mint([69420])
const logs = await contract.getEvents.Transfer()
const unwatch = contract.watchEvent.Transfer(
{
from: '0xd8da6bf26964af9d7eed9e03e53415d37aa96045',
to: '0xa5cc3c03994db5b0d9a5eedd10cabab0813678ac'
},
{ onLogs: logs => console.log(logs) }
)
```
### Sending UserOps
#### UserOp API
Sending raw UserOps affords you with the highest degree of control. To send a raw UserOp, use `sendUserOperation`:
```typescript
const userOpHash = await kernelClient.sendUserOperation({
callData: "0x..."
})
```
While `callData` is the only required field, there are many other fields that you can read about on the [ERC-4337 spec](https://github.com/eth-infinitism/account-abstraction/blob/develop/erc/ERCS/erc-4337.md):
```typescript
const userOpHash = await kernelClient.sendUserOperation({
sender: "0x0C123D90Da0a640fFE54a2359D159629065775C5",
nonce: 3n,
initCode: "0x",
callData: "0x18dfb3c7000000000000000000000000000000000000000000000000000000000000004000000000000000000000000000000000000000000000000000000000000000a00000000000000000000000000000000000000000000000000000000000000002000000000000000000000000d2f598c826429eee7c071c02735549acd88f2c09000000000000000000000000d2f598c826429eee7c071c02735549acd88f2c090000000000000000000000000000000000000000000000000000000000000002000000000000000000000000000000000000000000000000000000000000004000000000000000000000000000000000000000000000000000000000000000c00000000000000000000000000000000000000000000000000000000000000044a9059cbb00000000000000000000000043a4eacb7839f202d9cab465dbdd77d4fabe0a1800000000000000000000000000000000000000000000000003782dace9d90000000000000000000000000000000000000000000000000000000000000000000000000000000000000000000000000000000000000000000000000044a9059cbb000000000000000000000000982e148216e3aa6b38f9d901ef578b5c06dd750200000000000000000000000000000000000000000000000005d423c655aa000000000000000000000000000000000000000000000000000000000000",
callGasLimit: 50305n,
verificationGasLimit: 80565n,
preVerificationGas: 56135n,
maxFeePerGas: 113000000n,
maxPriorityFeePerGas: 113000100n,
paymasterAndData: "0xe93eca6595fe94091dc1af46aac2a8b5d79907700000000000000000000000000000000000000000000000000000000065133b6f0000000000000000000000000000000000000000000000000000000000000000000000000000000000000000000000000000000000000000000000000000000000000000000000000000000000000000000000000000000000000000000000005d3d07ae8973ba1b8a26d0d72d8882dfa97622942a63c4b655f4928385ce587f6aa2fa1ab347e615d5f39e1214d18f426375da8a01514fb126eb0bb29f0c319d1b",
signature: "0xf1513a8537a079a4d728bb87099b2c901e2c9034e60c95a4d41ac1ed75d6ee90270d52b48af30aa036e9a205ea008e1c62b317e7b3f88b3f302d45fb1ba76a191b"
})
```
Other than `callData`, every field has a sensible default:
* `sender` defaults to the Kernel account address
* `nonce` defaults to the next available nonce
* `initCode` defaults to `0x` if the account has been deployed, or the correct `initCode` if not.
* `callGasLimit`, `verificationGasLimit`, and `preVerificationGas` default to estimations provided by the underlying bundler and paymaster.
* `maxFeePerGas` and `maxPriorityFeePerGas` default to estimations provided by the public client.
* `paymasterAndData` defaults to `0x` if no paymaster was specified when you created the Kernel account object, or it will use the value provided by the paymaster.
* `signature` defaults to the signature provided by the signer.
#### Encoding callData
To encode the calldata, use the `encodeCalls` function from the account object:
```typescript
const userOpHash = await kernelClient.sendUserOperation({
callData: kernelClient.account.encodeCalls([{
to,
value,
data,
}]),
})
```
You can use Viem's helper functions such as `encodeFunctionData` to encode function calls. For example:
```ts
const userOpHash = await kernelClient.sendUserOperation({
callData: await kernelClient.account.encodeCalls([{
to: contractAddress,
value: BigInt(0),
data: encodeFunctionData({
abi: contractABI,
functionName: "functionName",
args: [args1, args2],
}),
}]),
})
```
#### Waiting for a UserOp to complete
To wait for a UserOp to complete, call `waitForUserOperationReceipt` using a kernelClient client:
```typescript
const receipt = await kernelClient.waitForUserOperationReceipt({
hash: userOpHash,
})
```
#### Constructing a UserOp for sending later
In some applications, you might want to construct a UserOp but not immediately send it. There are two possible flows:
* If you want to separate signing and sending:
* Create and sign a UserOp with `kernelClient.signUserOperation()`
* Send the UserOp with `kernelClient.sendUserOperation()`
* If you want to separate the constructing, signing, and sending:
* Create an unsigned UserOp with `kernelClient.prepareUserOperation()`
* Sign the UserOp with `kernelClient.account.signUserOperation()` and manually set the `userOp.signature` field
* Send the UserOp with `kernelClient.sendUserOperation()`
## Signing and Verifying Messages
Signing and verifying messages for smart accounts is different than with EOAs. There are a few reasons why:
* With an EOA, the address is effectively the public key of the private key used for signing. Therefore, verifying a EOA signature is as simple as [recovering](https://soliditydeveloper.com/ecrecover) the signature and compare the recovered public key with the address.
* With a smart account, the address is the address of a smart contract that has no cryptographic link to the signing private key. Therefore, you must use [ERC-1271](https://eips.ethereum.org/EIPS/eip-1271) to validate the message.
* With an EOA, you don't have to deploy the account. It just exists.
* Since smart accounts need to be deployed, it may not be clear how you can validate messages against a smart account not yet deployed. However, that's actually possible thanks to [ERC-6492](https://eips.ethereum.org/EIPS/eip-6492).
If you are impatient, head straight to [the API](#api). Otherwise, read on to learn more about ERC-1271 and ERC-6492.
### Understanding ERC-1271 and ERC-6492
TODO
### API
#### Signing messages
Both [the account and account client objects](/smart-accounts/create-a-smart-account#create-a-kernel-account) are able to sign messages:
```ts
const signature = await account.signMessage({
message: 'hello world',
})
const signature = await kernelClient.signMessage({
message: 'hello world',
})
```
If the account hasn't been deployed, a ERC-6492 signature will be generated.
#### Validating signatures
While you can validate signatures with ERC-1271, it's recommended that you use ERC-6492 since it works just like ERC-1271 if the account has been deployed, but it can also validate signatures for undeployed accounts.
To validate signatures with ERC-6492:
```ts
import { verifyEIP6492Signature } from '@zerodev/sdk'
import { hashMessage } from "viem"
await verifyEIP6492Signature({
signer: account.address, // your smart account address
hash: hashMessage('hello world'),
signature: signature,
client: publicClient,
})
```
## Getting Started
ZeroDev's React SDK is called `@zerodev/waas`, which stands for Wallet-as-a-Service. This is to signal that the React SDK provides higher-level abstractions over the [low-level SDK](/).
The relationship between `@zerodev/waas` and `@zerodev/sdk` is similar to the relationship between Wagmi and Viem. We recommend using `@zerodev/waas` in all React projects, and you can always ["drop down" to the SDK](/advanced/react-hooks/use-kernelclient) if you want lower-level control.
### Installation
:::code-group
```bash [npm]
npm i @zerodev/waas wagmi viem@2.x @tanstack/react-query
```
```bash [yarn]
yarn add @zerodev/waas wagmi viem@2.x @tanstack/react-query
```
```bash [pnpm]
pnpm i @zerodev/waas wagmi viem@2.x @tanstack/react-query
```
```bash [bun]
bun add @zerodev/waas wagmi viem@2.x @tanstack/react-query
```
:::
### Setup
In typical React pattern, `@zerodev/waas` is set up via a provider. A typical setup may look like this:
```tsx
import { ZeroDevProvider, createConfig as createZdConfig } from "@zerodev/waas"
import { WagmiProvider, createConfig, http } from "wagmi"
import { sepolia, arbitrum } from "wagmi/chains"
import { QueryClient, QueryClientProvider } from "@tanstack/react-query"
export default function Providers({ children }: { children: React.ReactNode }) {
const wagmiConfig = createConfig({
chains: [arbitrum, sepolia],
transports: {
[arbitrum.id]: http(),
[sepolia.id]: http(),
},
})
const zdConfig = createZdConfig({
chains: [arbitrum, sepolia],
transports: {
[arbitrum.id]: http(),
[sepolia.id]: http(),
},
projectIds: {
[arbitrum.id]: ZERODEV_ARB_PROJECT_ID,
[sepolia.id]: ZERODEV_SEPOLIA_PROJECT_ID
}
})
const queryClient = new QueryClient()
return (
{children}
)
}
```
### Next Steps
The best way to learn how to use `@zerodev/waas` is by looking at [the examples](https://github.com/zerodevapp/waas-examples) and browsing the hooks on the sidebar.
import QueryResult from "../../shared/query-result.mdx"
## useBalance \[Hook for getting balance of kernel account]
### Import
```tsx
import { useBalance } from '@zerodev/waas'
```
### Usage
```tsx
import { useBalance } from '@zerodev/waas';
function App() {
const { data } = useBalance();
}
```
### Parameters
```tsx
import { type UseBalanceParameters } from '@zerodev/waas';
```
#### address
`Address | undefined`
The address of owner, kernel account if not specified.
#### tokenAddress
`Address | undefined`
The address of token contract, native token if not specified.
### Return Types
```tsx
import { type UseBalanceReturnType } from '@zerodev/waas'
```
***
[TanStack Query mutation docs](https://tanstack.com/query/v5/docs/react/reference/useMutation)
#### data
`GetBalanceReturnType | undefined`
* ##### value
`BigInt` The amount of token owned.
* ##### decimals
`number` The decimals of the token.
* ##### symbol
`string` The symbol of the token.
* ##### formatted
`string` The formatted string.
## useChainId \[Hook for getting current connected chain id]
### Import
```tsx
import { useChainId } from '@zerodev/waas'
```
### Usage
```tsx
import { useChainId } from '@zerodev/waas'
function App() {
const chainId = useChainId()
}
```
### Parameters
No parameter needed.
### Return Types
```tsx
import { type UseChainIdReturnType } from '@zerodev/waas'
```
***
#### ChainId
`number`
## useChains \[Hook for getting configured chains]
### Import
```tsx
import { useChains } from '@zerodev/waas'
```
### Usage
```tsx
import { useChains } from '@zerodev/waas'
function App() {
const chains = useChains()
}
```
### Parameters
No parameter needed.
### Return Types
```tsx
import { type UseChainsReturnType } from '@zerodev/waas'
```
***
#### Chains
`readonly [Chain, ...Chain[]]`
import MutationResult from '../../shared/mutation-result.mdx'
## useCreateBasicSession \[Hook for creating session for kernel v2 account]
### Import
```tsx
import { useCreateBasicSession } from '@zerodev/waas'
```
### Usage
```tsx
import { useCreateBasicSession, useKernelClient } from '@zerodev/waas';
import { ParamOperator } from '@zerodev/session-keys';
import { parseAbi } from 'viem';
function App() {
const { write } = useCreateBasicSession();
const { address } = useKernelClient();
const abi = parseAbi(['function mint(address _to) public']);
return (
)
}
```
### Parameters
No parameter needed.
### Return Types
```tsx
import { type UseCreateBasicSessionReturnType } from '@zerodev/waas'
```
***
[TanStack Query mutation docs](https://tanstack.com/query/v5/docs/react/reference/useMutation)
#### write
`(variables: CreateBasicSessionVariables) => void`
The mutation function to create session for v2 kernel account.
* ##### variables
* ##### permissions
`Permission[]`
The permissions of the session.
#### writeAsync
`(variables: CreateBasicSessionVariables) => Promise`
Similar to [write](#write) but returns a promise.
* ##### variables
* ##### permissions
`Permission[]`
The permissions of the session.
#### data
`CreateBasicSessionData | undefined`
* ##### sessionKey
`0x${string}` The private key of the session.
* ##### sessionId
`0x${string}` The id of the session.
* ##### smartAccount
`0x${string}` The address of smart account.
* ##### enableSignature
`0x${string}` The signature to enable session.
* ##### permissions
`Permission[]` The permissions of the session.
import MutationResult from '../../shared/mutation-result.mdx'
## useCreateKernelClientEOA \[Hook for creating kernel client with EOA]
### Import
```tsx
import { useCreateKernelClientEOA } from '@zerodev/waas'
```
### Usage
```tsx
import { useCreateKernelClientEOA } from '@zerodev/waas';
import { injected } from 'wagmi/connectors';
function App() {
const { connect } = useCreateKernelClientEOA({ version: 'v3' });
return (
)
}
```
### Parameters
```tsx
import { type UseCreateKernelClientEOAParameters } from '@zerodev/waas';
```
#### version
`v2 | v3`
The version of kernel account.
```tsx
import { useCreateKernelClientEOA } from '@zerodev/waas';
function App() {
const { connect } = useCreateKernelClientEOA({ version: 'v3' }); // [!code focus]
}
```
### Return Types
```tsx
import { type UseCreateKernelClientEOAReturnType } from '@zerodev/waas'
```
***
[TanStack Query mutation docs](https://tanstack.com/query/v5/docs/react/reference/useMutation)
#### connect
`(variables: CreateKernelClientEOAVariables) => void`
The mutation function to connect eoa and create the kernel smart account.
* ##### variables
* ##### connector
`Connector | undefined`
The connectors.
#### connectAsync
`(variables: CreateKernelClientEOAVariables) => Promise`
Similar to [connect](#connect) but returns a promise.
* ##### variables
* ##### connector
`Connector | undefined`
The connectors.
#### data
`CreateKernelClientEOAData | undefined`
* ##### validator
`KernelValidator` The object of kernel validator.
* ##### kernelAccount
`KernelSmartAccount` The object of kernel account.
* ##### entryPoint
`EntryPoint` The entrypoint address of kernel account.
import MutationResult from '../../shared/mutation-result.mdx'
## useCreateKernelClientPasskey \[Hook for creating kernel client with Passkey]
### Import
```tsx
import { useCreateKernelClientPasskey } from '@zerodev/waas'
```
### Usage
```tsx
import { useCreateKernelClientPasskey } from '@zerodev/waas';
function App() {
const { connectRegister, connectLogin } =
useCreateKernelClientPasskey({ version: 'v3' });
return (
)
}
```
### Parameters
```tsx
import { type UseCreateKernelClientPasskeyParameters } from '@zerodev/waas';
```
#### version
`v2 | v3`
The version of kernel account.
```tsx
import { useCreateKernelClientPasskey } from '@zerodev/waas';
function App() {
const { connectRegister, connectLogin } =
useCreateKernelClientPasskey({ version: 'v3' }); // [!code focus]
}
```
### Return Types
```tsx
import { type UseCreateKernelClientPasskeyReturnType } from '@zerodev/waas'
```
***
[TanStack Query mutation docs](https://tanstack.com/query/v5/docs/react/reference/useMutation)
#### connectRegister
`(variables: CreateKernelClientPasskeyVariables) => void`
The mutation function to register passkey and create the kernel smart account.
* ##### variables
* ##### username
`string`
The username of the registered passkey.
#### connectRegisterAsync
`(variables: CreateKernelClientPasskeyVariables) => Promise`
Similar to [connectRegister](#connectregister) but returns a promise.
* ##### variables
* ##### username
`string`
The username of the registered passkey.
#### connectLogin
`() => void`
The mutation function to login created passkey and create the kernel smart account.
#### connectLoginAsync
`() => Promise`
Similar to [connectLogin](#connectlogin) but returns a promise.
#### data
`CreateKernelClientPasskeyData | undefined`
* ##### validator
`KernelValidator` The object of kernel validator.
* ##### kernelAccount
`KernelSmartAccount` The object of kernel account.
* ##### entryPoint
`EntryPoint` The entrypoint address of kernel account.
import MutationResult from '../../shared/mutation-result.mdx'
## useCreateKernelClientSocial \[Hook for creating a kernel client with social login integration]
### Import
```tsx
import { useCreateKernelClientSocial } from '@zerodev/waas'
```
### Usage
```tsx
import { useCreateKernelClientSocial } from '@zerodev/waas';
function App() {
const { login, isPending } = useCreateKernelClientSocial({
version: 'v3',
oauthCallbackUrl: window.location.href // Optional: Specify oauthCallbackUrl, defaults to the current window location
});
return (
<>
{isPending ? 'Loading...' : ''}
);
}
```
### Parameters
```tsx
import { type UseCreateKernelClientSocialParameters } from '@zerodev/waas';
```
#### version
`v2 | v3`
The version of kernel account.
```tsx
import { useCreateKernelClientSocial } from '@zerodev/waas';
function App() {
const { login, isPending } =
useCreateKernelClientSocial({ version: 'v3' }); // [!code focus]
}
```
#### oauthCallbackUrl (optional)
`string`
The callback URL for social login. After a successful login, the user will be redirected to this URL. Defaults to the current URI of your application if not specified.
### Return Types
```tsx
import { type UseCreateKernelClientSocialReturnType } from '@zerodev/waas'
```
***
[TanStack Query mutation docs](https://tanstack.com/query/v5/docs/react/reference/useMutation)
#### login
`(socialProvider: string) => void`
The function to trigger the redirect to your social provider for login.
* ##### socialProvider
`"google" | "facebook"`
Specifies the social provider platform for login.
#### data
`CreateKernelClientSocialReturnType | undefined`
* ##### validator
`KernelValidator` The object of kernel validator.
* ##### kernelAccount
`KernelSmartAccount` The object of kernel account.
* ##### entryPoint
`EntryPoint` The entrypoint address of kernel account.
import MutationResult from '../../shared/mutation-result.mdx'
## useCreateSession \[Hook for creating session for kernel v3 account]
### Import
```tsx
import { useCreateSession } from '@zerodev/waas'
```
### Usage
```tsx
import { useCreateSession } from '@zerodev/waas';
import { toGasPolicy } from '@zerodev/permissions/policies';
function App() {
const { write } = useCreateSession();
return (
)
}
```
### Parameters
No parameter needed.
### Return Types
```tsx
import { type UseCreateSessionReturnType } from '@zerodev/waas'
```
***
[TanStack Query mutation docs](https://tanstack.com/query/v5/docs/react/reference/useMutation)
#### write
`(variables: CreateSessionVariables) => void`
The mutation function to create session for v3 kernel account.
* ##### variables
* ##### policies
`Policy[]`
The policies of the session.
#### writeAsync
`(variables: CreateSessionVariables) => Promise`
Similar to [write](#write) but returns a promise.
* ##### variables
* ##### policies
`Policy[]`
The policies of the session.
#### data
`CreateSessionData | undefined`
* ##### sessionKey
`0x${string}`
The private key of the session.
* ##### sessionId
`0x${string}`
The id of the session.
* ##### smartAccount
`0x${string}`
The address of smart account.
* ##### enableSignature
`0x${string}`
The signature to enable session.
* ##### policies
`Policy[]`
The policies of session.
import MutationResult from '../../shared/mutation-result.mdx'
## useDisconnectKernelClient \[Hook for disconnecting kernel account client]
### Import
```tsx
import { useDisconnectKernelClient } from '@zerodev/waas'
```
### Usage
```tsx
import { useDisconnectKernelClient } from '@zerodev/waas';
function App() {
const { disconnect } = useDisconnectKernelClient();
return (
)
}
```
### Parameters
No parameter needed.
### Return Types
```tsx
import { type UseDisconnectKernelClientReturnType } from '@zerodev/waas'
```
***
[TanStack Query mutation docs](https://tanstack.com/query/v5/docs/react/reference/useMutation)
#### disconnect
`() => void`
The mutation function to disconnect kernel client.
#### disconnectAsync
`() => Promise`
Similar to [disconnect](#disconnect) but returns a promise.
#### data
`boolean | undefined`
* Defaults to `undefined`
* The last successfully resolved data for the mutation.
import QueryResult from "../../shared/query-result.mdx"
## useKernelClient \[Hook for getting kernel account client]
### Import
```tsx
import { useKernelClient } from '@zerodev/waas'
```
### Usage
```tsx
import { useKernelClient } from '@zerodev/waas';
function App() {
const { kernelClient } = useKernelClient();
}
```
### Parameters
```tsx
import { type UseKernelClientParameters } from '@zerodev/waas';
```
#### paymaster
`{type: "SPONSOR"} | {type: "ERC20", gasToken: string} | undefined`
The paymaster type and gas token address.
##### type
`SPONSOR | ERC20`
The type of paymaster.
##### gasToken
`string | undefined`
The symbol of erc20 token used for erc20 paymaster.
### Return Types
```tsx
import { type UseKernelClientReturnType } from '@zerodev/waas'
```
#### address
`Address | undefined`
The address of connected kernel account.
#### kernelAccount
`KernelSmartAccount | undefined`
The connected kernel account.
#### kernelClient
`KernelAccountClient | undefined`
The connected kernel account client.
#### isConnected
`boolean`
Will be `true` if the kernel client exists
import MutationResult from '../../shared/mutation-result.mdx'
## useSendTransactionWithSession \[Hooks for sending transactions with session keys]
### Import
```tsx
import { useSendTransactionWithSession } from '@zerodev/waas'
```
### Usage
```tsx
import { useSendTransactionWithSession } from '@zerodev/waas';
function App() {
const { write } = useSendTransactionWithSession();
return (
)
}
```
### Parameters
```tsx
import { type UseSendTransactionWithSessionParameters } from '@zerodev/waas';
```
#### sessionId
`0x${tring}`
The sessionId of session used to send user operation
#### paymaster
`{type: "SPONSOR"} | {type: "ERC20", gasToken: string} | undefined`
The paymaster type and gas token address.
* ##### type
`SPONSOR | ERC20`
The type of paymaster.
* ##### gasToken
`string | undefined`
The symbol of erc20 token used for erc20 paymaster.
#### isParallel
`boolean | undefined`
* Default to `True`
* The flag determine whether the user operation allows parallel execution.
#### nonceKey
`string | undefined`
The key to generate nonce for userop.
### Return Types
```tsx
import { type UseSendTransactionWithSessionReturnType } from '@zerodev/waas'
```
***
[TanStack Query mutation docs](https://tanstack.com/query/v5/docs/react/reference/useMutation)
#### write
`(variables: SendTransactionWithSessionVariables) => void`
The mutation function to send transactions with session.
* ##### variables
* ##### to
`Address`
The contract's address.
* ##### value
`bigint | undefined`
Value in wei sent with this transaction.
* ##### data
`Hex | undefined`
Data sent with this transaction.
#### writeAsync
`(variables: SendTransactionWithSessionVariables) => Promise`
Similar to [write](#write) but returns a promise.
* ##### variables
* ##### to
`Address`
The contract's address.
* ##### value
`bigint | undefined`
Value in wei sent with this transaction.
* ##### data
`Hex | undefined`
Data sent with this transaction.
#### data
`Hash | undefined`
* Defaults to `undefined`
* The last successfully resolved data for the mutation.
import MutationResult from '../../shared/mutation-result.mdx'
## useSendTransaction \[Hook for sending transaction]
### Import
```tsx
import { useSendTransaction } from '@zerodev/waas'
```
### Usage
```tsx
import { useSendTransaction } from '@zerodev/waas';
function App() {
const { write } = useSendTransaction();
return (
)
}
```
### Parameters
```tsx
import { type UseSendTransactionParameters } from '@zerodev/waas';
```
#### paymaster
`{type: "SPONSOR"} | {type: "ERC20", gasToken: string} | undefined`
The paymaster type and gas token address.
##### type
`SPONSOR | ERC20`
The type of paymaster.
##### gasToken
`string | undefined`
The symbol of erc20 token used for erc20 paymaster.
#### isParallel
`boolean | undefined`
* Default to `True`
* The flag determine whether the user operation allows parallel execution.
#### nonceKey
`string | undefined`
The key to generate nonce for userop.
### Return Types
```tsx
import { type UseSendTransactionReturnType } from '@zerodev/waas'
```
***
[TanStack Query mutation docs](https://tanstack.com/query/v5/docs/react/reference/useMutation)
#### write
`(variables: SendTransactionVariables) => void`
The mutation function to send transactions.
* ##### variables
* ##### to
`Address`
The contract's address.
* ##### value
`bigint | undefined`
Value in wei sent with this transaction.
* ##### data
`Hex | undefined`
Data sent with this transaction.
#### writeAsync
`(variables: SendTransactionVariables) => Promise`
Similar to [write](#write) but returns a promise.
* ##### variables
* ##### to
`Address`
The contract's address.
* ##### value
`bigint | undefined`
Value in wei sent with this transaction.
* ##### data
`Hex | undefined`
Data sent with this transaction.
#### data
`Hash | undefined`
* Defaults to `undefined`
* The last successfully resolved data for the mutation.
import MutationResult from '../../shared/mutation-result.mdx'
## useSendUserOperationWithSession \[Hooks for sending user operation with session keys]
### Import
```tsx
import { useSendUserOperationWithSession } from '@zerodev/waas'
```
### Usage
```tsx
import { useSendUserOperationWithSession, useKernelClient } from '@zerodev/waas';
import { parseAbi } from 'viem';
function App() {
const { write } = useSendUserOperationWithSession();
const { address } = useKernelClient();
const abi = parseAbi(['function mint(address _to) public']);
return (
)
}
```
### Parameters
```tsx
import { type UseSendUserOperationWithSessionParameters } from '@zerodev/waas';
```
#### sessionId
`0x${tring}`
The sessionId of session used to send user operation
#### paymaster
`{type: "SPONSOR"} | {type: "ERC20", gasToken: string} | undefined`
The paymaster type and gas token address.
* ##### type
`SPONSOR | ERC20`
The type of paymaster.
* ##### gasToken
`string | undefined`
The symbol of erc20 token used for erc20 paymaster.
#### isParallel
`boolean | undefined`
* Default to `True`
* The flag determine whether the user operation allows parallel execution.
#### nonceKey
`string | undefined`
The key to generate nonce for userop.
### Return Types
```tsx
import { type UseSendUserOperationWithSessionReturnType } from '@zerodev/waas'
```
***
[TanStack Query mutation docs](https://tanstack.com/query/v5/docs/react/reference/useMutation)
#### write
`(variables: SendUserOperationWithSessionVariables) => void`
The mutation function to send useroperation with session.
* ##### variables
* ##### address
`Address`
The contract's address.
* ##### abi
`Abi`
The contract's ABI.
* ##### functionName
`string`
* Function to call on the contract.
* Inferred from [`abi`](#abi)
* ##### args
`readonly unknown[] | undefined`
* Arguments to pass when calling the contract.
* Inferred from [`abi`](#abi) and [`functionName`](#functionname)
* ##### value
`bigint | undefined`
Value in wei sent with this transaction.
#### writeAsync
`(variables: SendUserOperationWithSessionVariables) => Promise`
Similar to [write](#write) but returns a promise.
* ##### variables
* ##### address
`Address`
The contract's address.
* ##### abi
`Abi`
The contract's ABI.
* ##### functionName
`string`
* Function to call on the contract.
* Inferred from [`abi`](#abi)
* ##### args
`readonly unknown[] | undefined`
* Arguments to pass when calling the contract.
* Inferred from [`abi`](#abi) and [`functionName`](#functionname)
* ##### value
`bigint | undefined`
Value in wei sent with this transaction.
#### data
`Hash | undefined`
* Defaults to `undefined`
* The last successfully resolved data for the mutation.
import MutationResult from '../../shared/mutation-result.mdx'
## useSendUserOperation \[Hook for sending user operation]
### Import
```tsx
import { useSendUserOperation } from '@zerodev/waas'
```
### Usage
```tsx
import { useSendUserOperation, useKernelClient } from '@zerodev/waas';
import { parseAbi } from 'viem';
function App() {
const { write } = useSendUserOperation();
const { address } = useKernelClient();
const abi = parseAbi(['function mint(address _to) public']);
return (
)
}
```
### Parameters
```tsx
import { type UseSendUserOperationParameters } from '@zerodev/waas';
```
#### paymaster
`{type: "SPONSOR"} | {type: "ERC20", gasToken: string} | undefined`
The paymaster type and gas token address.
##### type
`SPONSOR | ERC20`
The type of paymaster.
##### gasToken
`string | undefined`
The symbol of erc20 token used for erc20 paymaster.
#### isParallel
`boolean | undefined`
* Default to `True`
* The flag determine whether the user operation allows parallel execution.
#### nonceKey
`string | undefined`
The key to generate nonce for userop.
### Return Types
```tsx
import { type UseSendUserOperationReturnType } from '@zerodev/waas'
```
***
[TanStack Query mutation docs](https://tanstack.com/query/v5/docs/react/reference/useMutation)
#### write
`(variables: SendUserOperationVariables) => void`
The mutation function to send useroperation.
* ##### variables
* ##### address
`Address`
The contract's address.
* ##### abi
`Abi`
The contract's ABI.
* ##### functionName
`string`
* Function to call on the contract.
* Inferred from [`abi`](#abi)
* ##### args
`readonly unknown[] | undefined`
* Arguments to pass when calling the contract.
* Inferred from [`abi`](#abi) and [`functionName`](#functionname)
* ##### value
`bigint | undefined`
Value in wei sent with this transaction.
#### writeAsync
`(variables: SendUserOperationVariables) => Promise`
Similar to [write](#write) but returns a promise.
* ##### variables
* ##### address
`Address`
The contract's address.
* ##### abi
`Abi`
The contract's ABI.
* ##### functionName
`string`
* Function to call on the contract.
* Inferred from [`abi`](#abi)
* ##### args
`readonly unknown[] | undefined`
* Arguments to pass when calling the contract.
* Inferred from [`abi`](#abi) and [`functionName`](#functionname)
* ##### value
`bigint | undefined`
Value in wei sent with this transaction.
#### data
`Hash | undefined`
* Defaults to `undefined`
* The last successfully resolved data for the mutation.
import QueryResult from "../../shared/query-result.mdx"
## useSessionKernelClient \[Hook for getting kernel account client with session plugin]
### Import
```ts
import { useSessionKernelClient } from '@zerodev/waas'
```
### Usage
```ts
import { useSessionKernelClient } from '@zerodev/waas';
function App() {
const { kernelClient } = useSessionKernelClient();
}
```
### Parameters
```tsx
import { type UseSessionKernelClientParameters } from '@zerodev/waas';
```
#### sessionId
`0x${string}`
The sessionId of session used to send user operation.
#### paymaster
`{type: "SPONSOR"} | {type: "ERC20", gasToken: string} | undefined`
The paymaster type and gas token address.
* ##### type
`SPONSOR | ERC20`
The type of paymaster.
* ##### gasToken
`string | undefined`
The symbol of erc20 token used for erc20 paymaster.
### Return Types
```tsx
import { type UseKernelClientReturnType } from '@zerodev/waas'
```
### Return Types
```tsx
import { type UseSessionKernelClientReturnType } from '@zerodev/waas'
```
#### kernelAccount
`KernelSmartAccount | null`
The current kernel account with session plugin.
#### kernelClient
`KernelAccountClient`
The current kernel account client with session plugin.
## useSessions \[Hook for getting sessions]
### Import
```tsx
import { useSessions } from '@zerodev/waas'
```
### Usage
```tsx
import { useSessions } from '@zerodev/waas';
function App() {
const sessions = useSessions();
}
```
### Parameters
No parameter needed.
### Return Types
```tsx
import { type UseSessionsReturnType } from '@zerodev/waas'
```
#### sessions
`[sessionId: string]: SessionInfoType | null`
The session used in the smart account.
* SessionInfoType
* ##### sessionKey
`0x${string}`
The private key of the session.
* ##### sessionId
`0x${string}`
The id of the session.
* ##### smartAccount
`0x${string}`
The address of smart account.
* ##### enableSignature
`0x${string}`
The signature to enable session.
* ##### policies
`Policy[]`
The policies of session.
* ##### permissions
`Permission[]`
The permissions of the session.
import MutationResult from '../../shared/mutation-result.mdx'
## useSetKernelClient \[Hook for setting kernel account client]
### Import
```tsx
import { useSetKernelClient } from '@zerodev/waas'
```
### Usage
```tsx
import { useSetKernelClient } from '@zerodev/waas';
import { createKernelAccountClient } from '@zerodev/sdk';
function App() {
const { setKernelClient } = useSetKernelClient();
const kernelClient = createKernelAccountClient({
// create kernel client...
})
return (
)
}
```
### Parameters
No parameter needed.
### Return Types
```tsx
import { type UseSetKernelClientReturnType } from '@zerodev/waas'
```
***
[TanStack Query mutation docs](https://tanstack.com/query/v5/docs/react/reference/useMutation)
#### setKernelClient
`(kernelClient: KernelAccountClient) => void`
The mutation function to set kernel client.
#### setKernelClientAsync
`(kernelClient: KernelAccountClient) => Promise`
Similar to [setKernelClient](#setkernelclient) but returns a promise.
#### data
`boolean | undefined`
* Defaults to `undefined`
* The last successfully resolved data for the mutation.
import MutationResult from '../../shared/mutation-result.mdx'
## useSwitchChain \[Hook for switching chain]
### Import
```tsx
import { useSwitchChain } from '@zerodev/waas'
```
### Usage
```tsx
import { useSwitchChain, useChains } from '@zerodev/waas'
function App() {
const { switchChain } = useSwitchChain()
const chains = useChains()
return (
)
}
```
### Parameters
```tsx
import { type UseSwitchChainParameters } from '@zerodev/waas';
```
### Return Types
```tsx
import { type UseSwitchChainReturnType } from '@zerodev/waas'
```
***
[TanStack Query mutation docs](https://tanstack.com/query/v5/docs/react/reference/useMutation)
#### switchChain
`(variables: SwitchChainVariables) => void`
The mutation function to swich chain.
* ##### variables
* ##### chainId
`number`
ID of chain to switch to.
#### switchChainAsync
`(variables: SwitchChainVariables) => Promise`
Similar to [switchChain](#switchchain) but returns a promise.
* ##### variables
* ##### chainId
`number`
ID of chain to switch to.
#### data
`SwitchChainData | undefined`
## useWalletConnect
Do you want your users to be able to use their smart accounts with other DApps? If so, you can integrate ZeroDev with WalletConnect.
The useWalletConnect hook from the `@zerodev/waas` package integrates WalletConnect functionality with a React application, providing an interface for connecting to WalletConnect, handling session proposals, requests, and managing connections.
### Import
```tsx
import { useWalletConnect } from '@zerodev/waas'
```
### Usage
```tsx
import React from 'react';
import { useWalletConnect } from '@zerodev/waas';
const App = () => {
const {
connect,
sessionProposal,
approveSessionProposal,
rejectSessionProposal,
isLoading,
error,
disconnect,
sessions,
sessionRequest,
approveSessionRequest,
rejectSessionRequest,
} = useWalletConnect({
projectId: 'WALLET_CONNECT_PROJECT_ID',
metadata: {
name: 'ZeroDev Wallet',
url: 'https://zerodev.app',
description: 'Smart contract wallet for Ethereum',
icons: ['https://example-icon-url.com/400x400.jpg'],
}
});
// Use the returned properties and methods in your component
};
export default App;
```
For a practical demonstration of how `useWalletConnect` can be implemented in a project, check out our [live demo](https://wallet-connect-demo.onrender.com). You can also explore the [source code of the demo](https://github.com/zerodevapp/waas-wallet-connect-demo) for a deeper understanding and more detailed examples.
### Parameters
```tsx
import { type UseWalletConnectParameters } from '@zerodev/waas';
```
#### `projectId`
* A unique identifier for your WalletConnect project. You need to create a project ID at [WalletConnect](https://cloud.walletconnect.com/sign-in) to use this hook.
#### `metadata`
* Metadata provides details about your application to be displayed in the WalletConnect interface. It conforms to the following structure:
```typescript
interface Metadata {
name: string; // Name of your application
description: string; // Short description of your application
url: string; // URL to your application's homepage
icons: string[]; // Array of URLs to icons representing your application
verifyUrl?: string; // Optional URL for verification
redirect?: {
native?: string; // Optional native redirect URL
universal?: string; // Optional universal redirect URL
};
}
```
Please refer to the WalletConnect documentation for more information on the metadata and projectId.
### Return Types
```tsx
import { type UseWalletConnectReturnType } from '@zerodev/waas'
```
#### `connect(uri: string)`
* Function to initiate a WalletConnect session.
#### `approveSessionProposal(proposalData?: Web3WalletTypes.SessionProposal)`
* Function to approve a session proposal.
* Parameter `proposalData` is optional and should conform to the `Web3WalletTypes.SessionProposal` from `@walletconnect/web3wallet`.
#### `rejectSessionProposal()`
* Function to reject a session proposal.
#### `disconnect(session: SessionTypes.Struct)`
* Function to disconnect an active session.
* Parameter `session` should be an instance of `SessionTypes.Struct` from `@walletconnect/types`.
#### `approveSessionRequest()`
* Function to approve a session request.
#### `rejectSessionRequest()`
* Function to reject a session request.
#### `sessionProposal`
* Stateful value containing the current session proposal, if any.
#### `sessionRequest`
* Stateful value containing the current session request, if any.
#### `isLoading`
* Enum for loading states including 'Approve', 'Reject', 'Connect', 'Disconnect'.
#### `sessions`
* Array of active sessions.
#### `error`
* Error object if an error occurred during any of the operations.
## Presets
ZeroDev is highly modular and composable thanks to building on top of Viem, but sometimes it can feel like you are writing a lot of boilerplate code before you can set up a functional Kernel account. **Presets** are helper functions that help you set up Kernel accounts with common configurations, including connections to bundlers and paymasters.
Generally speaking, there will be a preset for each `` pair. For example, the `` preset will create a ECDSA Kernel account using ZeroDev's infrastructure.
Click the links below to see presets for different infra providers:
* [ZeroDev](/api-and-toolings/presets/zerodev)
* Pimlico
* Alchemy
* Gelato
## ZeroDev Presets
### ECDSA Validator
To set up a Kernel account using ECDSA for validation (mimicking EOAs):
```typescript
import { createEcdsaKernelAccountClient } from "@zerodev/presets/zerodev"
import { polygonMumbai } from "viem/chains"
const kernelClient = await createEcdsaKernelAccountClient({
// required
chain: polygonMumbai,
projectId: ZERODEV_PROJECT_ID,
signer: SIGNER,
// optional
provider: "PIMLICO", // defaults to a recommended provider
index: BigInt(1), // defaults to 0
paymaster: 'SPONSOR', // defaults to SPONSOR
})
```
* `chain` is a [Viem chain object](https://viem.sh/docs/clients/chains.html)
* `projectId` is a ZeroDev project ID from the [ZeroDev dashboard](https://dashboard.zerodev.app/).
* `signer` is a [Viem account](https://viem.sh/docs/accounts/local.html).
* (optional) `provider` can be [any provider that ZeroDev supports](/api-and-toolings/infrastructure/intro).
* (optional) `index` can be any positive integer. Different indexes will yield different accounts.
* (optional) `paymaster` can be:
* `'NONE'`: not using any paymaster (the user pays their own gas).
* `'SPONSOR'` (default): sponsor gas for users according to [gas policies](/api-and-toolings/infrastructure/gas-policies).
* A ERC20 token address: use the specified ERC20 token as gas tokens. See the [ERC20 gas token docs](/smart-accounts/pay-gas-with-erc20s) for details.
is a boolean flag that determines whether ZeroDev will use [the sponsoring paymaster](/api-and-toolings/infrastructure/intro).
## Admin API
ZeroDev infra can be configured through APIs. [Check out all our APIs here.](https://zerodev-api.readme.io/reference/getaddresbyeoav2)
## Choosing an infra provider
ZeroDev is compatible with any account abstraction infra provider. Check out these guides for integrating with a specific provider:
* [ZeroDev](/api-and-toolings/infrastructure/intro)
* [Pimlico](/api-and-toolings/infrastructure/pimlico)
Read on to learn how to integrate with a custom provider.
### Interop with Bundlers
For the most part, bundlers are perfectly interoperable between different providers. You simply specify the bundler RPC when you construct a Kernel client:
```typescript
import { createKernelAccountClient } from "@zerodev/sdk";
import { http } from "viem";
const kernelClient = createKernelAccountClient({
// other options...
bundlerTransport: http("BUNDLER_RPC"),
});
```
### Interop with Paymasters
If the Paymaster supports [ERC-7677](https://www.erc7677.xyz/) paymaster methods, you can simply pass the Paymaster RPC URL to `createZeroDevPaymasterClient`:
```typescript
import { createKernelAccountClient, createZeroDevPaymasterClient } from "@zerodev/sdk"
const paymasterClient = createZeroDevPaymasterClient({
chain,
transport: http('PAYMASTER_RPC'),
})
const kernelClient = createKernelAccountClient({
// other options...
paymaster: paymasterClient
})
```
To integrate with a paymaster which doesn't support [ERC-7677](https://www.erc7677.xyz/), you need to implement the `getPaymasterData` function:
```typescript
const kernelClient = createKernelAccountClient({
// other options...
paymaster: {
getPaymasterData(userOperation) {
// return `paymasterAndData` for `EntryPoint 0.6` or `paymaster` and `paymasterData` for `EntryPoint 0.7`
}
}
})
```
## Coinbase Developer Platform
[Coinbase Developer Platform](https://docs.cdp.coinbase.com/) (CDP) offers bundler and paymaster services that you can use with ZeroDev.
Generally speaking, Coinbase bundlers & paymasters speak the same interface as Pimlico, so you can follow [this guide](/api-and-toolings/infrastructure/pimlico) and simply replace the Pimlico bundler/paymaster URLs with the CDP bundler/paymaster URLs.
You can also refer to [CDP's official examples for ZeroDev](https://github.com/coinbase/paymaster-bundler-examples/tree/master/examples/zerodev).
## Custom Gas Policies
Custom gas policies enable you to tailor your sponsorship criteria using a webhook. This feature allows you to set up a custom policy that calls a URL you provide to determine whether to sponsor a transaction.
### Getting Started
To utilize custom gas policies, you'll need to configure a webhook endpoint on your server. This endpoint will receive data from ZeroDev and must return a JSON response indicating whether to proceed with the transaction sponsorship.
#### Setting up Your Webhook Endpoint
**Endpoint Requirements:**
* Must accept `POST` requests.
* The `POST` request will include the `userOp`, `projectId`, and `chainId` in the body (see example below).
* The request must return a `200` status with a JSON body indicating whether to proceed (see example below).
### Configuring Your Custom Policy
Sign in to your ZeroDev dashboard and navigate to the Gas Policies page. At the bottom of the page, you will find the Custom Policy form as shown below.
Enter the following options:
* **Webhook URL**: The full URL that the ZeroDev policy engine will make a POST request to.
* **Timeout Settings**: The amount of time the policy engine will wait for a response from your webhook URL. It's important to keep response times low to decrease latency for your end-users.
* **Policy Pass on Error**: Select this option to always pass the policy when an error occurs or the webhook times out.
* **Enabling the Policy**: Toggle this option when you are ready to enable the policy for your project.
### Webhook Payload
The `POST` request sent to your webhook URL will include the following:
* **`projectId`**: The ID of your project.
* **`userOp`**: The `UserOperation` object.
* **`chainId`**: The ID of the chain where the operation is being performed.
Here is an example request body:
```JSON
{
"projectId": "",
"userOp": {
"sender": "0x...",
"nonce": "0x...",
"initCode": "0x...",
"callData": "0x...",
"paymasterAndData": "0x...",
"signature": "0x...",
"maxFeePerGas": "0x...",
"maxPriorityFeePerGas": "0x...",
"callGasLimit": "0x...",
"verificationGasLimit": "0x...",
"preVerificationGas": "0x..."
},
"chainId": 80001
}
```
### Expected Webhook Response
Your webhook should respond with a `200` status code and a JSON body indicating whether to proceed with the transaction. Additionally, you can specify how the webhook's decision interacts with ZeroDev's internal policy checks using an optional `logicalOperator` field.
#### Response Fields:
* **`proceed`** (boolean, required): Indicates whether to sponsor the `userOp` (`true`) or not (`false`).
* **`logicalOperator`** (string, optional): Defines how to combine the webhook's `proceed` value with ZeroDev's policy checks.
* Accepted values:
* `'and'`: Proceed only if both ZeroDev's policy checks and `proceed` are `true`.
* `'or'`: Proceed if either ZeroDev's policy checks or `proceed` is `true`.
* Default: `'and'` (if the field is omitted).
#### Example Webhook Responses:
##### Proceed using logical AND (default):
```json
{
"proceed": true
}
```
In this case, the transaction will proceed only if both ZeroDev's internal policy checks and the webhook return `true`.
##### Proceed using logical OR:
```json
{
"proceed": true,
"logicalOperator": "or"
}
```
With the `logicalOperator` set to `'or'`, the transaction will proceed if either ZeroDev's policy checks or the webhook approve it.
### Behavior of Transaction Approval
When a transaction is submitted, ZeroDev performs internal policy checks to determine if the transaction meets the predefined criteria (e.g., gas policies, rate limits). The result of these checks is combined with the webhook's `proceed` value based on the `logicalOperator`.
* **Logical AND (`'and'`):**
The transaction proceeds only if both ZeroDev's policy checks and the webhook approve (`true`).
* **Logical OR (`'or'`):**
The transaction proceeds if either ZeroDev's policy checks or the webhook approve (`true`).
**Note:** If the `logicalOperator` field is omitted or contains an invalid value, it defaults to `'and'`.
### Example Webhook Server
To help you get started with implementing your custom gas policies, we've provided an example webhook server. This server demonstrates how you might receive and handle incoming webhook requests from ZeroDev.
The repository includes a basic server setup using Express.js, which listens for POST requests on a specified route. It logs the incoming data to the console and responds with a JSON object indicating whether to sponsor the transaction.
You can find the example server [here](https://github.com/zerodevapp/example-webhook-server/tree/main).
**Note:** If you wish to implement the new `logicalOperator` functionality, make sure to update the example server to include the `logicalOperator` field in the response as needed.
## Gas Policies
You can configure **gas policies** for ZeroDev paymaster to have fine-grained control over what you sponsor, and how much.
Paymaster policies can be configured through either [the dashboard](https://dashboard.zerodev.app/paymasters) or [the API](/api-and-toolings/infrastructure/api).
### Policy Types
There are four types of gas policies on ZeroDev:
* Project policies: policies that apply to the entire project.
* Contract policies: policies that apply to specific contracts.
* Wallet policies: policies that apply to specific wallet addresses.
* [Custom policies](/api-and-toolings/infrastructure/custom-gas-policies): if none of the policies above meet your needs, you can program totally custom policies via a webhook.
### Rate Limit Types
When you create a new policy, you set up one or more *rate limits*.
There are four types of rate limits:
* Amount: limit by the amount of gas
* Request: limit by the number of requests
* Gas Price: limit by the current gas price
* Amount per txn: limit by the amount of gas per transaction
### Policy examples
The policies and rate limits are hopefully intuitive, but here are some common examples in case they are helpful. We will be using Polygon (MATIC) in these examples.
#### Sponsor up to 1 MATIC every hour for the entire project
Here we create a project policy:
#### Sponsor 100 transactions per minute for a specific contract
Here we create a contract policy:
#### Sponsor transactions for a specific function when gas price is below 50 GWEI
Here we create a contract policy:
#### Sponsor 100 transactions per hour for a specific address
Here we create a wallet policy:
## Meta AA Infrastructure
ZeroDev works with major AA infra providers to provide a "meta intrastructure." Our meta infra proxies traffic to the underlying bundlers and paymasters, ensuring that our users have the highest possible uptime, since traffic can be routed to a different bundler when one goes down.
ZeroDev integrates with the following infra provider:
* [UltraRelay](/smart-accounts/sponsor-gas/evm#ultrarelay), ZeroDev's own bundler optimized for sponsored transactions
* Alchemy
* Gelato
* Pimlico
To get started using bundlers & paymasters through ZeroDev:
### Getting a ZeroDev RPC
You will need an RPC to start using bundlers & paymasters through ZeroDev.
* Sign up at the ZeroDev dashboard
* Create a project
* Copy the RPC from the project page (each network has an RPC).
The same RPC can be used as both bundler and paymaster RPCs.
[Learn more about bundler & paymaster RPCs here](/api-and-toolings/infrastructure/rpcs).
### Setting up sponsoring policies
If you would like to sponsor gas for your users, you need to set up gas policies on the dashboard.
[Learn more about gas policies here.](/api-and-toolings/infrastructure/gas-policies)
## Pimlico
You can use the ZeroDev SDK with Pimlico bundlers.
### Using Pimlico bundler
Simply specify Pimlico's bundler RPC when [constructing a Kernel client](/smart-accounts/create-a-smart-account#standard-api):
```typescript
import { createKernelAccountClient } from "@zerodev/sdk"
import { http } from "viem"
const kernelClient = createKernelAccountClient({
// other options...
transport: http('PIMLICO_BUNDLER_RPC'),
})
```
### Using Pimlico paymaster
Construct the Kernel client with Pimlico's paymaster client:
```typescript
import { http } from "viem"
import { polygonMumbai } from 'viem/chains'
import { createKernelAccountClient } from "@zerodev/sdk"
import { createPaymasterClient } from 'viem/account-abstraction'
const paymaster = createPaymasterClient({
chain: polygonMumbai,
transport: http('PIMLICO_PAYMASTER_RPC'),
})
const kernelClient = createKernelAccountClient({
account,
chain: polygonMumbai,
bundlerTransport: http('PIMLICO_BUNDLER_RPC'),
paymaster
})
```
## Bundler & Paymaster RPCs
To ensure utmost reliability for our customers, our RPCs use multiple bundlers under the hood, including:
* [UltraRelay](/smart-accounts/sponsor-gas/evm#ultrarelay), ZeroDev's own bundler optimized for sponsored transactions
* Alchemy
* Gelato
* Pimlico
Our RPCs support all standard methods defined in the [ERC-4337 spec](https://eips.ethereum.org/EIPS/eip-4337).
By default, ZeroDev sends traffic to a provider that's known to work well on the given network. However, you can configure which specific provider to proxy traffic to, as described below.
You can find the bundler & paymaster RPCs for a specific ZeroDev project on the [ZeroDev dashboard](https://dashboard.zerodev.app/).
:::info
While you can in principle use a paymaster from one provider with a bundler from another provider, in practice different providers are sometimes incompatible, so we recommend that if you want to use a specific provider, you use it for both the bundler and the paymaster.
:::
### Configuring the RPC for a specific infra provider
You can append the following query params (i.e. `?param=value`) to the RPC:
* `provider`, which specifies the underlying bundler to use. Possible values include:
* `ULTRA_RELAY`
* `ALCHEMY`
* `GELATO`
* `PIMLICO`
Example:
```txt
https://rpc.zerodev.app/api/v3/xxxxxf2d-xxxx-xxxx-90cc-xxxxxxxxx007/chain/42161?provider=ULTRA_RELAY
```
## ZeroDev
ZeroDev provides a meta infrastructure that proxies traffic to multiple infra providers including Alchemy, Gelato and Pimlico. [Read more here](/api-and-toolings/infrastructure/intro).
## ZeroDev Audits
All ZeroDev contracts and plugins are audited unless otherwise noted.
Please check out [our audits repo](https://github.com/zerodevapp/kernel/tree/dev/audits) for the reports.
## Supported Networks
Since we need to update this list manually, it may be missing some networks that we support. To see a complete list, check out [our dashboard](https://dashboard.zerodev.app/).
### Regular EVM Networks
| Network | ID |
| -------------------------- | ---------- |
| Aleph Zero EVM | 41455 |
| Aleph Zero EVM Testnet | 2039 |
| Arbitrum One | 42161 |
| Arbitrum Nova | 42170 |
| Arbitrum Sepolia | 421614 |
| Astar zkEVM | 3776 |
| Astar zkEVM Testnet zKyoto | 6038361 |
| Astar ZKatana Testnet | 1261120 |
| Aurora | 1313161554 |
| Aurora Testnet | 1313161555 |
| Avalanche | 43114 |
| Avalanche Fuji | 43113 |
| Base | 8453 |
| Base Sepolia | 84532 |
| Berachain | 80094 |
| Berachain bArtio | 80084 |
| Binance Smart Chain | 56 |
| Blast | 81457 |
| Blast Sepolia | 168587773 |
| BOB | 60808 |
| BOB Sepolia | 111 |
| Camp Network Testnet | 90354 |
| Celo | 42220 |
| Celo Alfajores | 44787 |
| Cyber | 7560 |
| Cyber Testnet | 111557560 |
| Degen | 666666666 |
| Ethereum | 1 |
| Ethereum Sepolia | 11155111 |
| Ethereum Holesky | 17000 |
| Ethernity | 183 |
| Ethernity Testnet | 233 |
| Gnosis | 100 |
| Gnosis Chiado | 10200 |
| HyperEVM | 999 |
| Ink | 57073 |
| Ink Sepolia | 763373 |
| Linea | 59144 |
| Linea Sepolia | 59141 |
| Mantle | 5000 |
| Mantle Sepolia | 5003 |
| MegaETH Testnet | 6342 |
| Mode | 34443 |
| Mode Sepolia | 919 |
| Monad Testnet | 10143 |
| Open Campus Codex | 656476 |
| opBNB | 204 |
| Optimism | 10 |
| Optimism Sepolia | 11155420 |
| Polygon | 137 |
| Polygon Amoy | 80002 |
| Re.al | 111188 |
| Re.al Unreal | 18233 |
| Scroll | 534352 |
| Sonic | 146 |
| Scroll Sepolia | 534351 |
| Shape | 360 |
| Unichain | 130 |
| Unichain Sepolia | 1301 |
### Rollup Provider Networks
We also support chains deployed on rollup providers like Conduit and Gelato. The comprehensive list is available on the [dashboard](https://dashboard.zerodev.app/).
Top rollup networks:
| Network | ID | Provider |
| ------------- | ----- | -------- |
| Plume Mainnet | 98866 | Conduit |
| Plume Testnet | 98867 | Conduit |
### Are we missing a network?
If you don't see a EVM network that you'd like support for, feel free to reach out to us on [Discord](https://discord.gg/KS9MRaTSjx).
## Debugging UserOps with Tenderly
In account abstraction (ERC-4337), the transactions sent by smart accounts are known as "UserOps." UserOps are similar to but not the same as regular transactions, so it may not be clear how to debug them.
In this guide, we will be using [Tenderly](https://dashboard.tenderly.co/) to debug UserOps. Make sure you have signed up and created a Tenderly account.
### The UserOp Structure
Let's begin by examining a typical UserOp example:
```json
{
"sender": "0xd2f1a28cc13c95ac4671cee806593c920d81c1f8",
"nonce": "330",
"initCode": "0x",
"callData": "0x51945447000000000000000000000000a02cddfa44b8c01b4257f54ac1c43f75801e81750000000000000000000000000000000000000000000000000000000000000000000000000000000000000000000000000000000000000000000000000000008000000000000000000000000000000000000000000000000000000000000000000000000000000000000000000000000000000000000000000000000000000000",
"callGasLimit": "55000",
"verificationGasLimit": "1000000",
"preVerificationGas": "100000",
"maxFeePerGas": "39459600032",
"maxPriorityFeePerGas": "39459600000",
"paymasterAndData": "0x",
"signature": "0x00000000bb864a968f25011aeb6574bef934726c066e9b47c261f6e40a49a3065da7deb57b0b40fffe70ec9ff0c1572358cd09d14cf8e671fdb66facfae0cb0a2db3a9cb1c"
}
```
This UserOp structure will be our reference point as we navigate through the process of simulating and debugging UserOps. Understanding the components of this example is key to effectively using Tenderly's tools for our debugging needs.
### UserOp Lifecycle
Before delving into the nuances of debugging UserOps, it's helpful to learn the lifecycle of a UserOp. Here it is:
If this looks daunting, let's focus on only the high level:
* A UserOp, with no gas estimates nor signature, is sent to a paymaster server, who simulates the UserOp and returns the gas estimates.
* If the UserOp has any errors in the validation or execution phase, the paymaster server will return an error since it can't properly simulate it.
* Now, the UserOp, with gas estimates and a proper signature, is sent to the bundler.
* At this point, the UserOp is not expected to revert during the validation phase, but it may nevertheless revert during the execution phase due to the on-chain state having changed between when the UserOp was sent to the paymaster and when it's submitted by the bundler.
### Understanding UserOp Failures
A UserOp can fail at various stages, including during the paymaster call (if sponsored), the gas estimation call, or the final execution call. Identifying the failure point is straightforward by examining the method indicated in the error log of the failed UserOp. For instance:
* **Paymaster Call Failures** might involve methods such as **`zd_sponsorUserOperation`** (ZeroDev meta-paymaster), **`pm_sponsorUserOperation`** (Pimlico), or **`alchemy_requestPaymasterAndData`** (Alchemy).
* **Gas Estimation Call Failures** are indicated by the **`eth_estimateUserOperationGas`** method.
* **Execution Call Failures** are marked by the **`eth_sendUserOperation`** method.
Failures are generally classified into two categories:
* **Validation Errors**: These occur during the validation phase when transactions are deemed invalid due to issues like incorrect signatures or nonce values. They typically present as EntryPoint error codes (e.g., AA23: XXXX).
* **Execution Errors**: These occur during the execution phase when transactions are valid, but the contract interaction is reverted, often noted as **`execution reverted`**.
### Using Tenderly for Simulation and Debugging
#### Adjusting Gas Limits for Simulation
For failures during paymaster or gas estimation calls, the UserOp gas limits (**`preVerificationGas`**, **`callGasLimit`**, **`verificationGasLimit`**) may default to **`0x`**. Before simulating the UserOp, adjust these gas limits as shown below. Increase these values based on error feedback if the simulation fails:
```json
{
"preVerificationGas": "0x186A0",
"callGasLimit": "0xD6D8",
"verificationGasLimit": "0xF4240"
}
```
If the failure occurs during **`eth_sendUserOperation`**, the UserOp should already contain all necessary values for accurate simulation.
#### Debugging Execution Errors
To simulate a UserOp in Tenderly, follow these steps:
1. Log in to your Tenderly account.
2. Navigate to **`Simulator`** and click **`New Simulation`**.
3. Enter the EntryPoint contract address in `Insert any address` input and select the appropriate chain.
* The EntryPoint address is `0x5FF137D4b0FDCD49DcA30c7CF57E578a026d2789` for v0.6 (default for ZeroDev SDK v5.1.x or below) and `0x0000000071727De22E5E9d8BAf0edAc6f37da032` for v0.7 (default for ZeroDev SDK v5.2.x or above)
4. Choose **`simulateHandleOp`**, input the UserOp into the tuple field, and commence the simulation.
If the simulation fails, it typically indicates a problem with the end contract. Verify the initial calldata thoroughly.
#### Simulating End Contract Calls
To simulate an end contract call:
1. Insert the Smart Contract Wallet address in `Insert any address` input (**`sender`** field from UserOp).
2. Select the chain and enter the EntryPoint contract address in the **`From`** field.
3. Enter the **`calldata`** field from UserOp into the **`Raw input data`** field and simulate the transaction.
#### Debugging Validation Errors
For validation errors, simulate the validation process by:
1. Inserting the EntryPoint contract address and selecting the chain.
2. Choosing **`simulateValidation`**, inputting the UserOp into the tuple field, and filling in the **`sender`** and **`calldata`** fields accordingly before simulating the transaction.
When simulating the validation process for a UserOp in Tenderly, the output can provide insightful details into potential issues. For instance, after simulating a UserOp, you might receive a **`ValidationResult`** like the one below:
```json
ValidationResult[{"preOpGas":"437497","prefund":"2118037380807816","sigFailed":true,"validAfter":"0","validUntil":"1708466460","paymasterContext":"0x"},{"stake":"0","unstakeDelaySec":"0"},{"stake":"0","unstakeDelaySec":"0"},{"stake":"100000000000000000000","unstakeDelaySec":"86400"}]
```
On Tenderly, it might look like this:
This result indicates various aspects of the validation process, with a particular focus on the failure due to signature validation (**`"sigFailed": true`**). Such output suggests that the UserOp failed validation because the signature did not match the expected parameters or was otherwise invalid.
### Decoding Error Messages
When a UserOp reverts with encoded error data, you can decode the error message to understand what went wrong. Here's how to decode error messages like:
```
UserOperation reverted during simulation with reason:
0x08c379a0000000000000000000000000000000000000000000000000000000000000002000000000000000000000000000000000000
0000000000000000000000000001d5472616e73616374696f6e20616c726561647920636f6e6669726d6564000000
```
#### Step 1: Identify the Error Signature
1. Go to [https://openchain.xyz/signatures](https://openchain.xyz/signatures)
2. Search for the error signature (first 4 bytes): `0x08c379a0`
3. This will show you the error type - in this case, it's the standard Solidity `Error(string)` function
#### Step 2: Decode the Error Message
Use Viem's `decodeErrorResult` function to decode the full error data:
```javascript
import { decodeErrorResult } from 'viem'
const error = decodeErrorResult({
data: "0x08c379a0000000000000000000000000000000000000000000000000000000000000002000000000000000000000000000000000000000000000000000000000000001d5472616e73616374696f6e20616c726561647920636f6e6669726d6564000000",
abi: [
{
name: "Error",
type: "error",
inputs: [{ name: "message", type: "string" }],
},
],
})
console.log(error)
// Output:
// {
// abiItem: { name: 'Error', type: 'error', inputs: [ [Object] ] },
// args: [ 'Transaction already confirmed' ],
// errorName: 'Error'
// }
```
In this example, the decoded error message is "Transaction already confirmed", which indicates that the transaction you're trying to execute has already been processed.
#### Common Error Signatures
* `0x08c379a0` - Standard Solidity `Error(string)` revert
* Custom errors will have different signatures that you can look up on openchain.xyz
Understanding these decoded error messages helps you quickly identify and fix issues with your UserOps.
### Other resources
There are some resources that we find helpful:
* [Pimlico's UserOp debugger/simulator](https://dashboard.pimlico.io/debugging)
* [Pimlico error codes](https://docs.pimlico.io/infra/bundler/entrypoint-errors/aa10)
## Can I Use a KernelClient with Ethers?
Our KernelClient implements the Viem WalletClient interface. Although it is not directly compatible with Ethers.js, we have developed an EIP1193Provider that accepts a KernelClient as a constructor parameter. This provider enables the use of KernelClient with Ethers.js in a similar manner to how window\.ethereum is utilized with Ethers.js.
Below is an example demonstrating how to use a KernelClient with the EIP1193Provider. This example assumes you are familiar with the creating of a KernelClient. For detailed instructions on creating a KernelClient, please refer to our [API docs](https://docs.zerodev.app/sdk/core-api/create-account).
```typescript
import { KernelEIP1193Provider } from '@zerodev/sdk/providers';
import { ethers } from 'ethers';
// Ensure to initialize your KernelClient here
const kernelClient = …;
// Initialize the KernelEIP1193Provider with your KernelClient
const kernelProvider = new KernelEIP1193Provider(kernelClient);
// Use the KernelProvider with ethers
const ethersProvider = new ethers.BrowserProvider(kernelProvider);
const signer = await ethersProvider.getSigner();
```
## Using ZeroDev with Gelato
Gelato's has a unique approach to handling transaction fees without the need for an EntryPoint deposit or an on-chain paymaster. Instead, transaction fees are settled post-execution via [1Balance](https://docs.gelato.network/web3-services/relay/subscriptions-and-payments/1balance-and-relay) across all supported networks, ensuring accurate charging of gas consumed without necessitating per-chain user deposits.
For a deeper understanding of Gelato's capabilities, refer to [their comprehensive documentation](https://docs.gelato.network/web3-services/account-abstraction/advantages-and-highlights).
### ZeroDev SDK with Gelato
Integrating Gelato with our SDK necessitates specific configurations, diverging from conventional bundler setups due to Gelato's distinct fee management mechanism.
#### Essential Configurations
* **Omit Paymaster**: Unlike other services, Gelato's transactions are sponsored without specifying a paymaster. Thus, your account will directly bear the gas fees incurred through Gelato's operations.
```typescript
const kernelClient = createKernelAccountClient({
account,
chain,
bundlerTransport: http(process.env.BUNDLER_RPC),
// The following is omitted for Gelato integration:
// paymaster: {
// getPaymasterData: (userOperation) => {
// const zerodevPaymaster = createZeroDevPaymasterClient({
// chain,
// // Get this RPC from ZeroDev dashboard
// transport: http(PAYMASTER_RPC),
// })
// return zerodevPaymaster.sponsorUserOperation({
// userOperation,
// })
// }
// }
})
```
## Using ZeroDev with React Native
ZeroDev works great in React Native. Our user Stephen Gordon has helpfully made starter templates for:
* [ZeroDev with React Native.](https://github.com/stephen-gordon/zerodev-expo-starter)
* [ZeroDev + Privy with Expo.](https://github.com/Stephen-Gordon/zerodev-privy-expo)
## UserOp Debugger
ZeroDev ships a web-based UserOp debugger at [debug.zerodev.app](https://debug.zerodev.app). Unlike similar tools on the market, the ZeroDev debugger has some major advantages:
* It's fully free to use (even for non-ZeroDev users!).
* It runs fully locally in the browser, with no dependencies on our servers.
* As a result, you can trust that the debugger will always be available independent of the uptime of ZeroDev itself.
The reason why the UserOp debugger can run fully in the browser is because we make innovative use of [TEVM](https://www.tevm.sh/), an Ethereum client implementation in TypeScript. This allows us to simulate UserOps without dependencies on RPC-based debuggers such as Tenderly, thus allowing us to offer this tool for free with 100% uptime.
### Using the debugger
The debugger UI is very self-explanatory, so we encourage you to just [head over directly](https://debug.zerodev.app/).
The debugger supports three modes (available as the three tabs on the navbar).
#### Direct simulation
To use the debugger, simply:
* Select a network
* Enter a JSON RPC for the network manually or select one from the preexisting list.
* Select an EntryPoint version (if you are unsure, you are likely using 0.7 which is the default for ZeroDev SDK).
* Paste in the UserOp. We support multiple UserOp formats including the output from Viem, so in most cases it should just work.
* Click "Simulate."
#### Importing from bundler transactions
Sometimes you might want to find a UserOp from a bundler transaction. In that case, simply select the network and paste in the transaction hash.
You can give try this transaction hash on Arbitrum if you'd like to see an example: `0x9b9bc487071fb1258892658853f6f89aace80647affc06c793c83eb193fc57e0`.
#### Analyze an account
You can analyze an account by inputing its address. Try this address on Base: `0x2E9f1C283A151927afED5dEd86dD147243A8fa79`.
### Next steps
[Head to the debugger and try some of the examples.](https://debug.zerodev.app)
## Status API
ZeroDev provides a status API for monitoring uptime and performance metrics of RPC endpoints across different chains.
You can also find the status page here: [https://status.zerodev.app/](https://status.zerodev.app/)
### API Documentation
You can find the base URL at: [https://status-api.zerodev.app/](https://status-api.zerodev.app/)
#### 1. Get Uptime & Chain List
**Endpoint**: `GET /uptime`
Returns the service's overall uptime status and a list of supported chains. This is the primary endpoint for checking general service health.
This returns uptime as a list of boolean values indicating health status for last 24 hours per minute.
Additionally this returns a list of chains supported by our bundler service.
**Response Format**:
```json
{
"uptime": {
"uptimePercent": 99.9,
"perMinute": [
{
"tsIso": "2023-10-27T10:00:00.000Z",
"ts": 1698400800,
"up": true
}
// ... list of boolean status per minute (last 24h window)
]
},
"chains": [
{
"networkId": "42161",
"networkName": "Arbitrum One"
}
// ... list of all supported chains
]
}
```
***
#### 2. Get Chain Performance
**Endpoint**: `GET /performance/:chainId`
Returns detailed performance metrics for a specific chain. (for last 6 hours)
This endpoint gives the error rate, and latency performance data for the specific chain for every minute, and also for major RPC methods
**Parameters**:
* `chainId` (path parameter): The numeric ID of the network (e.g., `42161`).
**Response Format**:
```json
{
"networkName": "Arbitrum One",
"networkId": "42161",
"perMinute": [
{
"minuteTs": 1698400800,
"minuteISO": "2023-10-27T10:00:00.000Z",
"requestCount": 1500,
"errorCount": 5,
"errorRatePercent": 0.33,
"p95Ms": 120,
"maxMs": 450,
"p99Ms": 200,
"perRPC": {
"eth_call": {
"requestCount": 1000,
"errorCount": 2,
"errorRatePercent": 0.2,
"p95Ms": 110,
"maxMs": 300,
"p99Ms": 150
}
// ... metrics breakdown by RPC method
}
}
]
}
```
**Errors**:
* `400 Bad Request`: If `chainId` is not a number.
## SDKs
ZeroDev ships SDKs for browser, mobile, and server-side stacks. Most non-TypeScript bindings are powered by the **[Omni SDK](https://github.com/zerodevapp/zerodev-omni-sdk)** — a single Zig core exposed through C FFI, with first-class language bindings for Swift, Kotlin, Go, Rust, Python, and C. Pick the one that matches your runtime.
### Client-side
For applications that run in a user's browser or on their device.
* **[TypeScript / JavaScript](/get-started/sdks/client-side/typescript)** — the core `@zerodev/sdk` package, for browser apps.
* **[Embedded Wallet (React)](/wallets/quickstart)** — `@zerodev/wallet-react` for embedded smart wallet flows.
* **[iOS (Swift)](/get-started/sdks/client-side/ios)** — Omni SDK Swift binding (SPM, precompiled xcframework).
* **[Android (Kotlin)](/get-started/sdks/client-side/android)** — Omni SDK Kotlin binding (Maven Central, bundled native libs).
### Server-side
For backend services, scripts, and agents.
* **[Node.js / TypeScript](/get-started/sdks/server-side/nodejs)** — `@zerodev/sdk` running server-side.
* **[Go](/get-started/sdks/server-side/go)** — Omni SDK Go binding.
* **[Python](/get-started/sdks/server-side/python)** — Omni SDK Python binding (PyPI).
* **[Rust](/get-started/sdks/server-side/rust)** — Omni SDK Rust crate (crates.io).
* **[C](/get-started/sdks/server-side/c)** — Omni SDK C FFI for cross-language embedding.
## Set up a project
Before integrating any ZeroDev SDK, create a project on the ZeroDev dashboard and configure a gas-sponsorship policy. The project gives you an RPC URL that the SDKs use to talk to ZeroDev's bundler and paymaster.
This page covers ZeroDev's hosted AA infra, but you can use ZeroDev with [any AA infra provider](/api-and-toolings/infrastructure/intro).
### Create a ZeroDev project
Go to the [ZeroDev dashboard](https://dashboard.zerodev.app/) and create a project for the network you want to build on (Sepolia is a common starting point).
### Set up a gas policy
To sponsor user operations, you need a gas-sponsorship policy on the project.
Go to the `Gas Policies` section of your dashboard, select the network you created the project on, and toggle `Sponsor all transactions`.
### Copy your RPC URL
From the project home page, copy the RPC URL — you'll pass it to the SDK when constructing clients (typically as a `ZERODEV_RPC` environment variable).
)
}
```
### How it works
1. **Send code**: `useSendOTP` sends a one-time verification code to the provided email address. It returns an `otpId` that identifies this verification attempt.
2. **Verify code**: `useVerifyOTP` takes the `otpId` and the code the user entered. If the code is valid, the SDK authenticates and creates a session.
After verification, the Wagmi connector is connected and the user's address is available via `useAccount`.
## Google OAuth \[Authenticate with Google sign-in]
:::danger[IMPORTANT]
**USE FOR INTERNAL TESTING PURPOSES ONLY.** You may use these features solely for internal evaluation purposes on supported testnets. DO NOT use for production use or share with your users. Wallets created during this preview ("Alpha Wallets") will be discontinued. Any tokens remaining within Alpha Wallets will be permanently lost upon discontinuance. Any mainnet tokens sent to an Alpha Wallet will not be deposited and will be permanently lost when discontinued. We are unable to help recover any lost funds from Alpha Wallets. We provide all previews on an "as is" basis without warranty of any kind, and we may terminate or suspend the availability of any preview at any time.
:::
Google OAuth lets users sign in with their Google account using a popup-based flow. The SDK handles the popup, redirect, and session creation automatically.
By default, the Google OAuth flow uses a Zerodev-managed Google account for authentication. This allows you to get started quickly without any additional configuration. You can customize the OAuth flow by providing your own Google OAuth client ID and secret in the developer dashboard.
> **Important:** Using custom credentials requires creating a new project with no wallets already created. You cannot switch an existing project from the default Zerodev-managed OAuth setup to a custom client configuration.
### Hook
* [`useAuthenticateOAuth`](/wallets/hooks/use-authenticate-oauth) — Trigger the OAuth flow
### Example
```tsx
import { useAccount, useDisconnect } from 'wagmi'
import {
useAuthenticateOAuth,
OAUTH_PROVIDERS,
} from '@zerodev/wallet-react'
function GoogleAuth() {
const { address, isConnected } = useAccount()
const { disconnectAsync } = useDisconnect()
const authenticateOAuth = useAuthenticateOAuth()
if (isConnected) {
return (
Connected: {address}
)
}
return (
{authenticateOAuth.isError && (
Error: {authenticateOAuth.error.message}
)}
)
}
```
### How it works
1. **Open popup**: `useAuthenticateOAuth` opens a popup window to the KMS backend's OAuth endpoint.
2. **Google sign-in**: The backend initiates the Google OAuth flow with PKCE. The user signs in with their Google account.
3. **Backend callback**: Google redirects back to the backend, which exchanges the auth code for tokens and sets a session cookie.
4. **Popup redirect**: The backend redirects the popup to your app with `?oauth_success=true`.
5. **Auto-detect**: The SDK detects the success parameter. If running in a popup, it sends a `postMessage` to the opener window and closes. The main window then calls the backend's auth endpoint (reading the session cookie) to get a session.
After the flow completes, the Wagmi connector is connected and the user's address is available via `useAccount`.
## Magic Link Authentication \[Authenticate with a link sent by email]
:::danger[IMPORTANT]
**USE FOR INTERNAL TESTING PURPOSES ONLY.** You may use these features solely for internal evaluation purposes on supported testnets. DO NOT use for production use or share with your users. Wallets created during this preview ("Alpha Wallets") will be discontinued. Any tokens remaining within Alpha Wallets will be permanently lost upon discontinuance. Any mainnet tokens sent to an Alpha Wallet will not be deposited and will be permanently lost when discontinued. We are unable to help recover any lost funds from Alpha Wallets. We provide all previews on an "as is" basis without warranty of any kind, and we may terminate or suspend the availability of any preview at any time.
:::
Magic links let users authenticate by clicking a link in their email. The link redirects to your app where the SDK completes the verification.
### Hooks
* [`useSendMagicLink`](/wallets/hooks/use-send-magic-link) — Send a magic link to an email address
* [`useVerifyMagicLink`](/wallets/hooks/use-verify-magic-link) — Verify the magic link and authenticate
### Example
#### Login page — send the magic link
```tsx
import { useState } from 'react'
import { useSendMagicLink } from '@zerodev/wallet-react'
function MagicLinkLogin() {
const [email, setEmail] = useState('')
const sendMagicLink = useSendMagicLink()
return (
)
}
```
#### Verify page — handle the redirect
When the user clicks the magic link, they're redirected to your `redirectURL` with query parameters. The verify page reads these and completes authentication:
```tsx
import { useEffect } from 'react'
import { useSearchParams } from 'next/navigation'
import { useAccount } from 'wagmi'
import { useVerifyMagicLink } from '@zerodev/wallet-react'
function VerifyMagicLink() {
const searchParams = useSearchParams()
const { isConnected, address } = useAccount()
const verifyMagicLink = useVerifyMagicLink()
useEffect(() => {
const code = searchParams.get('code')
const otpId = sessionStorage.getItem('magicLinkOtpId')
if (code && otpId && !isConnected) {
verifyMagicLink.mutateAsync({ otpId, code })
}
}, [searchParams])
if (isConnected) {
return
Connected: {address}
}
if (verifyMagicLink.isPending) {
return
Verifying...
}
if (verifyMagicLink.isError) {
return
Error: {verifyMagicLink.error.message}
}
return
Waiting for verification...
}
```
### How it works
1. **Send link**: `useSendMagicLink` sends an email with a magic link pointing to your `redirectURL`. It returns an `otpId` that you need for verification.
2. **User clicks link**: The user clicks the link in their email, which redirects them to your app with a `code` query parameter.
3. **Verify**: Your verify page calls `useVerifyMagicLink` with the `otpId` and `code`. If valid, the SDK authenticates and creates a session.
After verification, the Wagmi connector is connected and the user's address is available via `useAccount`.
## Passkey Authentication \[Register and login with WebAuthn passkeys]
:::danger[IMPORTANT]
**USE FOR INTERNAL TESTING PURPOSES ONLY.** You may use these features solely for internal evaluation purposes on supported testnets. DO NOT use for production use or share with your users. Wallets created during this preview ("Alpha Wallets") will be discontinued. Any tokens remaining within Alpha Wallets will be permanently lost upon discontinuance. Any mainnet tokens sent to an Alpha Wallet will not be deposited and will be permanently lost when discontinued. We are unable to help recover any lost funds from Alpha Wallets. We provide all previews on an "as is" basis without warranty of any kind, and we may terminate or suspend the availability of any preview at any time.
:::
Passkeys use the [WebAuthn](https://webauthn.guide/) standard for passwordless authentication. Users authenticate with biometrics (Face ID, Touch ID, fingerprint) or a hardware security key.
### Configure RP ID (optional)
Set `rpId` on the connector if you need a custom [relying party identifier](https://www.w3.org/TR/webauthn-2/#relying-party-identifier) (defaults to the current hostname):
```ts
zeroDevWallet({
projectId: process.env.NEXT_PUBLIC_ZERODEV_PROJECT_ID!,
chains: [sepolia],
rpId: "example.com",
});
```
### Hooks
* [`useRegisterPasskey`](/wallets/hooks/use-register-passkey) — Create a new wallet with a passkey
* [`useLoginPasskey`](/wallets/hooks/use-login-passkey) — Sign in to an existing wallet
### Example
```tsx
import { useAccount, useDisconnect } from 'wagmi'
import { useRegisterPasskey, useLoginPasskey } from '@zerodev/wallet-react'
function PasskeyAuth() {
const { address, isConnected } = useAccount()
const { disconnectAsync } = useDisconnect()
const registerPasskey = useRegisterPasskey()
const loginPasskey = useLoginPasskey()
if (isConnected) {
return (
)
}
```
### How it works
1. **Register**: `useRegisterPasskey` triggers the browser's WebAuthn prompt. The user creates a passkey stored on their device. A new wallet is created and linked to the passkey.
2. **Login**: `useLoginPasskey` triggers the WebAuthn prompt. The user selects their existing passkey. The SDK authenticates and creates a session.
After either flow, the Wagmi connector is connected and the user's address is available via `useAccount`.
### Notes
* No email is required for passkey auth — the passkey itself is the credential
* Passkeys are supported in all major browsers (Chrome, Safari, Firefox, Edge)
* Passkeys can sync across devices via iCloud Keychain, Google Password Manager, etc.
#### error
`Error | null`
The error object for the mutation, if an error was encountered.
#### isError / isIdle / isPending / isSuccess
`boolean`
Boolean variables derived from [`status`](#status).
#### isPaused
`boolean`
* will be `true` if the mutation has been `paused`.
* see [Network Mode](https://tanstack.com/query/v5/docs/react/guides/network-mode) for more information.
#### status
`'idle' | 'pending' | 'error' | 'success'`
* `'idle'` initial status prior to the mutation function executing.
* `'pending'` if the mutation is currently executing.
* `'error'` if the last mutation attempt resulted in an error.
* `'success'` if the last mutation attempt was successful.
#### reset
`() => void`
A function to clean the mutation internal state (e.g. it resets the mutation to its initial state).
#### error
`Error | null`
* The error object for the query, if an error was thrown.
* Defaults to `null`
#### isError / isPending / isSuccess
`boolean`
Boolean variables derived from [`status`](#status).
#### isFetched
`boolean`
Will be `true` if the query has been fetched.
#### isLoading
`boolean`
* Is `true` whenever the first fetch for a query is in-flight
* Is the same as `isFetching && isPending`
#### status
`'error' | 'pending' | 'success'`
* `pending` if there's no cached data and no query attempt was finished yet.
* `error` if the query attempt resulted in an error. The corresponding `error` property has the error received from the attempted fetch
* `success` if the query has received a response with no errors and is ready to display its data. The corresponding `data` property on the query is the data received from the successful fetch or if the query's `enabled` property is set to `false` and has not been fetched yet `data` is the first `initialData` supplied to the query on initialization.
#### refetch
`(options: { cancelRefetch?: boolean | undefined; throwOnError?: boolean | undefined }) => Promise`
* A function to manually refetch the query.
* `throwOnError`
* When set to `true`, an error will be thrown if the query fails.
* When set to `false`, an error will be logged if the query fails.
* `cancelRefetch`
* When set to `true`, a currently running request will be cancelled before a new request is made.
* When set to `false`, no refetch will be made if there is already a request running.
* Defaults to `true`
import MutationResult from '../shared/mutation-result.mdx'
## useAuthenticateOAuth \[Hook for authenticating with an OAuth provider]
:::danger[IMPORTANT]
**USE FOR INTERNAL TESTING PURPOSES ONLY.** You may use these features solely for internal evaluation purposes on supported testnets. DO NOT use for production use or share with your users. Wallets created during this preview ("Alpha Wallets") will be discontinued. Any tokens remaining within Alpha Wallets will be permanently lost upon discontinuance. Any mainnet tokens sent to an Alpha Wallet will not be deposited and will be permanently lost when discontinued. We are unable to help recover any lost funds from Alpha Wallets. We provide all previews on an "as is" basis without warranty of any kind, and we may terminate or suspend the availability of any preview at any time.
:::
### Import
```tsx
import { useAuthenticateOAuth, OAUTH_PROVIDERS } from '@zerodev/wallet-react'
```
### Usage
```tsx
import {
useAuthenticateOAuth,
OAUTH_PROVIDERS,
} from '@zerodev/wallet-react'
import { useAccount } from 'wagmi'
function OAuthLogin() {
const authenticateOAuth = useAuthenticateOAuth()
const { address, isConnected } = useAccount()
if (isConnected) {
return
Logged in: {address}
}
return (
)
}
```
### Parameters
#### provider
`OAuthProvider`
**Required.** The OAuth provider to authenticate with. Use the `OAUTH_PROVIDERS` constant:
* `OAUTH_PROVIDERS.GOOGLE` — Google OAuth
### Return Types
[TanStack Query mutation docs](https://tanstack.com/query/v5/docs/react/reference/useMutation)
#### mutate
`(variables: { provider: OAuthProvider }) => void`
The mutation function to start the OAuth flow. Opens a popup window for the user to sign in.
#### mutateAsync
`(variables: { provider: OAuthProvider }) => Promise`
Similar to [`mutate`](#mutate) but returns a promise. Resolves when the OAuth flow completes and the wallet is connected.
#### data
`void`
This mutation does not return data. On success, the Wagmi connector is connected and the account is available via `useAccount`.
import MutationResult from '../shared/mutation-result.mdx'
## useExportPrivateKey \[Hook for exporting a private key]
:::danger[IMPORTANT]
**USE FOR INTERNAL TESTING PURPOSES ONLY.** You may use these features solely for internal evaluation purposes on supported testnets. DO NOT use for production use or share with your users. Wallets created during this preview ("Alpha Wallets") will be discontinued. Any tokens remaining within Alpha Wallets will be permanently lost upon discontinuance. Any mainnet tokens sent to an Alpha Wallet will not be deposited and will be permanently lost when discontinued. We are unable to help recover any lost funds from Alpha Wallets. We provide all previews on an "as is" basis without warranty of any kind, and we may terminate or suspend the availability of any preview at any time.
:::
### Import
```tsx
import { useExportPrivateKey } from '@zerodev/wallet-react'
```
### Usage
```tsx
import { useExportPrivateKey } from '@zerodev/wallet-react'
function ExportKey() {
const exportPrivateKey = useExportPrivateKey()
return (
)
}
```
### Parameters
#### iframeContainerId
`string`
**Required.** The `id` of the DOM element where the secure export iframe will be rendered. The private key is displayed inside this iframe.
#### iframeStyles
`Record | undefined`
Optional CSS styles to apply to the export iframe element.
#### address
`string | undefined`
The address of the account to export the private key for. If omitted, uses the currently active account.
#### keyFormat
`'Hexadecimal' | 'Solana' | undefined`
The format for the exported private key.
* `'Hexadecimal'` — Standard hex-encoded private key (default)
* `'Solana'` — Solana-compatible key format
#### connector
`Connector | undefined`
The Wagmi connector to export the key for. If omitted, uses the currently active connector.
### Return Types
[TanStack Query mutation docs](https://tanstack.com/query/v5/docs/react/reference/useMutation)
#### mutate
`(variables: { iframeContainerId: string; iframeStyles?: Record; address?: string; keyFormat?: 'Hexadecimal' | 'Solana'; connector?: Connector }) => void`
The mutation function to initiate the private key export. Renders a secure iframe containing the private key in the specified container.
#### mutateAsync
`(variables: { iframeContainerId: string; iframeStyles?: Record; address?: string; keyFormat?: 'Hexadecimal' | 'Solana'; connector?: Connector }) => Promise`
Similar to [`mutate`](#mutate) but returns a promise. Resolves when the export iframe is rendered.
#### data
`void`
This mutation does not return data. The private key is displayed inside the secure iframe.
import MutationResult from '../shared/mutation-result.mdx'
## useExportWallet \[Hook for exporting the wallet seed phrase]
:::danger[IMPORTANT]
**USE FOR INTERNAL TESTING PURPOSES ONLY.** You may use these features solely for internal evaluation purposes on supported testnets. DO NOT use for production use or share with your users. Wallets created during this preview ("Alpha Wallets") will be discontinued. Any tokens remaining within Alpha Wallets will be permanently lost upon discontinuance. Any mainnet tokens sent to an Alpha Wallet will not be deposited and will be permanently lost when discontinued. We are unable to help recover any lost funds from Alpha Wallets. We provide all previews on an "as is" basis without warranty of any kind, and we may terminate or suspend the availability of any preview at any time.
:::
### Import
```tsx
import { useExportWallet } from '@zerodev/wallet-react'
```
### Usage
```tsx
import { useExportWallet } from '@zerodev/wallet-react'
function ExportSeedPhrase() {
const exportWallet = useExportWallet()
return (
)
}
```
### Parameters
#### iframeContainerId
`string`
**Required.** The `id` of the DOM element where the secure export iframe will be rendered. The seed phrase is displayed inside this iframe.
#### iframeStyles
`Record | undefined`
Optional CSS styles to apply to the export iframe element. Accepts a dictionary of CSS property names to values.
#### connector
`Connector | undefined`
The Wagmi connector to export the wallet for. If omitted, uses the currently active connector.
### Return Types
[TanStack Query mutation docs](https://tanstack.com/query/v5/docs/react/reference/useMutation)
#### mutate
`(variables: { iframeContainerId: string; iframeStyles?: Record; connector?: Connector }) => void`
The mutation function to initiate the wallet export. Renders a secure iframe containing the seed phrase in the specified container.
#### mutateAsync
`(variables: { iframeContainerId: string; iframeStyles?: Record; connector?: Connector }) => Promise`
Similar to [`mutate`](#mutate) but returns a promise. Resolves when the export iframe is rendered.
#### data
`void`
This mutation does not return data. The seed phrase is displayed inside the secure iframe.
import QueryResult from '../shared/query-result.mdx'
## useGetUserEmail \[Hook for getting the authenticated user's email]
:::danger[IMPORTANT]
**USE FOR INTERNAL TESTING PURPOSES ONLY.** You may use these features solely for internal evaluation purposes on supported testnets. DO NOT use for production use or share with your users. Wallets created during this preview ("Alpha Wallets") will be discontinued. Any tokens remaining within Alpha Wallets will be permanently lost upon discontinuance. Any mainnet tokens sent to an Alpha Wallet will not be deposited and will be permanently lost when discontinued. We are unable to help recover any lost funds from Alpha Wallets. We provide all previews on an "as is" basis without warranty of any kind, and we may terminate or suspend the availability of any preview at any time.
:::
### Import
```tsx
import { useGetUserEmail } from '@zerodev/wallet-react'
```
### Usage
```tsx
import { useGetUserEmail } from '@zerodev/wallet-react'
import { useAccount } from 'wagmi'
function UserProfile() {
const { isConnected } = useAccount()
const { data: userEmail, isLoading } = useGetUserEmail({})
if (!isConnected) return null
if (isLoading) return
Loading email...
return
Email: {userEmail?.email ?? 'Not available'}
}
```
### Parameters
```tsx
import { type UseGetUserEmailParameters } from '@zerodev/wallet-react'
```
This hook takes an empty object `{}` as its argument. No additional parameters are required.
### Return Types
#### data
`{ email: string } | undefined`
* Defaults to `undefined`
* The authenticated user's email address, if available.
##### email
`string`
The user's email address. This is available when the user authenticated with Email OTP, Magic Link, or Google OAuth. It may not be available for passkey-only authentication.
import MutationResult from '../shared/mutation-result.mdx'
## useLoginPasskey \[Hook for logging in with an existing passkey]
:::danger[IMPORTANT]
**USE FOR INTERNAL TESTING PURPOSES ONLY.** You may use these features solely for internal evaluation purposes on supported testnets. DO NOT use for production use or share with your users. Wallets created during this preview ("Alpha Wallets") will be discontinued. Any tokens remaining within Alpha Wallets will be permanently lost upon discontinuance. Any mainnet tokens sent to an Alpha Wallet will not be deposited and will be permanently lost when discontinued. We are unable to help recover any lost funds from Alpha Wallets. We provide all previews on an "as is" basis without warranty of any kind, and we may terminate or suspend the availability of any preview at any time.
:::
### Import
```tsx
import { useLoginPasskey } from '@zerodev/wallet-react'
```
### Usage
```tsx
import { useLoginPasskey } from '@zerodev/wallet-react'
import { useAccount } from 'wagmi'
function Login() {
const loginPasskey = useLoginPasskey()
const { address, isConnected } = useAccount()
if (isConnected) {
return
Logged in: {address}
}
return (
)
}
```
### Parameters
This hook takes no mutation variables. It triggers the browser's WebAuthn prompt to authenticate with an existing passkey.
### Return Types
[TanStack Query mutation docs](https://tanstack.com/query/v5/docs/react/reference/useMutation)
#### mutate
`() => void`
The mutation function to log in with a passkey. Triggers the WebAuthn browser prompt.
#### mutateAsync
`() => Promise`
Similar to [`mutate`](#mutate) but returns a promise. Resolves when the passkey is verified and the wallet is connected.
#### data
`void`
This mutation does not return data. On success, the Wagmi connector is connected and the account is available via `useAccount`.
import MutationResult from '../shared/mutation-result.mdx'
## useRefreshSession \[Hook for manually refreshing the current session]
:::danger[IMPORTANT]
**USE FOR INTERNAL TESTING PURPOSES ONLY.** You may use these features solely for internal evaluation purposes on supported testnets. DO NOT use for production use or share with your users. Wallets created during this preview ("Alpha Wallets") will be discontinued. Any tokens remaining within Alpha Wallets will be permanently lost upon discontinuance. Any mainnet tokens sent to an Alpha Wallet will not be deposited and will be permanently lost when discontinued. We are unable to help recover any lost funds from Alpha Wallets. We provide all previews on an "as is" basis without warranty of any kind, and we may terminate or suspend the availability of any preview at any time.
:::
### Import
```tsx
import { useRefreshSession } from '@zerodev/wallet-react'
```
### Usage
```tsx
import { useRefreshSession } from '@zerodev/wallet-react'
function SessionControls() {
const refreshSession = useRefreshSession()
return (
)
}
```
### Parameters
This hook takes an empty object `{}` as its mutation variable. An optional `connector` can be provided if you have multiple connectors configured.
#### connector
`Connector | undefined`
The Wagmi connector to refresh the session for. If omitted, uses the currently active connector.
### Return Types
[TanStack Query mutation docs](https://tanstack.com/query/v5/docs/react/reference/useMutation)
#### mutate
`(variables: { connector?: Connector }) => void`
The mutation function to refresh the session.
#### mutateAsync
`(variables: { connector?: Connector }) => Promise`
Similar to [`mutate`](#mutate) but returns a promise. Resolves with the refreshed session data.
#### data
`unknown`
The refreshed session data.
import MutationResult from '../shared/mutation-result.mdx'
## useRegisterPasskey \[Hook for registering a new passkey wallet]
:::danger[IMPORTANT]
**USE FOR INTERNAL TESTING PURPOSES ONLY.** You may use these features solely for internal evaluation purposes on supported testnets. DO NOT use for production use or share with your users. Wallets created during this preview ("Alpha Wallets") will be discontinued. Any tokens remaining within Alpha Wallets will be permanently lost upon discontinuance. Any mainnet tokens sent to an Alpha Wallet will not be deposited and will be permanently lost when discontinued. We are unable to help recover any lost funds from Alpha Wallets. We provide all previews on an "as is" basis without warranty of any kind, and we may terminate or suspend the availability of any preview at any time.
:::
### Import
```tsx
import { useRegisterPasskey } from '@zerodev/wallet-react'
```
### Usage
```tsx
import { useRegisterPasskey } from '@zerodev/wallet-react'
import { useAccount } from 'wagmi'
function Register() {
const registerPasskey = useRegisterPasskey()
const { address, isConnected } = useAccount()
if (isConnected) {
return
Wallet created: {address}
}
return (
)
}
```
### Parameters
This hook takes no mutation variables. It triggers the browser's WebAuthn prompt to create a new passkey.
### Return Types
[TanStack Query mutation docs](https://tanstack.com/query/v5/docs/react/reference/useMutation)
#### mutate
`() => void`
The mutation function to register a passkey. Triggers the WebAuthn browser prompt.
#### mutateAsync
`() => Promise`
Similar to [`mutate`](#mutate) but returns a promise. Resolves when the passkey is registered and the wallet is connected.
#### data
`void`
This mutation does not return data. On success, the Wagmi connector is connected and the account is available via `useAccount`.
import MutationResult from '../shared/mutation-result.mdx'
## useSendMagicLink \[Hook for sending a magic link email]
:::danger[IMPORTANT]
**USE FOR INTERNAL TESTING PURPOSES ONLY.** You may use these features solely for internal evaluation purposes on supported testnets. DO NOT use for production use or share with your users. Wallets created during this preview ("Alpha Wallets") will be discontinued. Any tokens remaining within Alpha Wallets will be permanently lost upon discontinuance. Any mainnet tokens sent to an Alpha Wallet will not be deposited and will be permanently lost when discontinued. We are unable to help recover any lost funds from Alpha Wallets. We provide all previews on an "as is" basis without warranty of any kind, and we may terminate or suspend the availability of any preview at any time.
:::
### Import
```tsx
import { useSendMagicLink } from '@zerodev/wallet-react'
```
### Usage
```tsx
import { useState } from 'react'
import { useSendMagicLink } from '@zerodev/wallet-react'
function SendMagicLink() {
const [email, setEmail] = useState('')
const sendMagicLink = useSendMagicLink()
return (
setEmail(e.target.value)}
placeholder="Enter your email"
/>
{sendMagicLink.isSuccess &&
Check your email!
}
)
}
```
### Parameters
#### email
`string`
**Required.** The email address to send the magic link to.
#### redirectURL
`string`
**Required.** The URL the user will be redirected to after clicking the magic link. This should be a page in your app that calls [`useVerifyMagicLink`](/wallets/hooks/use-verify-magic-link).
#### otpCodeCustomization
`{ length?: 6 | 7 | 8 | 9; alphanumeric?: boolean } | undefined`
Optional customization for the generated verification code.
##### length
`6 | 7 | 8 | 9 | undefined`
The number of characters in the code. Defaults to `6`.
##### alphanumeric
`boolean | undefined`
Whether to use alphanumeric characters instead of digits only. Defaults to `false`.
### Return Types
[TanStack Query mutation docs](https://tanstack.com/query/v5/docs/react/reference/useMutation)
#### mutate
`(variables: { email: string; redirectURL: string }) => void`
The mutation function to send the magic link.
#### mutateAsync
`(variables: { email: string; redirectURL: string }) => Promise<{ otpId: string }>`
Similar to [`mutate`](#mutate) but returns a promise.
#### data
`{ otpId: string } | undefined`
* Defaults to `undefined`
* The data returned from the mutation on success.
##### otpId
`string`
The identifier for this magic link verification. Store this value and pass it to [`useVerifyMagicLink`](/wallets/hooks/use-verify-magic-link) on the redirect page.
import MutationResult from '../shared/mutation-result.mdx'
## useSendOTP \[Hook for sending a one-time verification code]
:::danger[IMPORTANT]
**USE FOR INTERNAL TESTING PURPOSES ONLY.** You may use these features solely for internal evaluation purposes on supported testnets. DO NOT use for production use or share with your users. Wallets created during this preview ("Alpha Wallets") will be discontinued. Any tokens remaining within Alpha Wallets will be permanently lost upon discontinuance. Any mainnet tokens sent to an Alpha Wallet will not be deposited and will be permanently lost when discontinued. We are unable to help recover any lost funds from Alpha Wallets. We provide all previews on an "as is" basis without warranty of any kind, and we may terminate or suspend the availability of any preview at any time.
:::
### Import
```tsx
import { useSendOTP } from '@zerodev/wallet-react'
```
### Usage
```tsx
import { useState } from 'react'
import { useSendOTP } from '@zerodev/wallet-react'
function SendCode() {
const [email, setEmail] = useState('')
const sendOTP = useSendOTP()
return (
setEmail(e.target.value)}
placeholder="Enter your email"
/>
)
}
```
### Parameters
#### email
`string`
**Required.** The email address to send the verification code to.
#### emailCustomization
`{ magicLinkTemplate?: string } | undefined`
Optional email customization options.
##### magicLinkTemplate
`string | undefined`
Custom template for the email content.
#### otpCodeCustomization
`{ length?: 6 | 7 | 8 | 9; alphanumeric?: boolean } | undefined`
Optional customization for the generated OTP code.
##### length
`6 | 7 | 8 | 9 | undefined`
The number of characters in the OTP code. Defaults to `6`.
##### alphanumeric
`boolean | undefined`
Whether to use alphanumeric characters instead of digits only. Defaults to `false`.
### Return Types
[TanStack Query mutation docs](https://tanstack.com/query/v5/docs/react/reference/useMutation)
#### mutate
`(variables: { email: string; emailCustomization?: { magicLinkTemplate?: string } }) => void`
The mutation function to send the OTP.
#### mutateAsync
`(variables: { email: string; emailCustomization?: { magicLinkTemplate?: string } }) => Promise<{ otpId: string }>`
Similar to [`mutate`](#mutate) but returns a promise.
#### data
`{ otpId: string } | undefined`
* Defaults to `undefined`
* The data returned from the mutation on success.
##### otpId
`string`
The identifier for this OTP verification attempt. Pass this to [`useVerifyOTP`](/wallets/hooks/use-verify-otp) to complete authentication.
import MutationResult from '../shared/mutation-result.mdx'
## useVerifyMagicLink \[Hook for verifying a magic link and authenticating]
:::danger[IMPORTANT]
**USE FOR INTERNAL TESTING PURPOSES ONLY.** You may use these features solely for internal evaluation purposes on supported testnets. DO NOT use for production use or share with your users. Wallets created during this preview ("Alpha Wallets") will be discontinued. Any tokens remaining within Alpha Wallets will be permanently lost upon discontinuance. Any mainnet tokens sent to an Alpha Wallet will not be deposited and will be permanently lost when discontinued. We are unable to help recover any lost funds from Alpha Wallets. We provide all previews on an "as is" basis without warranty of any kind, and we may terminate or suspend the availability of any preview at any time.
:::
### Import
```tsx
import { useVerifyMagicLink } from '@zerodev/wallet-react'
```
### Usage
```tsx
import { useEffect } from 'react'
import { useSearchParams } from 'next/navigation'
import { useAccount } from 'wagmi'
import { useVerifyMagicLink } from '@zerodev/wallet-react'
function VerifyPage() {
const searchParams = useSearchParams()
const verifyMagicLink = useVerifyMagicLink()
const { address, isConnected } = useAccount()
useEffect(() => {
const code = searchParams.get('code')
const otpId = sessionStorage.getItem('magicLinkOtpId')
if (code && otpId && !isConnected) {
verifyMagicLink.mutateAsync({ otpId, code })
}
}, [searchParams])
if (isConnected) return
Authenticated: {address}
if (verifyMagicLink.isPending) return
Verifying...
if (verifyMagicLink.isError) return
Error: {verifyMagicLink.error.message}
return
Waiting for verification...
}
```
### Parameters
#### otpId
`string`
**Required.** The OTP identifier returned by [`useSendMagicLink`](/wallets/hooks/use-send-magic-link).
#### code
`string`
**Required.** The verification code from the magic link URL query parameters.
### Return Types
[TanStack Query mutation docs](https://tanstack.com/query/v5/docs/react/reference/useMutation)
#### mutate
`(variables: { otpId: string; code: string }) => void`
The mutation function to verify the magic link.
#### mutateAsync
`(variables: { otpId: string; code: string }) => Promise`
Similar to [`mutate`](#mutate) but returns a promise. Resolves when the magic link is verified and the wallet is connected.
#### data
`void`
This mutation does not return data. On success, the Wagmi connector is connected and the account is available via `useAccount`.
import MutationResult from '../shared/mutation-result.mdx'
## useVerifyOTP \[Hook for verifying a one-time code and authenticating]
:::danger[IMPORTANT]
**USE FOR INTERNAL TESTING PURPOSES ONLY.** You may use these features solely for internal evaluation purposes on supported testnets. DO NOT use for production use or share with your users. Wallets created during this preview ("Alpha Wallets") will be discontinued. Any tokens remaining within Alpha Wallets will be permanently lost upon discontinuance. Any mainnet tokens sent to an Alpha Wallet will not be deposited and will be permanently lost when discontinued. We are unable to help recover any lost funds from Alpha Wallets. We provide all previews on an "as is" basis without warranty of any kind, and we may terminate or suspend the availability of any preview at any time.
:::
### Import
```tsx
import { useVerifyOTP } from '@zerodev/wallet-react'
```
### Usage
```tsx
import { useState } from 'react'
import { useVerifyOTP } from '@zerodev/wallet-react'
import { useAccount } from 'wagmi'
function VerifyCode({ otpId }: { otpId: string }) {
const [code, setCode] = useState('')
const verifyOTP = useVerifyOTP()
const { address, isConnected } = useAccount()
if (isConnected) {
return
)
}
```
### Parameters
#### code
`string`
**Required.** The verification code entered by the user.
#### otpId
`string`
**Required.** The OTP identifier returned by [`useSendOTP`](/wallets/hooks/use-send-otp).
### Return Types
[TanStack Query mutation docs](https://tanstack.com/query/v5/docs/react/reference/useMutation)
#### mutate
`(variables: { code: string; otpId: string }) => void`
The mutation function to verify the OTP.
#### mutateAsync
`(variables: { code: string; otpId: string }) => Promise`
Similar to [`mutate`](#mutate) but returns a promise. Resolves when the code is verified and the wallet is connected.
#### data
`void`
This mutation does not return data. On success, the Wagmi connector is connected and the account is available via `useAccount`.
## Send a Transaction \[Gasless transactions with Wagmi hooks]
:::danger[IMPORTANT]
**USE FOR INTERNAL TESTING PURPOSES ONLY.** You may use these features solely for internal evaluation purposes on supported testnets. DO NOT use for production use or share with your users. Wallets created during this preview ("Alpha Wallets") will be discontinued. Any tokens remaining within Alpha Wallets will be permanently lost upon discontinuance. Any mainnet tokens sent to an Alpha Wallet will not be deposited and will be permanently lost when discontinued. We are unable to help recover any lost funds from Alpha Wallets. We provide all previews on an "as is" basis without warranty of any kind, and we may terminate or suspend the availability of any preview at any time.
:::
Use standard Wagmi hooks to send transactions. The ZeroDev connector turns transactions into user operations (AA transactions) behind the scenes, achieving gas abstraction automatically so long as you have enabled it on the ZeroDev dashboard.
### `useSendTransaction`
```tsx
import { useState } from "react";
import { parseEther } from "viem";
import { useAccount, useSendTransaction } from "wagmi";
export function SendEth() {
const { address, isConnected } = useAccount();
const { sendTransaction, data, isPending } = useSendTransaction();
const [to, setTo] = useState("0x...");
const [amount, setAmount] = useState("0.001");
const handleSend = () => {
if (!isConnected) return;
sendTransaction({
to,
value: parseEther(amount),
});
};
return (
);
}
```
## Sign a Message \[Sign messages with Wagmi hooks]
:::danger[IMPORTANT]
**USE FOR INTERNAL TESTING PURPOSES ONLY.** You may use these features solely for internal evaluation purposes on supported testnets. DO NOT use for production use or share with your users. Wallets created during this preview ("Alpha Wallets") will be discontinued. Any tokens remaining within Alpha Wallets will be permanently lost upon discontinuance. Any mainnet tokens sent to an Alpha Wallet will not be deposited and will be permanently lost when discontinued. We are unable to help recover any lost funds from Alpha Wallets. We provide all previews on an "as is" basis without warranty of any kind, and we may terminate or suspend the availability of any preview at any time.
:::
To sign a message, use Wagmi's `useSignMessage` hook:
```tsx
import { useSignMessage } from "wagmi";
export function SignMessage() {
const { signMessage, data, isPending, error } = useSignMessage();
const handleSign = () =>
signMessage({
message: "Hello from ZeroDev Wallet",
});
return (
{data &&
Signature: {data}
}
{error &&
Signing failed: {error.message}
}
);
}
```
## Sign a Typed Message \[EIP-712 typed data signing]
:::danger[IMPORTANT]
**USE FOR INTERNAL TESTING PURPOSES ONLY.** You may use these features solely for internal evaluation purposes on supported testnets. DO NOT use for production use or share with your users. Wallets created during this preview ("Alpha Wallets") will be discontinued. Any tokens remaining within Alpha Wallets will be permanently lost upon discontinuance. Any mainnet tokens sent to an Alpha Wallet will not be deposited and will be permanently lost when discontinued. We are unable to help recover any lost funds from Alpha Wallets. We provide all previews on an "as is" basis without warranty of any kind, and we may terminate or suspend the availability of any preview at any time.
:::
EIP-712 typed data signing works through Wagmi's `useSignTypedData`.
```tsx
import { useSignTypedData } from "wagmi";
const typedData = {
domain: {
name: "Ether Mail",
version: "1",
chainId: 1,
verifyingContract: "0xCcCCccccCCCCcCCCCCCcCcCccCcCCCcCcccccccC",
},
types: {
Person: [
{ name: "name", type: "string" },
{ name: "wallet", type: "address" },
],
Mail: [
{ name: "from", type: "Person" },
{ name: "to", type: "Person" },
{ name: "contents", type: "string" },
],
},
primaryType: "Mail",
message: {
from: {
name: "Alice",
wallet: "0xCD2a3d9F938E13CD947Ec05AbC7FE734Df8DD826",
},
to: {
name: "Bob",
wallet: "0xbBbBBBBbbBBBbbbBbbBbbbbBBbBbbbbBbBbbBBbB",
},
contents: "Hello, Bob!",
},
} as const;
export function SignTypedData() {
const { signTypedData, data, isPending, error } = useSignTypedData();
const handleSign = () => signTypedData(typedData);
return (
{data &&
Signature: {data}
}
{error &&
Signing failed: {error.message}
}
);
}
```
## Recovery Flow
ZeroDev provides a set of pre-built UIs to quickly integrate account recovery into your project. These are collectively referred to as "recovery flow."
The recovery flow works with Kernel accounts that have set up recovery using the official recovery plugin. There are two ways to set up recovery:
* [Using our pre-built recovery setup UI.](/smart-accounts/account-recovery/flow-setup)
* This is super easy to integrate with.
* [Using ZeroDev.](/smart-accounts/account-recovery/sdk-recovery)
* This is harder to integrate with but allows you to customize your user experience.
In either case, once an account has been set up for recovery, the guardian (which may be the user themselves) can recover the user's account through [the recovery portal](/smart-accounts/account-recovery/portal).
## Recovery Setup
[Follow instructions here to set up the recovery flow.](https://github.com/zerodevapp/recovery-flow)
## Recovery Portal
The recovery portal is a hosted UI where Kernel account owners can recover their accounts, if they have set up recovery.
Note that the recovery portal is just a convenience UI -- it's not essential for executing recovery. That is, even if the portal goes down or ceases to exist, a guardian can always interact with the smart account directly to complete recovery.
[Click here to go to the recovery portal](https://recovery.zerodev.app)
## Recovery
With Kernel's [permissions system](/smart-accounts/permissions/intro), it's possible to set up a guardian (or multiple guardians) for a smart account, so that if the owner loses their key, the guardian(s) can recover the key for the owner.
There are two typical types of recovery:
* **Self-recovery**: your user can set up recovery for their account with another auth factor they own, such as a passkey or another wallet they own.
* **DApp-assisted recovery**: your user might set you (the DApp) as their guardian. When they lose their account, they would contact you and you would recover the account for them.
There are two ways to use recovery: through a pre-built recovery flow or build a totally custom flow using the Kernel recovery plugin.
### Recovery Plugin
:::info
Impatient? Check out [complete examples here](https://github.com/zerodevapp/zerodev-examples/tree/main/guardians/recovery.ts).
:::
Here we go through the process of using the recovery plugin:
#### Setting up the guardian validator
Start by creating a permissions validator. Let's say you want a single key to be your guardian:
```ts
const guardianSigner = privateKeyToAccount(GUARDIAN_KEY)
const guardianValidator = await signerToEcdsaValidator(publicClient, {
signer: guardianSigner,
entryPoint,
kernelVersion
})
```
If you want multiple guardians, set up a [multisig validator](/smart-accounts/use-plugins/multisig) instead.
#### Setting up account with the recovery action
We have deployed a simple recovery executor that can recover any accounts using [the ECDSA validator](/smart-accounts/permissions/signers/ecdsa). You can set it up with the following values:
```ts
import { toFunctionSelector } from "viem"
const recoveryExecutorAddress = '0xe884C2868CC82c16177eC73a93f7D9E6F3A5DC6E'
const recoveryExecutorFunction = 'function doRecovery(address _validator, bytes calldata _data)'
const recoveryExecutorSelector = toFunctionSelector(recoveryExecutorFunction)
```
Then, set up the account with the executor:
```ts
const account = await createKernelAccount(publicClient, {
entryPoint,
kernelVersion,
plugins: {
sudo: sudoValidator,
regular: guardianValidator,
action: {
address: recoveryExecutorAddress,
selector: recoveryExecutorSelector,
},
}
})
```
you only need to set the sudo validator if you are enabling the guardian validator, i.e. that it's the first time you are using the guardian.
#### Executing recovery
After you [construct the account client from the account](/smart-accounts/create-a-smart-account#create-an-account-client), you can execute recovery as such:
```ts
import { encodeFunctionData } from "viem"
import { ECDSA_VALIDATOR_ADDRESS } from "@zerodev/ecdsa-validator"
const userOpHash = await kernelClient.sendUserOperation({
callData: encodeFunctionData({
abi: parseAbi([recoveryExecutorFunction]),
functionName: 'doRecovery',
args: [ECDSA_VALIDATOR_ADDRESS, newSigner.address],
})
})
```
#### Using account with the new owner
After you update the account owner, the account address can no longer by computed from the new owner. Therefore, you should use the `address` option to manually set the account address when you [create the account object](/smart-accounts/create-a-smart-account#create-a-kernel-account). For example:
```ts
const account = await createKernelAccount(publicClient, {
address: "the smart account address",
// ...other options
})
```
## Quickstart -- EIP-7702
[EIP-7702](https://github.com/ethereum/EIPs/blob/master/EIPS/eip-7702.md) is an Ethereum upgrade that allows for attaching a piece of EVM code to a EOA, effectively turning it into a "dual account" that can function simultaneously as a EOA and a smart account. You can learn more about EIP-7702 from our blog series [here](/blog/7702-adoption) and [here](/blog/7702-for-dapps).
In practical terms, this means that EOA users can now enjoy most of the benefits of AA, such as gas sponsorship, transaction batching, session keys, chain abstraction, and more.
In this example, we will upgrade a EOA into a ZeroDev smart account ([Kernel](https://github.com/zerodevapp/kernel)) and send a gasless batched transaction from it.
### Complete example
Here's [the complete code example](https://github.com/zerodevapp/zerodev-examples/blob/main/7702/7702.ts) for you to reference as you follow along.
You can run the example with `npx ts-node 7702/7702.ts` after you [set up the repo](https://github.com/zerodevapp/zerodev-examples?tab=readme-ov-file#zerodev-examples).
### Install packages
You will be using the following packages:
```bash
npm i @zerodev/sdk viem
```
### Create a project for a 7702-compatible network
In this example, we will use the Sepolia testnet, but you can use any 7702-compatible network such as Arbitrum and Base.
* Go to [the ZeroDev dashboard](https://dashboard.zerodev.app) and create a project for `Sepolia`.
* Enable gas sponsorship for Sepolia under `Gas Policies`.
* Create a `.env` file as follows:
```env
ZERODEV_RPC=
```
Use the ZeroDev RPC on your project page from the dashboard.
### Upgrade EOA to smart account
To upgrade a EOA to a smart account, you need to sign an "authorization." You can create this authorization manually and pass it to the ZeroDev SDK, or you can let ZeroDev create this authorization automatically.
#### Automatically create the authorization
Set up a ZeroDev account using the 7702 helper functions:
```ts
import { createKernelAccount, createKernelAccountClient, createZeroDevPaymasterClient } from "@zerodev/sdk";
import { KERNEL_V3_3 } from "@zerodev/sdk/constants";
const kernelVersion = KERNEL_V3_3;
// This is the EOA you want to upgrade
const eip7702Account = privateKeyToAccount(generatePrivateKey());
const publicClient = createPublicClient({
transport: http(),
chain,
});
const account = await createKernelAccount(publicClient, {
eip7702Account,
entryPoint,
kernelVersion
})
const paymasterClient = createZeroDevPaymasterClient({
chain,
transport: http(ZERODEV_RPC),
});
const kernelClient = createKernelAccountClient({
account,
chain,
bundlerTransport: http(ZERODEV_RPC),
paymaster: paymasterClient,
client: publicClient,
userOperation: {
estimateFeesPerGas: async ({ bundlerClient }) => {
return getUserOperationGasPrice(bundlerClient)
}
}
})
```
Note that in this example, `eip7702Account` is the EOA you want to upgrade. We are using a random EOA in this example but you should replace this with the actual EOA.
#### Manually create the authorization
You can create the authorization manually with [Viem's `signAuthorization` function](https://viem.sh/docs/eip7702/signAuthorization), then pass the authorization to the ZeroDev SDK.
When you create the authorization, make sure you are specifying [Kernel](https://github.com/zerodevapp/kernel) as the smart account.
```ts
import { KERNEL_V3_3 } from "@zerodev/sdk/constants";
const authorization = await walletClient.signAuthorization({
account: signer,
contractAddress: KERNEL_V3_3,
})
const account = await createKernelAccount(publicClient, {
eip7702Account: signer,
entryPoint,
kernelVersion,
eip7702Auth: authorization
})
```
### Sending UserOps from the smart account
Once you have upgraded the EOA to a smart account, you can use the ZeroDev SDK as usual. For example, to send a gasless batched UserOp:
```ts
const userOpHash = await kernelClient.sendUserOperation({
callData: await kernelClient.account.encodeCalls([
{
to: zeroAddress,
value: BigInt(0),
data: "0x",
},
{
to: zeroAddress,
value: BigInt(0),
data: "0x",
},
]),
})
await kernelClient.waitForUserOperationReceipt({
hash: userOpHash,
})
console.log("UserOp completed")
```
Congratulations! You just sent your first gasless, batched transaction using a EOA. You can see it by looking up your account on [the Sepolia explorer](https://sepolia.etherscan.io/). Note that you may need to look under "Internal Transactions" because UserOps do not appear as regular transactions.
Easy, right? Now try some of the more advanced [examples](https://7702.zerodev.app/) for building with 7702, or explore the rest of the ZeroDev docs!
## Use Arcana Auth with ZeroDev
[Arcana Auth](https://www.arcana.network/) offers a self-custodial Web3 wallet embedded within applications, utilizing asynchronous distributed key generation algorithms for enhanced security and privacy. This wallet, accessible without the need for a browser extension, allows authenticated users to instantly access and sign blockchain transactions within the app environment.
### Set up
To use Arcana Auth with ZeroDev, first create an application that integrates with Arcana Auth.
* Refer to the [Arcana Auth documentation site](https://docs.arcana.network/) for instructions on setting up an application with the Arcana Auth.
* For a quick start, Arcana Auth provides a web app guide, available [here](https://docs.arcana.network/quick-start/web/).
### Integration
Integrating ZeroDev with Arcana Auth is straightforward after setting up the project. Arcana Auth provides an Externally Owned Account (EOA) wallet to use as a signer with Kernel.
#### Create the authProvider object
After following the Arcana Auth documentation, you will have access to a `authProvider` object as shown below:
```typescript
import {
AuthProvider,
type ConstructorParams,
} from "@arcana/auth";
// Param options here will be specific to your project. See the Arcana Auth docs for more info.
const params: ConstructorParams = {};
const authProvider = new AuthProvider(clientId, params);
```
#### Use with ZeroDev
Use the provider from Arcana to create a smart account signer, which can be passed to a validator. For detailed guidance on using a validator, refer to our documentation on [creating accounts](/smart-accounts/create-a-smart-account#api).
```typescript
import { signerToEcdsaValidator } from "@zerodev/ecdsa-validator"
import { KERNEL_V3_1, getEntryPoint } from "@zerodev/sdk/constants"
import { createPublicClient } from "viem";
const publicClient = createPublicClient({
// Use your own RPC provider (e.g. Infura/Alchemy).
transport: http('https://rpc-amoy.polygon.technology'),
chain
})
// Pass your `authProvider.provider` to the validator
const ecdsaValidator = await signerToEcdsaValidator(publicClient, {
signer: authProvider.provider,
entryPoint: getEntryPoint("0.7"),
kernelVersion: KERNEL_V3_1,
})
// You can now use this ECDSA Validator to create a Kernel account
```
## Use Para with ZeroDev
[Para](https://getpara.com/) offers a signing solution enabling the creation of secure, embedded MPC wallets accessible via email or social login. These wallets, compatible across different applications, offer portability, recoverability, and programmability, eliminating the need for users to establish separate signers or contract accounts for each application.
### Set up
To use Para with ZeroDev, first create an application that integrates with Para.
* Refer to the [Para documentation site](https://docs.getpara.com/) for instructions on setting up an application with the Para.
* For a quick start, Para provides an example hub, available [here](https://docs.getpara.com/getting-started/examples).
### Integration
:::info
Check out [this example](https://github.com/zerodevapp/zerodev-signer-examples/tree/main/capsule) for custom integration with Para.
:::
Integrating ZeroDev with Para is straightforward after setting up the project. Para provides an Externally Owned Account (EOA) wallet to use as a signer with Kernel.
#### Create the Para object
After following the Para documentation, you will have access to a `ParaWeb3Provider` object as shown below:
```typescript
import Para from "@getpara/web-sdk";
// Param options here will be specific to your project. See the Para docs for more info.
const para = new Para(env, apiKey, opts);
```
#### Use with ZeroDev
Use the WalletClient from Para to create a smart account signer, which can be passed to a validator. For detailed guidance on using a validator, refer to our documentation on [creating accounts](/smart-accounts/create-a-smart-account#api).
```typescript
import { signerToEcdsaValidator } from "@zerodev/ecdsa-validator"
import { KERNEL_V3_1, getEntryPoint } from "@zerodev/sdk/constants"
import { createParaViemClient } from '@getpara/web-sdk';
import { polygonAmoy } from 'viem/chains';
import { createPublicClient } from "viem";
// Follow the Para docs for more instructions on creating the Viem client https://docs.getpara.com/alpha/web/guides/evm/viem#viem-integration
const viemClient = createParaViemClient(para, {
chain: polygonAmoy,
transport: http('https://rpc-amoy.polygon.technology'),
});
const publicClient = createPublicClient({
// Use your own RPC provider (e.g. Infura/Alchemy).
transport: http('https://rpc-amoy.polygon.technology'),
chain: polygonAmoy,
})
// Pass your `viemClient` to the validator
const ecdsaValidator = await signerToEcdsaValidator(publicClient, {
signer: viemClient,
entryPoint: getEntryPoint("0.7"),
kernelVersion: KERNEL_V3_1,
})
// You can now use this ECDSA Validator to create a Kernel account
```
## Custom Signer Integration
ZeroDev offers the flexibility to integrate various types of signers, catering to diverse application requirements.
### Using Externally Owned Accounts (EOAs)
Most commonly used signers are Externally Owned Accounts (EOAs). If you're using a signer that falls under this category and isn't explicitly covered in our documentation, we recommend visiting our dedicated [EOA integration section](/smart-accounts/authentication/eoa). This section provides detailed guidance on integrating EOAs with ZeroDev.
### Implementing Custom Signers
If your requirements extend beyond standard EOAs, ZeroDev supports the integration of custom signers. Our signers conform to the `SmartAccountSigner` interface defined in permissionless.js. For developers looking to implement a custom solution, you can reference the `SmartAccountSigner` interface on their [GitHub repository](https://github.com/pimlicolabs/permissionless.js/blob/0b1cf0086b3fa131415a6a9bf398852c159fc181/packages/permissionless/accounts/types.ts#L60). This interface provides the necessary structure and guidelines to ensure compatibility with ZeroDev.
One easy way to implement a `SmartAccountSigner` is to implement Viem's account type, [by following this guide](https://viem.sh/docs/accounts/local/toAccount).
Once you've implemented the signer, you should be able to [use it with a validator](/smart-accounts/create-a-smart-account#creating-a-ecdsa-validator).
## Use Dfns with ZeroDev
[Dfns](https://www.dfns.co/) is an MPC/TSS Wallet-as-a-Service API/SDK provider. Dfns aims to optimize the balance of security and UX by deploying key shares into a decentralized network on the backend while enabling wallet access via biometric open standards on the frontend like Webauthn. Reach out [here](https://www.dfns.co/learn-more) to set up a sandbox environment to get started.
### Set up
To use Dfns with ZeroDev, first create an application that integrates with Dfns.
* Refer to the [Dfns documentation site](https://docs.dfns.co/d/) for instructions on setting up an application with the Dfns.
### Integration
Integrating ZeroDev with Dfns is straightforward after setting up the project. Dfns provides an Externally Owned Account (EOA) wallet to use as a signer with Kernel.
#### Set up Dfns
After following the Dfns documentation, you will have access to a `dfnsWallet` object as shown below:
```typescript
import { DfnsWallet } from "@dfns/lib-viem";
import { DfnsApiClient } from "@dfns/sdk";
import { AsymmetricKeySigner } from "@dfns/sdk-keysigner";
// See the Dfns example https://github.com/dfns/dfns-sdk-ts/tree/m/examples/libs/viem/alchemy-aa-gasless for details on populating the environment variables.
const DFNS_PRIVATE_KEY = null;
const DFNS_CRED_ID = null;
const DFNS_APP_ORIGIN = null;
const DFNS_APP_ID = null;
const DFNS_AUTH_TOKEN = null;
const DFNS_API_URL = null;
const AMOY_WALLET_ID = null;
const initDfnsWallet = (walletId: string) => {
const signer = new AsymmetricKeySigner({
privateKey: DFNS_PRIVATE_KEY!,
credId: DFNS_CRED_ID!,
appOrigin: DFNS_APP_ORIGIN!,
});
const dfnsClient = new DfnsApiClient({
appId: DFNS_APP_ID!,
authToken: DFNS_AUTH_TOKEN!,
baseUrl: DFNS_API_URL!,
signer,
});
return DfnsWallet.init({
walletId,
dfnsClient,
maxRetries: 10,
});
};
```
#### Use with ZeroDev
Use the WalletClient from Dfns to create a smart account signer, which can be passed to a validator. For detailed guidance on using a validator, refer to our documentation on [creating accounts](/smart-accounts/create-a-smart-account#api).
```typescript
import { signerToEcdsaValidator } from "@zerodev/ecdsa-validator"
import { KERNEL_V3_1, getEntryPoint } from "@zerodev/sdk/constants"
import { toAccount } from 'viem/accounts';
import { createWalletClient, createPublicClient } from 'viem';
import { polygonAmoy } from 'viem/chains';
// Convert the dfns wallet to a SmartAccountSigner
const amoyWallet = await initDfnsWallet(AMOY_WALLET_ID!);
const account = toAccount(amoyWallet)
const walletClient = createWalletClient({
account,
transport: http('https://rpc-amoy.polygon.technology'),
})
const publicClient = createPublicClient({
// Use your own RPC provider (e.g. Infura/Alchemy).
transport: http('https://rpc-amoy.polygon.technology'),
chain: polygonAmoy,
})
// Pass your `walletClient` to the validator
const ecdsaValidator = await signerToEcdsaValidator(publicClient, {
signer: walletClient,
entryPoint: getEntryPoint("0.7"),
kernelVersion: KERNEL_V3_1
})
// You can now use this ECDSA Validator to create a Kernel account
```
## Use Dynamic with ZeroDev
[Dynamic](https://www.dynamic.xyz/) is a platform that offers Web3 login solutions designed for easy integration and user-friendly experiences. It features [passkey embedded wallets](https://www.dynamic.xyz/features/embedded-wallets), crypto-native login, and profile and multi-wallet management. Additionally, the platform provides tools for authorization, orchestration, and more, aiming to streamline wallet-based authentication and identity management. Dynamic is built to cater to both casual users and crypto-savvy individuals, emphasizing non-custodial, passwordless, and flexible login options.
### Set up
To use Dynamic with ZeroDev, you have two options: Dynamic's native integration that utilizes ZeroDev, or a custom integration using Dynamic's Externally Owned Account (EOA) as a signer. Choose the approach that best fits your needs.
#### Native Integration
Dynamic natively supports account abstraction using ZeroDev. This integration allows you to sponsor gas fees, bundle transactions, recover and transfer accounts, utilize session keys.
* For more information and how to get started, visit the [Dynamic Account Abstraction documentation](https://docs.dynamic.xyz/smart-wallets/smart-wallet-providers/zerodev).
#### Custom Integration
If you would like to use ZeroDev directly with a Dynamic project, you can set up a custom integration using Dynamics's EOA as a signer.
* Begin by setting up your application with Dynamic, as detailed in the [Dynamic documentation](https://docs.dynamic.xyz/introduction/welcome).
* Dynamic also offers a quick start guide and sample apps, available [here](https://docs.dynamic.xyz/quickstart).
### Implementing Custom Integration
Integrating ZeroDev with Dynamic is straightforward once your application is set up. Dynamic provides an EOA wallet to use as a signer with Kernel.
#### Get the Dynamic wallet's Provider
To begin, ensure your application is integrated with Dynamic. Detailed guidance is available in the [Dynamic documentation](https://docs.dynamic.xyz/).
The following example demonstrates the use of Dynamic's React Core SDK. Ensure your React app is already configured with Dynamic; for setup instructions, refer to the [tutorial](https://docs.dynamic.xyz/react-sdk/tutorial).
```typescript
import { useDynamicContext } from "@dynamic-labs/sdk-react-core";
// Use the `useDynamicContext` hook to get the primary wallet
const { primaryWallet } = useDynamicContext();
// Get the dynamicWalletClient, we will use in the next section
const dynamicWalletClient = await primaryWallet?.connector?.getWalletClient();
```
#### Use with ZeroDev
Use the WalletClient from Dynamic to create a smart account signer, which can be passed to a validator. For detailed guidance on using a validator, refer to our documentation on [creating accounts](/smart-accounts/create-a-smart-account#api).
```typescript
import { signerToEcdsaValidator } from "@zerodev/ecdsa-validator"
import { KERNEL_V3_1, getEntryPoint } from "@zerodev/sdk/constants"
import { createPublicClient } from "viem";
import { polygonAmoy } from 'viem/chains';
const publicClient = createPublicClient({
// Use your own RPC provider (e.g. Infura/Alchemy).
transport: http('https://rpc-amoy.polygon.technology'),
chain: polygonAmoy,
})
// Pass your `smartAccountSigner` to the validator
const ecdsaValidator = await signerToEcdsaValidator(publicClient, {
signer: dynamicWalletClient,
entryPoint: getEntryPoint("0.7"),
kernelVersion: KERNEL_V3_1
})
// You can now use this ECDSA Validator to create a Kernel account
```
### Starter Template
A user has helpfully created a [starter template for Dynamic + ZeroDev](https://github.com/tantodefi/se2-dynamic-zerodev).
## Use an EOA with ZeroDev
An Externally Owned Account (EOA) is a standard Ethereum account operated via a private key. It's commonly used in wallets like MetaMask. ZeroDev is compatible with EOAs as signers, and the method of integrating an EOA varies based on your dApp's connection approach.
### Integration Methods
We'll explore three methods to integrate a signer with ZeroDev: using an EIP-1193 provider, using a viem WalletClient, and employing a Local Account.
#### EIP-1193 Provider Integration
EIP-1193 is a standard interface for Ethereum providers, such as MetaMask or hardware wallets, where the key material is hosted externally rather than on the local client. ZeroDev supports creating a signer from any provider that implements this interface.
```typescript
import { signerToEcdsaValidator } from "@zerodev/ecdsa-validator"
import { KERNEL_V3_1, getEntryPoint } from "@zerodev/sdk/constants"
import { createPublicClient } from "viem";
import { polygonAmoy } from 'viem/chains';
const publicClient = createPublicClient({
// Use your own RPC provider (e.g. Infura/Alchemy).
transport: http('https://rpc-amoy.polygon.technology'),
chain: polygonAmoy,
})
// Pass your `window.ethereum` to the validator
const ecdsaValidator = await signerToEcdsaValidator(publicClient, {
signer: window.ethereum,
entryPoint: getEntryPoint("0.7"),
kernelVersion: KERNEL_V3_1
})
// You can now use this ECDSA Validator to create a Kernel account
```
#### Viem Wallet Client Integration
A [Wallet Client](https://viem.sh/docs/clients/wallet.html) is an interface to interact with Ethereum Account(s) and provides the ability to retrieve accounts, execute transactions, sign messages, etc through Wallet Actions.
In this example, we assume that you have access to a WalletClient object.
```typescript
import { signerToEcdsaValidator } from "@zerodev/ecdsa-validator"
import { KERNEL_V3_1, getEntryPoint } from "@zerodev/sdk/constants"
const publicClient = createPublicClient({
// Use your own RPC provider (e.g. Infura/Alchemy).
transport: http('https://rpc-amoy.polygon.technology'),
chain
})
// Pass your `walletClient` to the validator
const ecdsaValidator = await signerToEcdsaValidator(publicClient, {
signer: walletClient,
entryPoint: getEntryPoint("0.7"),
kernelVersion: KERNEL_V3_1
})
// You can now use this ECDSA Validator to create a Kernel account
```
#### Local Account
A Local Account refers to an EOA where the private key is directly accessible on the client. In this example we assume you have access to the private key locally.
```typescript
import { signerToEcdsaValidator } from "@zerodev/ecdsa-validator"
import { KERNEL_V3_1, getEntryPoint } from "@zerodev/sdk/constants"
import { privateKeyToAccount } from "viem/accounts"
import { Hex } from "viem"
// Create a signer
const smartAccountSigner = privateKeyToAccount(process.env.PRIVATE_KEY as Hex)
const publicClient = createPublicClient({
transport: http('https://rpc-amoy.polygon.technology'),
chain
})
// Pass your `smartAccountSigner` to the validator
const ecdsaValidator = await signerToEcdsaValidator(publicClient, {
signer: smartAccountSigner,
entryPoint: getEntryPoint("0.7"),
kernelVersion: KERNEL_V3_1
})
// You can now use this ECDSA Validator to create a Kernel account
```
## Use Fireblocks with ZeroDev
[Fireblocks](https://www.fireblocks.com/) is a user-friendly platform designed for building blockchain-based products and managing digital asset operations. It uses a direct custody approach, combining high performance with zero counterparty risk and multi-layered security. The platform includes secure MPC-based digital asset wallets, a policy engine for governance and transaction rules, and comprehensive treasury management. Fireblocks' security framework features multiple layers, including MPC-CMP technology, secure enclaves, and a robust policy engine, ensuring protection against cyberattacks, internal threats, and human errors. It's widely used for various operations like treasury, trading, and managing NFTs, smart contracts, and user wallets.
### Set up
To use Fireblocks with ZeroDev, first create an application that integrates with Fireblocks.
* Refer to the [Fireblocks documentation site](https://developers.fireblocks.com/) for instructions on setting up an application with the Fireblocks.
* For a quick start, Fireblocks provides a guide, available [here](https://developers.fireblocks.com/docs/quickstart).
### Integration
Integrating ZeroDev with Fireblocks is straightforward after setting up the project. Fireblocks provides an Externally Owned Account (EOA) wallet to use as a signer with Kernel.
#### Create the Fireblocks object
After following the Fireblocks documentation, you will have access to a `FireblocksWeb3Provider` object as shown below:
```typescript
import { FireblocksWeb3Provider, type FireblocksProviderConfig } from "@fireblocks/fireblocks-web3-provider";
// Config options here will be specific to your project. See the Fireblocks docs for more info.
const fireblocksProviderConfig: FireblocksProviderConfig = { ... };
const fireblocksWeb3Provider = new FireblocksWeb3Provider(fireblocksProviderConfig);
```
#### Use with ZeroDev
Use the provider from Fireblocks to create a smart account signer, which can be passed to a validator. For detailed guidance on using a validator, refer to our documentation on [creating accounts](/smart-accounts/create-a-smart-account#api).
```typescript
import { signerToEcdsaValidator } from "@zerodev/ecdsa-validator"
import { KERNEL_V3_1, getEntryPoint } from "@zerodev/sdk/constants"
import { createPublicClient } from "viem";
import { polygonAmoy } from 'viem/chains';
const publicClient = createPublicClient({
// Use your own RPC provider (e.g. Infura/Alchemy).
transport: http('https://rpc-amoy.polygon.technology'),
chain: polygonAmoy,
})
// Pass your `smartAccountSigner` to the validator
const ecdsaValidator = await signerToEcdsaValidator(publicClient, {
signer: fireblocksWeb3Provider,
entryPoint: getEntryPoint("0.7"),
kernelVersion: KERNEL_V3_1
})
// You can now use this ECDSA Validator to create a Kernel account
```
## Use Lit Protocol with ZeroDev
[Lit Protocol](https://www.litprotocol.com/) is distributed cryptography for signing, encryption, and compute. A generalizable key management network, Lit provides you with a set of tools for managing sovereign identities on the open Web.
### Set up
To use Lit with ZeroDev, first create an application that integrates with Lit.
* Refer to the [Lit documentation site](https://developer.litprotocol.com/v3/) for instructions on setting up an application with the Lit.
* For a quick start, Lit provides examples, available [here](https://docs.Lit.com/getting-started/examples).
### Integration
Integrating ZeroDev with Lit is straightforward after setting up the project. Lit provides an Externally Owned Account (EOA) wallet to use as a signer with Kernel.
#### Create the pkpWallet
After following the Lit documentation, you will have access to a `pkpWallet`. An example is shown below:
```typescript
import { LitAbility, LitActionResource } from "@lit-protocol/auth-helpers";
import { LitNodeClient } from "@lit-protocol/lit-node-client";
import { PKPEthersWallet } from "@lit-protocol/pkp-ethers";
import { AuthCallbackParams } from "@lit-protocol/types";
const POLYGON_MUMBAI_RPC_URL = "";
const PKP_PUBLIC_KEY = "";
const litNodeClient = new LitNodeClient({
litNetwork: "cayenne",
debug: false,
});
await litNodeClient.connect();
const resourceAbilities = [
{
resource: new LitActionResource("*"),
ability: LitAbility.PKPSigning,
},
];
/**
* For provisioning keys and setting up authentication methods see documentation below
* https://developer.litprotocol.com/v2/pkp/minting
*/
const authNeededCallback = async (params: AuthCallbackParams) => {
const response = await litNodeClient.signSessionKey({
sessionKey: params.sessionKeyPair,
statement: params.statement,
authMethods: [],
pkpPublicKey: PKP_PUBLIC_KEY,
expiration: params.expiration,
resources: params.resources,
chainId: 1,
});
return response.authSig;
};
const sessionSigs = await litNodeClient
.getSessionSigs({
chain: "ethereum",
expiration: new Date(Date.now() + 1000 * 60 * 60 * 24 * 7).toISOString(),
resourceAbilityRequests: resourceAbilities,
authNeededCallback,
})
.catch((err) => {
console.log("error while attempting to access session signatures: ", err);
throw err;
});
const pkpWallet = new PKPEthersWallet({
pkpPubKey: PKP_PUBLIC_KEY,
rpc: POLYGON_MUMBAI_RPC_URL,
controllerSessionSigs: sessionSigs,
});
```
#### Use with ZeroDev
Use the provider from Lit Protocol to create a smart account signer, which can be passed to a validator. For detailed guidance on using a validator, refer to our documentation on [creating accounts](/smart-accounts/create-a-smart-account#api).
```typescript
import { signerToEcdsaValidator } from "@zerodev/ecdsa-validator"
import { KERNEL_V3_1, getEntryPoint } from "@zerodev/sdk/constants"
import { createPublicClient } from "viem";
import { polygonAmoy } from 'viem/chains';
const smartAccountSigner = await providerToSmartAccountSigner(pkpWallet);
const publicClient = createPublicClient({
// Use your own RPC provider (e.g. Infura/Alchemy).
transport: http('https://rpc-amoy.polygon.technology'),
chain: polygonAmoy,
})
// Pass your `pkpWallet` to the validator
const ecdsaValidator = await signerToEcdsaValidator(publicClient, {
signer: pkpWallet,
entryPoint: getEntryPoint("0.7"),
kernelVersion: KERNEL_V3_1
})
// You can now use this ECDSA Validator to create a Kernel account
```
## Use Magic with ZeroDev
[Magic](https://magic.link/) is a popular embedded wallet provider that supports social logins. While social logins are great, your users still need to onramp in order to pay for gas, which introduces significant friction.
By combining ZeroDev with Magic, you can use Magic to enable a smooth social login experience, while using ZeroDev as the smart wallet to sponsor gas for users, batch transactions, and more.
You can check out Magic's [official ZeroDev guide](https://magic.link/docs/wallets/integrations/zerodev-account-abstraction), or keep reading our guide.
### Set up
To use Magic with ZeroDev, first create an application that integrates with Magic.
* Refer to the [Magic documentation site](https://magic.link/docs/home/welcome) for instructions on setting up an application with the Magic SDK.
* For a quick start, Magic provides a CLI to create a starter project, available [here](https://magic.link/docs/home/quickstart/cli).
### Integration
:::info
Check out [this example](https://github.com/zerodevapp/zerodev-signer-examples/tree/main/magic) for custom integration with Magic.
:::
Integrating ZeroDev with Magic is straightforward after setting up the Magic SDK. Magic provides an Externally Owned Account (EOA) wallet to use as a signer with Kernel.
#### Create the Magic object
After following the Magic documentation, you will have access to a MagicBase object as shown below:
```typescript
import { Magic as MagicBase } from 'magic-sdk';
const magic = new MagicBase(process.env.MAGIC_API_KEY as string, {
network: {
rpcUrl: getNetworkUrl(),
chainId: getChainId(),
},
extensions: [new AuthExtension(), new OAuthExtension()],
});
```
#### Use with ZeroDev
Use the provider from Magic to create a smart account signer, which can be passed to a validator. For detailed guidance on using a validator, refer to our documentation on [creating accounts](/smart-accounts/create-a-smart-account#api).
```typescript
import { signerToEcdsaValidator } from "@zerodev/ecdsa-validator"
import { KERNEL_V3_1, getEntryPoint } from "@zerodev/sdk/constants"
import { createPublicClient } from "viem";
import { polygonAmoy } from 'viem/chains';
// Get the Provider from Magic
const magicProvider = await magic.wallet.getProvider();
const publicClient = createPublicClient({
// Use your own RPC provider (e.g. Infura/Alchemy).
transport: http('https://rpc-amoy.polygon.technology'),
chain: polygonAmoy,
})
// Pass your `smartAccountSigner` to the validator
const ecdsaValidator = await signerToEcdsaValidator(publicClient, {
signer: magicProvider,
entryPoint: getEntryPoint("0.7"),
kernelVersion: KERNEL_V3_1
})
// You can now use this ECDSA Validator to create a Kernel account
```
## Use Particle Network with ZeroDev
[Particle Network](https://particle.network/) is an intent-centric, modular wallet-as-a-service (WaaS). By utilizing MPC-TSS for key management, Particle can streamline onboarding via familiar Web2 methods such as Google, emails, and phone numbers.
By combining ZeroDev with Particle, you can use Particle to enable a smooth social login experience, while using ZeroDev as the smart wallet to sponsor gas for users, batch transactions, and more.
### Set up
To use Particle Network with ZeroDev, first create an application that integrates with Particle Network.
* Refer to the [Particle Network documentation site](https://docs.particle.network/) for instructions on setting up an application with the Particle Network.
* For a quick start, Particle Network provides a guide, available [here](https://docs.particle.network/getting-started/get-started).
### Integration
Integrating ZeroDev with Particle Network is straightforward after setting up the project. Particle Network provides an Externally Owned Account (EOA) wallet to use as a signer with Kernel.
#### Create the Particle Network object
After following the Particle Network documentation, you will have access to a `ParticleProvider` object as shown below:
```typescript
import { ParticleNetwork } from "@particle-network/auth";
import { ParticleProvider } from "@particle-network/provider";
// Param options here will be specific to your project. See the Particle docs for more info.
const particle = new ParticleNetwork({
projectId,
clientKey,
appId,
chainName,
chainId,
});
const particleProvider = new ParticleProvider(particle.auth)
```
#### Use with ZeroDev
Use the provider from Particle Network to create a smart account signer, which can be passed to a validator. For detailed guidance on using a validator, refer to our documentation on [creating accounts](/smart-accounts/create-a-smart-account#api).
```typescript
import { signerToEcdsaValidator } from "@zerodev/ecdsa-validator"
import { KERNEL_V3_1, getEntryPoint } from "@zerodev/sdk/constants"
import { createPublicClient } from "viem";
import { polygonAmoy } from 'viem/chains';
const publicClient = createPublicClient({
// Use your own RPC provider (e.g. Infura/Alchemy).
transport: http('https://rpc-amoy.polygon.technology'),
chain: polygonAmoy,
})
// Pass your `particleProvider` to the validator
const ecdsaValidator = await signerToEcdsaValidator(publicClient, {
signer: particleProvider,
entryPoint: getEntryPoint("0.7"),
kernelVersion: KERNEL_V3_1
})
// You can now use this ECDSA Validator to create a Kernel account
```
## Use Portal with ZeroDev
[Portal](https://www.portalhq.io/) is an embedded blockchain infrastructure company that powers companies with an end to end platform for key management for self-custodial wallets (MPC and AA), security firewall, and web3 protocol connect kit.
### Set up
To use Portal with ZeroDev, you have two options: Portal's native integration using ZeroDev, or a custom integration using Portal's Externally Owned Account (EOA) as a signer for ZeroDev. Choose the approach that best fits your needs.
#### Native Integration
Portal natively supports account abstraction using ZeroDev. This integration allows your organization to sponsor gas fees for your clients using specific policies and chains, with additional features coming soon.
* For more information, visit the [Portal Account Abstraction documentation](https://docs.portalhq.io/resources/account-abstraction-alpha)
#### Custom Integration
If you require ZeroDev functionality not yet supported natively by Portal, a custom integration using Portal's EOA as a signer might be preferable.
* Begin by setting up your application with Portal, as detailed in the [Portal documentation](https://docs.portalhq.io/).
* Portal also offers a quick start guide for their web SDK, available [here](https://docs.portalhq.io/sdk/web).
### Implementing Custom Integration
Integrating ZeroDev with Portal is straightforward once your application is set up. Portal provides an EOA wallet to use as a signer with Kernel.
#### Create the Portal object
After following the Portal documentation, you will have access to a `Portal` object as shown below:
```typescript
import Portal, { type PortalOptions } from "@portal-hq/web";
// Config options here will be specific to your project. See the Portal docs for more info.
const portalOptions: PortalOptions = { ... };
const portal = new Portal(portalOptions);
```
#### Use with ZeroDev
Use the provider from Portal to create a smart account signer, which can be passed to a validator. For detailed guidance on using a validator, refer to our documentation on [creating accounts](/smart-accounts/create-a-smart-account#api).
```typescript
import { signerToEcdsaValidator } from "@zerodev/ecdsa-validator"
import { KERNEL_V3_1, getEntryPoint } from "@zerodev/sdk/constants"
import { createPublicClient } from "viem";
import { polygonAmoy } from 'viem/chains';
// Get the Provider from Portal
const portalProvider = portal.provider;
const publicClient = createPublicClient({
// Use your own RPC provider (e.g. Infura/Alchemy).
transport: http('https://rpc-amoy.polygon.technology'),
chain: polygonAmoy,
})
// Pass your `smartAccountSigner` to the validator
const ecdsaValidator = await signerToEcdsaValidator(publicClient, {
signer: portalProvider,
entryPoint: getEntryPoint("0.7"),
kernelVersion: KERNEL_V3_1
})
// You can now use this ECDSA Validator to create a Kernel account
```
## Use Privy with ZeroDev
[Privy](https://privy.io/) offers a seamless user onboarding experience for both mobile and desktop platforms, accommodating users with or without existing wallets. It simplifies the process of setting up self-custodial wallets for users logging in via email, SMS, or social media accounts. Additionally, it provides flexibility for web3-savvy users to continue using their existing wallets with your application, offering them a choice based on their preference.
### Set up
To use Privy with ZeroDev, you have two options: Privy's native integration that utilizes ZeroDev, or a custom integration using Privy's Externally Owned Account (EOA) as a signer. Choose the approach that best fits your needs.
#### Native Integration
Privy natively supports account abstraction using ZeroDev. This integration allows you to sponsor gas fees, bundle transactions, recover and transfer accounts, utilize session keys.
* For more information and how to get started, visit the Privy's [Account Abstraction documentation](https://docs.privy.io/wallets/using-wallets/evm-smart-wallets/overview).
#### Custom Integration
:::info
Check out [this example](https://github.com/zerodevapp/zerodev-signer-examples/tree/main/privy) for custom integration with Privy.
:::
If you would like to use ZeroDev directly with a Privy project, you can set up a custom integration using Privys's EOA as a signer.
* Begin by setting up your application with Privy, as detailed in the [Privy documentation](https://docs.privy.io/).
* Privy also offers a quick start guide, available [here](https://docs.privy.io/guide/quickstart).
### Implementing Custom Integration
Integrating ZeroDev with Privy is straightforward once your application is set up. Privy provides an EOA wallet to use as a signer with Kernel.
#### Get the Privy wallet's Provider
To begin, ensure your application is integrated with Privy. Detailed guidance is available in the [Privy documentation](https://docs.privy.io/guide/quickstart). You should also configure your PrivyProvider to create embedded wallets for your users when they login.
The following example demonstrates the use of Privy's react auth SDK to get the embedded wallet and use it as a signer for ZeroDev.
```typescript
import { useWallets } from "@privy-io/react-auth";
// Use the `useWallets` hook to get the primary wallet
const { wallets } = useWallets();
// Get the privy embeded wallet.
const embeddedWallet = wallets.find(
(wallet) => wallet.walletClientType === "privy"
);
if (!embeddedWallet) throw new Error("User does not have an embedded wallet");
// Get the provider for the embeded wallet, we will use in the next section
const privyProvider = await embeddedWallet.getEthereumProvider();
```
#### Use with ZeroDev
Use the provider from Privy to create a smart account signer, which can be passed to a validator. For detailed guidance on using a validator, refer to our documentation on [creating accounts](/smart-accounts/create-a-smart-account#api).
```typescript
import { signerToEcdsaValidator } from "@zerodev/ecdsa-validator"
import { KERNEL_V3_1, getEntryPoint } from "@zerodev/sdk/constants"
import { createPublicClient } from "viem";
import { polygonAmoy } from 'viem/chains';
const publicClient = createPublicClient({
// Use your own RPC provider (e.g. Infura/Alchemy).
transport: http('https://rpc-amoy.polygon.technology'),
chain: polygonAmoy,
})
// Pass your `smartAccountSigner` to the validator
const ecdsaValidator = await signerToEcdsaValidator(publicClient, {
signer: privyProvider,
entryPoint: getEntryPoint("0.7"),
kernelVersion: KERNEL_V3_1
})
// You can now use this ECDSA Validator to create a Kernel account
```
### Templates
A user has helpfully created a ZeroDev + Privy template for React Native (Expo). [Check it out here.](https://github.com/Stephen-Gordon/zerodev-privy-expo)
## Use a Smart Wallet as a Signer
ZeroDev supports using one smart wallet (kernel account) as a signer for another kernel account.
### Integration Example
Here's how to use one kernel account as a validator for another kernel account:
```typescript
import { signerToSmartAccountValidator } from "@zerodev/smart-account-validator"
// Create the first kernel account (this will be our signer)
const signerKernelAccount = await createKernelAccount(publicClient, {
// Configure with your preferred validator (e.g., ECDSA, WebAuthn, etc.)
plugins: {
sudo: ecdsaValidator,
},
entryPoint,
kernelVersion
})
// Create a validator using the first kernel account as a signer
const validator = await signerToSmartAccountValidator(publicClient, {
entryPoint,
kernelVersion,
signer: signerKernelAccount,
smartAccountType: "OTHER"
})
// You can now use this Validator to create a Kernel account
```
### Starter Template
An example of a starter template for using a Safe smart wallet as a signer is available [here](https://github.com/zerodevapp/safe-as-owner-example).
import SocialLoginSetup from '../../shared/social-login-setup.mdx'
## Social Login
Social login allows users to authenticate using their existing social media accounts such as Google or Facebook.
ZeroDev supports social logins natively, but you can also use ZeroDev with [third-party auth providers](/smart-accounts/use-plugins/signers-intro) such as Privy, Dynamic, and Magic if you prefer their UI.
### Setup
### Installation
:::code-group
```bash [npm]
npm i @zerodev/social-validator
```
```bash [yarn]
yarn add @zerodev/social-validator
```
```bash [pnpm]
pnpm i @zerodev/social-validator
```
```bash [bun]
bun add @zerodev/social-validator
```
:::
### API
#### `isAuthorized`
Checks if the user is authorized. In a web app, this is typically called on page load to check if the user is logged in.
```ts
isAuthorized({ projectId: string }): Promise
```
##### Parameters
* projectId (string): Your ZeroDev project ID.
##### Returns
* `Promise`: Resolves to true if the user is logged in, otherwise false.
##### Example
```ts
import { isAuthorized } from "@zerodev/social-validator"
const authorized = await isAuthorized({ projectId: 'your_project_id' });
console.log(authorized); // true or false
```
#### `initiateLogin`
Initiates a social login process by redirecting the user to the specified OAuth provider.
After a successful login, the user will be redirected back to your app. You may then call the `getSocialValidator` function to create a [Kernel account](https://docs.zerodev.app/sdk/core-api/create-account#create-a-kernel-account) using the social validator as the sudo validator.
```ts
initiateLogin({
socialProvider: "google" | "facebook",
oauthCallbackUrl?: string,
projectId: string
})
```
##### Parameters
* socialProvider ("google" | "facebook"): The social provider to use for login.
* oauthCallbackUrl (string, optional): The URL to redirect to after login. Defaults to the current window location if not provided.
* projectId (string): Your ZeroDev project ID.
##### Example
```ts
import { initiateLogin } from "@zerodev/social-validator"
initiateLogin({
socialProvider: "google",
projectId: "your_project_id"
});
```
#### `getSocialValidator`
Gets a social validator for the specified entry point. Use this function after a successful login to create a [Kernel account](https://docs.zerodev.app/sdk/core-api/create-account#create-a-kernel-account) using the social validator as the sudo validator.
```ts
export async function getSocialValidator<
entryPointVersion extends EntryPointVersion
>(
client: Client,
{
entryPoint,
kernelVersion,
projectId
}: {
entryPoint: EntryPointType
kernelVersion: GetKernelVersion
projectId: string
}
): Promise>
```
##### Parameters
* client (Client): The client instance.
* entryPoint (entryPoint): The entry point object.
* projectId (string): Your ZeroDev project ID.
##### Returns
* `Promise>`: Resolves to a social validator object.
##### Example
```ts
import { getSocialValidator } from "@zerodev/social-validator"
const socialValidator = await getSocialValidator(
publicClient,
{
entryPoint: getEntryPoint("0.7"),
projectId: "your_project_id"
}
);
```
:::info
Now you can proceed to [create Kernel accounts](https://docs.zerodev.app/sdk/core-api/create-account#create-a-kernel-account) using the social validator as the sudo validator.
:::
#### `logout`
Logs out the current user.
```ts
logout({ projectId: string })
```
##### Parameters
* projectId (string): Your ZeroDev project ID.
##### Example
```ts
import { logout } from "@zerodev/social-validator"
await logout({ projectId: "your_project_id" });
```
## Use Turnkey with ZeroDev
[Turnkey](https://turnkey.com/) is a key infrastructure provider with a great developer API and a powerful security policy engine.
By combining ZeroDev with Turnkey, you can create **custodial AA wallets** whose security is provided by Turnkey, with powerful functionalities such as sponsoring gas, batching transactions, etc.
### Set up
To use Turnkey with ZeroDev, first create an application that integrates with Turnkey.
* Refer to the [Turnkey documentation site](https://docs.turnkey.com/) for instructions on setting up an application with the Turnkey.
* For a quick start, Turnkey provides examples, available [here](https://docs.turnkey.com/getting-started/examples).
### Integration
Integrating ZeroDev with Turnkey is straightforward after setting up the project. Turnkey provides an Externally Owned Account (EOA) wallet to use as a signer with Kernel.
#### Create the TurnkeyClient and a Turnkey viem account
After following the Turnkey documentation, you will have access to a `TurnkeyClient`. An example is shown below:
```typescript
import { TurnkeyClient } from "@turnkey/http";
import { createAccount } from "@turnkey/viem";
// Param options here will be specific to your project. See the Turnkey docs for more info.
const turnkeyClient = new TurnkeyClient({ baseUrl: '' }, stamper);
const turnkeyAccount = createAccount({
client: turnkeyClient,
organizationId: subOrganizationId, // Your subOrganization id
signWith: signWith, // Your suborganization `signWith` param.
})
```
#### Use with ZeroDev
Use the WalletClient from Turnkey to create a smart account signer, which can be passed to a validator. For detailed guidance on using a validator, refer to our documentation on [creating accounts](/smart-accounts/create-a-smart-account#api).
```typescript
import { signerToEcdsaValidator } from "@zerodev/ecdsa-validator"
import { KERNEL_V3_1, getEntryPoint } from "@zerodev/sdk/constants"
import { createWalletClient, createPublicClient } from "viem";
import { polygonAmoy } from 'viem/chains';
const publicClient = createPublicClient({
// Use your own RPC provider (e.g. Infura/Alchemy).
transport: http('https://rpc-amoy.polygon.technology'),
chain: polygonAmoy,
})
// Pass your `walletClient` to the validator
const ecdsaValidator = await signerToEcdsaValidator(publicClient, {
signer: turnkeyAccount,
entryPoint: getEntryPoint("0.7"),
kernelVersion: KERNEL_V3_1
})
// You can now use this ECDSA Validator to create a Kernel account
```
## Use Web3Auth with ZeroDev
[Web3Auth](https://web3auth.io/) is a popular embedded wallet provider that supports social logins. While social logins are great, your users still need to onramp in order to pay for gas, which introduces significant friction.
By combining ZeroDev with Web3Auth, you can use Web3Auth to enable a smooth social login experience, while using ZeroDev as the smart wallet to sponsor gas for users, batch transactions, and more.
### Set up
To use Web3Auth with ZeroDev, first create an application that integrates with Web3Auth.
* Refer to the [Web3Auth documentation site](https://web3auth.io/docs/index.html) for instructions on setting up an application with the Web3Auth.
* For a quick start, Web3Auth provides example starter projects, available [here](https://web3auth.io/docs/examples?product=Plug+and+Play\&sdk=Plug+and+Play+Web+Modal+SDK).
### Integration
Integrating ZeroDev with Web3Auth is straightforward after setting up the project. Web3Auth provides an Externally Owned Account (EOA) wallet to use as a signer with Kernel.
#### Create the Web3Auth object
After following the Web3Auth documentation, you will have access to a `web3auth` object as shown below:
```typescript
import { Web3Auth } from "@web3auth/modal";
// Config options here will be specific to your project. See the Web3Auth docs for more info.
const web3auth = new Web3Auth({
clientId,
chainConfig: {},
uiConfig: {},
web3AuthNetwork: WEB3AUTH_NETWORK.SAPPHIRE_MAINNET,
});
```
#### Use with ZeroDev
Use the provider from Web3Auth to create a smart account signer, which can be passed to a validator. For detailed guidance on using a validator, refer to our documentation on [creating accounts](/smart-accounts/create-a-smart-account#api).
```typescript
import { signerToEcdsaValidator } from "@zerodev/ecdsa-validator"
import { KERNEL_V3_1, getEntryPoint } from "@zerodev/sdk/constants"
import Web3 from "web3";
import { type Hex, createPublicClient } from "viem"
import { polygonAmoy } from 'viem/chains';
// Get the Provider and EOA address (this will be the address of the signer) from Web3Auth
const web3authProvider = await web3auth.provider;
const web3 = new Web3(provider as any);
const [address] = await web3.eth.getAccounts();
const publicClient = createPublicClient({
// Use your own RPC provider (e.g. Infura/Alchemy).
transport: http('https://rpc-amoy.polygon.technology'),
chain: polygonAmoy,
})
// Pass your `web3authProvider` to the validator
const ecdsaValidator = await signerToEcdsaValidator(publicClient, {
signer: web3authProvider,
entryPoint: getEntryPoint("0.7"),
kernelVersion: KERNEL_V3_1
})
// You can now use this ECDSA Validator to create a Kernel account
```
## Multisig
:::info
Impatient? Check out our examples:
* [ECDSA multisig example](https://github.com/zerodevapp/zerodev-examples/tree/main/multisig/main.ts)
* [Passkey + ECDSA multisig example](https://github.com/zerodevapp/multi-sig-with-passkey-demo)
:::
With Kernel, it's possible to configure multiple signers for your smart account. The plugin that supports this functionality is named `WeightedValidator`, which supports multiple signers (including both ECDSA and WebAuthn/passkey signers), each having a specific "weight."
### How it works
Each signer is set up with a **weight**, and for any given signature, there must be enough combined weight to reach or surpass the **threshold** for the signature to be considered valid.
For example, let's say we have:
* Threshold: 100
* Weights:
* Signer A (ECDSA or Passkey): 100
* Signer B (ECDSA or Passkey): 50
* Signer C (ECDSA or Passkey): 50
In this case, we are setting up a multisig where either signer A alone (100 = 100), or signer B and C together (50 + 50 = 100) can provide a valid signature. You can mix and match ECDSA and passkey signers as needed.
### Installation
:::code-group
```bash [npm]
npm i @zerodev/weighted-validator
```
```bash [yarn]
yarn add @zerodev/weighted-validator
```
```bash [pnpm]
pnpm i @zerodev/weighted-validator
```
```bash [bun]
bun i @zerodev/weighted-validator
```
:::
### Setting up a new multisig account
To set up a new multisig account, start by creating a validator. Here are examples for both ECDSA and passkey signers:
#### With ECDSA Signers
```ts
import { createWeightedValidator } from "@zerodev/weighted-validator"
import { toECDSASigner, WeightedValidatorContractVersion } from "@zerodev/weighted-validator"
const validatorContractVersion = WeightedValidatorContractVersion.V0_0_2_PATCHED
// Create ECDSA signers from private keys
const ecdsaSigner1 = await toECDSASigner({ signer: eoaAccount1 })
const ecdsaSigner2 = await toECDSASigner({ signer: eoaAccount2 })
const multiSigValidator = await createWeightedValidator(publicClient, {
entryPoint,
kernelVersion,
validatorContractVersion,
signer: ecdsaSigner1, // The current signer being used
config: {
threshold: 100,
signers: [
{ publicKey: ecdsaSigner1.account.address, weight: 50 },
{ publicKey: ecdsaSigner2.account.address, weight: 50 }
]
},
})
```
#### With Passkey Signers
```ts
import { createWeightedValidator } from "@zerodev/weighted-validator"
import { toWebAuthnSigner } from "@zerodev/weighted-validator"
import { toWebAuthnKey, WebAuthnKey } from "@zerodev/webauthn-key"
// Create or get WebAuthn keys
const webAuthnKey1 = await toWebAuthnKey({
passkeyName: "passkey1",
passkeyServerUrl: PASSKEY_URL,
webAuthnKey: publicKey1,
rpID: publicKey1.rpID,
})
const webAuthnKey2 = await toWebAuthnKey({
passkeyName: "passkey2",
passkeyServerUrl: PASSKEY_URL,
webAuthnKey: publicKey2,
rpID: publicKey2.rpID,
})
// Create WebAuthn signers
const passKeySigner1 = await toWebAuthnSigner(publicClient, {
webAuthnKey: webAuthnKey1,
})
const passKeySigner2 = await toWebAuthnSigner(publicClient, {
webAuthnKey: webAuthnKey2,
})
const multiSigValidator = await createWeightedValidator(publicClient, {
entryPoint,
kernelVersion,
validatorContractVersion,
signer: passKeySigner1, // The current signer being used
config: {
threshold: 100,
signers: [
{ publicKey: publicKey1, weight: 50 },
{ publicKey: publicKey2, weight: 50 }
]
},
})
```
After creating the validator, you can [set up a Kernel account using the validator](/smart-accounts/create-a-smart-account#create-a-kernel-account) as usual:
```ts
const account = await createKernelAccount(publicClient, {
entryPoint,
kernelVersion,
plugins: {
sudo: multiSigValidator,
}
})
// Create the client
const client = createWeightedKernelAccountClient({
account,
chain,
bundlerTransport: http(BUNDLER_URL),
// ... other configuration options
})
```
### Using a multisig account
When using a multisig account, sending transactions requires gathering enough signatures to meet the threshold. This is a two-step process:
1. First, get approvals from the required signers
2. Then, send the UserOperation with the collected signatures
Here's how to implement this flow:
```ts
// First, create the callData that needs to be signed
const callData = await client.account.encodeCalls([
{
target: targetAddress,
data: encodeFunctionData(...),
value: 0n,
}
])
// Each signer can approve the UserOperation
// This can be done by different signers at different times/places
// For example, with two different passkey signers:
const sig1 = await client1.approveUserOperation({
callData,
validatorContractVersion
})
const sig2 = await client2.approveUserOperation({
callData,
validatorContractVersion
})
// Or with ECDSA signers:
const sig1 = await ecdsaClient1.approveUserOperation({
callData,
validatorContractVersion
})
const sig2 = await ecdsaClient2.approveUserOperation({
callData,
validatorContractVersion
})
// Once you have enough signatures to meet the threshold,
// you can send the UserOperation with all collected signatures
const hash = await client.sendUserOperationWithSignatures({
callData,
signatures: [sig1, sig2]
})
// You can wait for the UserOperation to be included in a block
const receipt = await client.waitForUserOperationReceipt({
hash: userOpHash
})
```
Note that:
* The signatures can be collected asynchronously from different signers
* You need to collect enough signatures to meet the threshold weight
* The same UserOperation object must be used for all signatures
* Each signer must use their own client instance configured with their signer
* You can mix signatures from both ECDSA and passkey signers as long as their combined weight meets the threshold
### Updating multisig config
To update the multisig configuration (like adding or removing signers), you can use the update config functionality. This works the same way for both ECDSA and passkey signers:
```ts
import { getUpdateConfigCall } from "@zerodev/weighted-validator"
// Example updating config with ECDSA signers
await kernelClient.sendTransaction(
getUpdateConfigCall({
threshold: 100,
signers: [
{ publicKey: ecdsaSigner1.account.address, weight: 50 },
{ publicKey: ecdsaSigner2.account.address, weight: 50 },
{ publicKey: ecdsaSigner3.account.address, weight: 50 },
]
}),
)
// Example updating config with passkey signers
await kernelClient.sendTransaction(
getUpdateConfigCall({
threshold: 100,
signers: [
{ publicKey: publicKey1, weight: 50 }, // WebAuthn key
{ publicKey: publicKey2, weight: 50 }, // WebAuthn key
{ publicKey: publicKey3, weight: 50 }, // WebAuthn key
]
}),
)
```
Note that `kernelClient` here must itself be a correctly set-up instance of a multisig account client with sufficient signing authority to make the change.
## Using Plugins
ZeroDev is built on [Kernel](https://github.com/zerodevapp/kernel), a *modular smart account* that can be extended with *plugins* (sometimes also called *modules*).
While there are many types of plugins, we will focus on *validators*, which modify the logic for validating UserOps. Validators are used for most of the major use cases of AA, including:
* Alternative signature schemes, such as passkeys and multisig.
* Dynamic access control, such as guardians and session keys.
### Sudo vs regular validators
For any given Kernel account, it will have one **sudo validator** and any number of **regular validators**.
* The **sudo validator** is the "owner" of the account. It's the only validator that can enable other validators.
* A **regular validator** represents an alternative form of access to the smart account. For example, a session key or a guardian would be a regular validator. Regular validators cannot enable other validators.
When you set up a [Kernel account object](/smart-accounts/create-a-smart-account#create-a-kernel-account) with the SDK, you must specify a sudo validator, a regular validator, or both. Let's walk through the three cases:
#### Using only a sudo validator
In the most common case, you set up a Kernel account that is powered by a single sudo validator. For example, to set up an account owned by a ECDSA key:
```ts
const account = await createKernelAccount(publicClient, {
plugins: {
sudo: ecdsaValidator,
},
entryPoint,
kernelVersion
})
```
Here, when you send a UserOp, the ECDSA key will be used for signing the UserOp, and the ECDSA key has sudo access to the smart account (meaning it can do anything).
#### Enabling a regular validator
If you have access to the sudo validator, you can enable a regular validator. For example, to enable a [session key](/smart-accounts/permissions/session-keys):
```ts
const account = await createKernelAccount(publicClient, {
plugins: {
sudo: ecdsaValidator,
regular: sessionKeyValidator,
},
entryPoint,
kernelVersion
})
```
Now, when you send a UserOp with this `account`, the regular validator will be enabled, and the regular validator (in this case the session key) will be used for signing the UserOp.
Note that Kernel plugins are enabled "lazily" -- you don't have to explicitly enable them. That is, whenever you send the first UserOp with an `account` object with a `regular` plugin, the plugin will be enabled as a part of that UserOp. The UserOp itself can do whatever it needs to do.
#### Using only a regular validator
If a regular validator has already been enabled, you can use it without access to the sudo validator.
For example, continuing the session key example above, if the session key has already been enabled, you can simply do:
```ts
const account = await createKernelAccount(publicClient, {
plugins: {
regular: sessionKeyValidator,
},
entryPoint,
kernelVersion
})
```
### Next Steps
Learn more about plugins such as [passkeys](/smart-accounts/use-plugins/passkeys/overview) and [permissions](/smart-accounts/permissions/intro).
## Auth Providers
Smart accounts, like EOAs, rely on signatures to validate transactions and messages. The difference with smart accounts is that it can use arbitrary signatures schemes, such as multisig, passkeys, etc.
It's possible to use third-party "wallet services" as signers for smart accounts. The end result is that your users will be interacting with the wallet UIs provided by these services, while using a smart account powered by ZeroDev.
ZeroDev has been integrated natively with many leading wallet services such as [Privy](https://docs.privy.io/guide/frontend/account-abstraction/zerodev), [Dynamic](https://docs.dynamic.xyz/account-abstraction/aa-providers/zerodev), [Portal](https://docs.portalhq.io/resources/account-abstraction-alpha), [JoyID](https://docs.joyid.dev/guide/evm/evm-aa), etc. However, even when a native integration doesn't exist, it's generally very easy to integrate ZeroDev with a wallet service as long as it's able to sign messages.
Check out the wallet services that are known to work with ZeroDev using the left sidebar. If the wallet service you want to use is not listed, check out the general guide for [integrating with EOA signers](/smart-accounts/authentication/eoa), or try [building your own integration](/smart-accounts/authentication/custom-signer).
## Sponsoring Gas
With account abstraction, you can pay gas for users so they don't have to acquire native tokens in order to interact with your DApp.
When you sponsor gas through ZeroDev, there are two ways to pay for the gas:
* Put down your credit card. We front the gas for your users, and then at the end of the billing cycle (once a month) we charge your credit card.
* Buy gas credits from us.
### Setting up gas sponsoring policies
To avoid over-spending gas on sponsoring, you must set up gas-sponsoring policies. Sign up on the ZeroDev dashboard if you haven't already, then [set up gas policies](/api-and-toolings/infrastructure/gas-policies).
Note that you MUST set up a gas policy to begin sponsoring. Without setting up a gas policy, there won't be any gas sponsored.
### API
:::info
Impatient? Check out [complete examples here](https://github.com/zerodevapp/zerodev-examples/blob/main/create-account/main.ts).
:::
When [setting up an account](/smart-accounts/create-a-smart-account), you can specify a `getPaymasterData` function in `paymaster` when you [create the account client](/smart-accounts/create-a-smart-account#create-an-account-client).
The `getPaymasterData` function essentially takes a UserOp and then returns a UserOp with the `paymasterAndData` field set. For example, if you are using the ZeroDev paymaster, use the `createZeroDevPaymasterClient` helper function:
```typescript
import { http } from "viem"
import { createZeroDevPaymasterClient, createKernelAccountClient } from "@zerodev/sdk"
import { getEntryPoint } from "@zerodev/sdk/constants"
const entryPoint = getEntryPoint("0.7")
const paymasterClient = createZeroDevPaymasterClient({
chain,
// Get this RPC from ZeroDev dashboard
transport: http(ZERODEV_RPC),
})
const kernelClient = createKernelAccountClient({
paymaster: {
getPaymasterData: (userOperation) => {
return paymasterClient.sponsorUserOperation({
userOperation,
})
}
}
// other args...
})
```
#### What happens when you reach the sponsorship limit?
If you have reached the sponsorship limit, either because of the [policies](/api-and-toolings/infrastructure/gas-policies) you set up or because you have reached an account-level limit, sending UserOp will fail.
If, instead of failing, you want the UserOp to proceed but use the user's own native tokens (e.g. ETH), then you can set up your `paymaster` middleware like this:
```ts
import { GetPaymasterDataReturnType } from "viem/account-abstraction"
const kernelClient = createKernelAccountClient({
// other args...
paymaster: {
getPaymasterData: async (userOperation) => {
try {
return await paymasterClient.sponsorUserOperation({ userOperation })
} catch (error) {
return {} as GetPaymasterDataReturnType
}
},
},
})
```
### UltraRelay
UltraRelay is a new relay solution that functions as a combination of ERC-4337 bundlers and paymasters, as a single entity. UltraRelay is significantly more efficient than regular ERC-4337 bundlers and paymasters. In our benchmarks, UltraRelay achieves:
* 30% less gas than ERC-4337 bundlers
* 20% lower latency than ERC-4337 bundlers
This makes UltraRelay the best solution for gas sponsorship.
#### API
To use UltraRelay, simply update your `createKernelAccountClient` config as follows:
* Append `?provider=ULTRA_RELAY` to your ZeroDev RPC.
* (optional) Do NOT set the [paymaster middleware](#api), which will save you some latency.
* (optional) Set a no-op gas estimation middleware, which will save you even more latency.
Here's how it looks like in code:
```ts
const kernelClient = createKernelAccountClient({
account,
chain,
bundlerTransport: http(ZERODEV_RPC+`?provider=ULTRA_RELAY`),
userOperation: {
estimateFeesPerGas: async ({ bundlerClient }) => {
return {
maxFeePerGas: BigInt(0),
maxPriorityFeePerGas: BigInt(0),
}
},
},
})
```
#### Supported networks
UltraRelay is being gradually rolled out to all networks. It currently supports:
* Base
* Arbitrum
* Optimism
* HyperEVM
* Polynomial
* Abstract
* ZkSync
* Base Sepolia
* Holesky
Feel free to [contact us](https://t.me/derek_chiang) if you want us to deploy UltraRelay for your network.
## Sponsor Gas on Solana
With ZeroDev, you can sponsor transaction fees for your users on Solana, so they don't need to hold SOL to interact with your DApp.
### How Solana fee sponsorship works
Unlike EVM chains, Solana doesn't need ERC-4337 or paymasters for fee sponsorship. Every Solana transaction has a **fee payer** field that can be set to any account — it doesn't have to be the same account that initiates the transaction. ZeroDev takes advantage of this by setting the fee payer to a ZeroDev-managed wallet that covers two types of costs:
* **Transaction fees** — the cost of including and executing the transaction on the network.
* **Rent** — the minimum SOL deposit required to create new accounts or token accounts on-chain (e.g. when calling `createAccount` or `createAssociatedTokenAccount`).
Your users sign the transaction normally, and ZeroDev's sponsorship server co-signs as the fee payer and broadcasts the transaction — all in a single step.
:::info
Solana doesn't have a notion of chain ID, but we use sentinel values for consistency in our RPC endpoints. Currently supported networks:
* **Solana mainnet** — `9034109930`
* **Solana devnet** — `9034109931`
:::
### Paying for sponsored gas
When you sponsor gas through ZeroDev, there are two ways to pay for the gas:
* Put down your credit card. We front the gas for your users, and then at the end of the billing cycle (once a month) we charge your credit card.
* Buy gas credits from us.
### Setting up gas sponsoring policies
To avoid over-spending on sponsoring, you must set up gas-sponsoring policies. Sign up on the [ZeroDev dashboard](https://dashboard.zerodev.app/) if you haven't already, then [set up gas policies](/api-and-toolings/infrastructure/gas-policies).
Note that you MUST set up a gas policy to begin sponsoring. Without setting up a gas policy, there won't be any gas sponsored.
### Installation
Install the ZeroDev Solana sponsorship SDK along with its peer dependencies:
```bash
npm i @zerodev/solana-sponsorship-sdk @solana/kit @solana-program/system
```
### Quick Start
#### 1. Get your RPC endpoint
Go to the [ZeroDev dashboard](https://dashboard.zerodev.app/) and create a Solana project. Copy the RPC endpoint for the correct Solana network (mainnet or devnet), e.g. `https://rpc.zerodev.app/api/v3/svm/YOUR_PROJECT_ID/chain/9034109930`.
#### 2. Create the sponsorship and Solana RPC clients
Get a Solana RPC URL from a provider like [Alchemy](https://www.alchemy.com/) or [Helius](https://www.helius.dev/), or use the public endpoint `https://api.mainnet-beta.solana.com` (restrictively rate-limited and not advisable for production).
```typescript
import { createSolanaRpc, mainnet } from "@solana/kit";
import { createSponsorshipRpc } from "@zerodev/solana-sponsorship-sdk";
const sponsorshipRpc = createSponsorshipRpc({
endpoint: "https://rpc.zerodev.app/api/v3/svm/YOUR_PROJECT_ID/chain/9034109930",
});
const solanaRpc = createSolanaRpc(mainnet("YOUR_SOLANA_RPC_URL"));
```
#### 3. Get a recent blockhash
```typescript
const { value: { blockhash: recentBlockhash, lastValidBlockHeight } } =
await solanaRpc.getLatestBlockhash({ commitment: "finalized" }).send();
```
#### 4. Create your transaction instruction(s)
This can be any Solana instruction. Here we use a simple SOL transfer as an example:
```typescript
import { lamports } from "@solana/kit";
import { getTransferSolInstruction } from "@solana-program/system";
const transferInstruction = getTransferSolInstruction({
source: userKeypair, // your user's keypair signer
destination: toAddress, // destination address
amount: lamports(1_000_000n), // 0.001 SOL
});
```
#### 5. Get the sponsor fee payer and build the transaction
Fetch ZeroDev's fee payer address and set it as the transaction's fee payer. We use a `NoopSigner` as a placeholder because the fee payer's private key lives on ZeroDev's server, not the client. The real fee payer signature is added server-side when you call `sponsorTransaction` in the next step.
```typescript
import {
createTransactionMessage,
pipe,
setTransactionMessageLifetimeUsingBlockhash,
address,
blockhash,
appendTransactionMessageInstructions,
setTransactionMessageFeePayerSigner,
createNoopSigner,
} from "@solana/kit";
const feePayer = await sponsorshipRpc.getFeePayer().send();
const message = pipe(
createTransactionMessage({ version: "legacy" }),
(msg) => setTransactionMessageFeePayerSigner(createNoopSigner(address(feePayer)), msg),
(msg) => appendTransactionMessageInstructions([transferInstruction], msg),
(msg) => setTransactionMessageLifetimeUsingBlockhash(
{ blockhash: blockhash(recentBlockhash), lastValidBlockHeight },
msg
),
);
```
#### 6. Sign and sponsor the transaction
The user signs the transaction, then ZeroDev co-signs as the fee payer and broadcasts it to the network:
```typescript
import { partiallySignTransactionMessageWithSigners } from "@solana/kit";
import { sponsorTransaction } from "@zerodev/solana-sponsorship-sdk";
const signedMessage = await partiallySignTransactionMessageWithSigners(message);
const response = await sponsorTransaction(sponsorshipRpc, signedMessage);
console.log(`Transaction sponsored: https://explorer.solana.com/tx/${response.signature}`);
```
### Using with external wallets
If your users sign with an external wallet provider, replace step 6 above: compile the transaction to bytes, sign with the wallet, then decode the signed bytes back for sponsorship.
#### Privy
```typescript
import { compileTransaction, getTransactionEncoder, getTransactionDecoder } from "@solana/kit";
import { sponsorTransaction } from "@zerodev/solana-sponsorship-sdk";
import { useSignTransaction } from "@privy-io/react-auth/solana";
const { signTransaction } = useSignTransaction();
// Build the transaction message with pipe() as shown in steps 2–5, then:
const unsignedTx = compileTransaction(message);
const encoded = new Uint8Array(getTransactionEncoder().encode(unsignedTx));
const { signedTransaction } = await signTransaction({ transaction: encoded, wallet });
const decoded = getTransactionDecoder().decode(signedTransaction);
const result = await sponsorTransaction(sponsorshipRpc, decoded);
```
#### Dynamic
```typescript
import { compileTransaction, getTransactionEncoder, getTransactionDecoder } from "@solana/kit";
import { sponsorTransaction } from "@zerodev/solana-sponsorship-sdk";
import { isSolanaWallet } from "@dynamic-labs/solana";
import { useDynamicContext } from "@dynamic-labs/sdk-react-core";
const { primaryWallet } = useDynamicContext();
if (!primaryWallet || !isSolanaWallet(primaryWallet)) throw new Error("No Solana wallet");
// Build the transaction message with pipe() as shown in steps 2–5, then:
const unsignedTx = compileTransaction(message);
const encoded = new Uint8Array(getTransactionEncoder().encode(unsignedTx));
const { VersionedTransaction } = await import("@solana/web3.js");
const signer = await primaryWallet.getSigner();
const versionedTx = VersionedTransaction.deserialize(encoded);
const signedTx = await (signer.signTransaction as any)(versionedTx);
const decoded = getTransactionDecoder().decode((signedTx as any).serialize());
const result = await sponsorTransaction(sponsorshipRpc, decoded);
```
### Error Handling
If sponsorship fails (e.g., you've hit a policy limit), the SDK throws a `SponsorshipError`:
```typescript
import { sponsorTransaction, SponsorshipError } from "@zerodev/solana-sponsorship-sdk";
try {
const response = await sponsorTransaction(sponsorshipRpc, signedMessage);
} catch (error) {
if (error instanceof SponsorshipError) {
console.error(`Sponsorship failed (code ${error.code}): ${error.message}`);
}
}
```
## Tutorial -- Transaction Automation
In this tutorial, you will learn how to enable 1-click trading for your app using session keys.
Refer to [this code example](https://github.com/zerodevapp/zerodev-examples/blob/main/session-keys/1-click-trading.ts) while you follow along the tutorial. You can run the example by following instructions of [the examples repo](https://github.com/zerodevapp/zerodev-examples).
### Installation
The examples repo already installed this, but normally you would install permissions with:
:::code-group
```bash [npm]
npm i @zerodev/permissions
```
```bash [yarn]
yarn add @zerodev/permissions
```
```bash [pnpm]
pnpm i @zerodev/permissions
```
```bash [bun]
bun add @zerodev/permissions
```
:::
### Owner-Agent Architecture
There are multiple ways to use session keys. In this tutorial, we will use the popular "owner-agent" pattern:
* The "owner" is the owner of the master key.
* The "agent" is the entity that wants to use the session key.
In a typical setup, you might be wishing to automate transactions for your users from your server.
your user's master key might be connected to your DApp frontend, in which case your frontend is the "owner." You might be wishing
### API
:::info
You can reference this [complete code example](https://github.com/zerodevapp/zerodev-examples/blob/main/permissions/main.ts) as you go through the tutorial.
:::
With a permissions validator, you are putting together:
* One signer
* Any number of policies
* (optionally) one action
#### Creating a signer
Start by creating a [ECDSA signer](/smart-accounts/permissions/signers/ecdsa):
```ts
const sessionPrivateKey = generatePrivateKey()
const sessionKeyAccount = privateKeyToAccount(sessionPrivateKey)
const sessionKeySigner = await toECDSASigner({
signer: sessionKeyAccount,
})
```
#### Creating a number of policies
Now, let's create two policies:
* A "call policy" that checks that the user is minting an NFT.
* A "rate limit policy" that checks that the user executes this action once per month.
```ts
const sessionPrivateKey = generatePrivateKey()
const sessionKeyAccount = privateKeyToAccount(sessionPrivateKey)
const callPolicy = toCallPolicy({
policyVersion: CallPolicyVersion.V0_0_2,
permissions: [
{
target: contractAddress,
valueLimit: BigInt(0),
abi: contractABI,
functionName: "mint",
},
],
})
const rateLimitPolicy = toRateLimitPolicy({
count: 1,
interval: 60 * 60 * 24 * 30, // month in seconds
}),
```
#### Composing signer and policies
Here comes the fun part -- we "compose" the signer and policies together into a single validator:
```ts
const sessionKeyValidator = await toPermissionValidator(publicClient, {
entryPoint,
kernelVersion,
signer: sessionKeySigner,
policies: [
callPolicy,
rateLimitPolicy,
],
}),
```
Now, we have created a ECDSA session key that's subject to a call policy and a rate limit policy. Just like that!
#### Using the session key
Finally, we can set up the account with this session key as the signer. Note that if this is the first time that the session key is used, we need to [enable the plugin](/smart-accounts/use-plugins/overview#enabling-a-regular-validator).
```ts
const account = await createKernelAccount(publicClient, {
plugins: {
sudo: ecdsaValidator,
regular: sessionKeyValidator,
},
entryPoint,
kernelVersion,
})
```
Now you can [set up a Kernel client](/smart-accounts/create-a-smart-account#create-an-account-client) using this account, and start minting NFTs with this session key -- but only up to once a month!
Try running [this script](https://github.com/zerodevapp/zerodev-examples/blob/main/permissions/main.ts) and see for yourself.
### Storing Session Keys
Session keys (and permission validators in general) can be stored, by serializing them and then deserializing them later.
#### Code examples
There are two general patterns with storing session keys.
* The owner creates a session key for another agent to store & use. Check out [this example](https://github.com/zerodevapp/zerodev-examples/blob/main/session-keys/owner-created.ts).
* The agent creates a session key and asks the owner to "approve" it as a session key. Check out [this example](https://github.com/zerodevapp/zerodev-examples/blob/main/session-keys/agent-created.ts).
* In this flow, the owner never sees the private part of the session key, so it may be better for security.
#### Serializing a session key
```ts
const serializedSessionKey = await serializePermissionAccount(sessionKeyAccount, sessionPrivateKey)
```
Note that `sessionPrivateKey` is optional. If the private key is not included, then you must provide the private key when you deserialize the session key.
#### De-serializing a session key
```ts
const sessionKeySigner = await toECDSASigner({
signer: privateKeyToAccount(sessionPrivateKey),
})
const sessionKeyAccount = await deserializePermissionAccount(
publicClient,
entryPoint,
kernelVersion,
serializedSessionKey,
sessionKeySigner,
)
```
Note that `sessionKeySigner` is only needed if you did not include the private key in the serialized session key.
## Quickstart — ZeroDev × AgentKit (LangChain chatbot)
> **Goal**: build a minimal LangChain chatbot whose on-chain wallet is a ZeroDev smart account, all in 50 lines of code.
The tutorial is a trimmed-down version of the full example that ships with AgentKit — `typescript/examples/langchain-zerodev-chatbot`. Here we swap the CDP MPC wallet for a local private key (via **Viem**) to keep things lightweight and dependency-free.
***
### 1. Prerequisites & install
• Node 18+\
• An **OpenAI** key (for the LLM)\
• A **ZeroDev Project ID** (grab one from the dashboard — Base Sepolia is perfect for testing)
```bash
mkdir zerodev-agentkit-bot && cd zerodev-agentkit-bot
npm init -y
# Core runtime deps
npm i @coinbase/agentkit @coinbase/agentkit-langchain viem @langchain/core @langchain/openai @langchain/langgraph dotenv
# Nice-to-have for TypeScript
npm i -D ts-node typescript @types/node
```
***
### 2. Environment variables
Create a `.env` file (or export vars however you prefer):
```env
OPENAI_API_KEY=
ZERODEV_PROJECT_ID=
# Any *testnet* private key will work here
PRIVATE_KEY=
# optional – defaults to base-sepolia
NETWORK_ID=base-sepolia
```
***
### 3. The code (index.ts)
```ts title="index.ts"
import {
AgentKit,
ViemWalletProvider,
ZeroDevWalletProvider,
NETWORK_ID_TO_VIEM_CHAIN,
walletActionProvider,
} from "@coinbase/agentkit";
import { getLangChainTools } from "@coinbase/agentkit-langchain";
import { ChatOpenAI } from "@langchain/openai";
import { createReactAgent } from "@langchain/langgraph/prebuilt";
import { HumanMessage } from "@langchain/core/messages";
import { privateKeyToAccount } from "viem/accounts";
import { createWalletClient, http } from "viem";
import * as dotenv from "dotenv";
dotenv.config();
function mustGet(name: string) {
const v = process.env[name];
if (!v) throw new Error(`Missing env var ${name}`);
return v;
}
async function main() {
/* 1️⃣ Wallet setup (Viem → ZeroDev smart account) */
const networkId = process.env.NETWORK_ID ?? "base-sepolia";
const signerAccount = privateKeyToAccount(mustGet("PRIVATE_KEY") as `0x${string}`);
const viemWalletProvider = new ViemWalletProvider(
createWalletClient({
account: signerAccount,
chain: NETWORK_ID_TO_VIEM_CHAIN[networkId],
transport: http(),
}),
);
const zeroDevWalletProvider = await ZeroDevWalletProvider.configureWithWallet({
signer: viemWalletProvider.toSigner(),
projectId: mustGet("ZERODEV_PROJECT_ID"),
entryPointVersion: "0.7",
networkId,
});
/* 2️⃣ AgentKit instance */
const agentkit = await AgentKit.from({
walletProvider: zeroDevWalletProvider,
actionProviders: [walletActionProvider()],
});
/* 3️⃣ LangChain agent */
const llm = new ChatOpenAI({
openAIApiKey: mustGet("OPENAI_API_KEY"),
model: "gpt-4o-mini",
});
const tools = await getLangChainTools(agentkit);
const lcAgent = createReactAgent({ llm, tools });
console.log("Smart-account address:", zeroDevWalletProvider.getAddress());
console.log("Ask me to do something on-chain (type ‘exit’ to quit)…\n");
const rl = require("readline").createInterface({ input: process.stdin, output: process.stdout });
for await (const line of rl) {
const prompt = line.trim();
if (prompt.toLowerCase() === "exit") break;
const stream = await lcAgent.stream({ messages: [new HumanMessage(prompt)] });
for await (const chunk of stream) {
if ("agent" in chunk) process.stdout.write(chunk.agent.messages[0].content);
else if ("tools" in chunk) console.log("\n[tool]", chunk.tools.messages[0].content);
}
console.log("\n---\n");
}
}
main().catch(err => console.error(err));
```
Run it:
```bash
npx ts-node --env-file=.env index.ts
```
#### Example session
```txt
Smart-account address: 0xAAc5…eF32
Ask me to do something on-chain (type ‘exit’ to quit)…
Prompt: transfer 0.001 eth to 0x000000000000000000000000000000000000dEaD
✅ Sent a gas-sponsored transaction – hash 0x9eab…1d3a
---
Prompt: what’s my eth balance?
Your smart-account holds ~0.42 ETH on Base Sepolia.
---
```
***
### 4. Next steps
• Swap the local key for a **CDP** or **Privy** wallet for MPC security.\
• Add more `actionProviders` (ERC-20, ERC-721, DeFi, …) so the agent can do *real* work.\
• Explore the [full chatbot example](https://github.com/coinbase/agentkit/tree/main/typescript/examples/langchain-zerodev-chatbot) for persistence, autonomous mode, and more advanced prompts.
Happy hacking 🚀
## Installing Permissions During Account Creation
You can install permission plugins during account creation using `initConfig`. This approach allows you to set up permissions right when the account is deployed.
:::note
The counterfactual account address is tied to the permission plugin configuration. If you modify the permission plugin's configuration after account creation and reinstall it, you'll need to explicitly specify the account address using the `address` parameter when calling `createKernelAccount`.
:::
### Example
Here's how to install a permission plugin during account creation:
```typescript
import {
toInitConfig
} from "@zerodev/permissions"
import { privateKeyToAccount, generatePrivateKey } from "viem/accounts"
// Create a permission plugin
const permissionPlugin = await toPermissionValidator(publicClient, {
entryPoint,
signer: ecdsaModularSigner,
kernelVersion,
policies: [toSudoPolicy({})]
})
// Create the account with the permission plugin in initConfig using the `toInitConfig` utility
const account = await createKernelAccount(publicClient, {
entryPoint,
plugins: {
sudo: ecdsaValidatorPlugin
},
kernelVersion,
initConfig: await toInitConfig(permissionPlugin)
})
```
### Starter Template
An example of a starter template for installing permissions during account creation is available [here](https://github.com/zerodevapp/zerodev-examples/blob/main/session-keys/install-permissions-with-init-config.ts).
## Permissions (Session Keys)
With Kernel, you can assign different permissions to different keys. Some of these keys might be owned by the owner(s) of the smart account, and some might be short-lived keys that you share with others to delegate transactions. The latter are also commonly known as "session keys."
To set up permissions for a key, you must answer three questions: who, when, and what.
* **Who** (what key) can perform the action?
* **When** (under what condition) can the action be performed?
* **What** is the action anyways?
These three questions correspond to three types of "permissions plugins":
* **Signers** (who) specify the key and the algorithm (ECDSA, WebAuthn) it uses.
* **Policies** (when) specify the *conditions* under which the keys can be used. Some example conditions are:
* Only if interacting with Uniswap
* Only if spending USDC
* Only once a month
* **Actions** (what) specify the execution function the key uses.
### Composing Permissions
Kernel is the first smart account to support *composable permissions*. That is, you can build up fine-grained permissions from putting together signers, policies, and actions. Here's the formula:
```
Permission = 1 signer + N policies + 1 action
```
In pseudo-code, this is what it looks like:
```ts
const account = createKernelAccount({
signer: passkeySigner,
policies: [
onlyUSDC,
onlyUniswap,
oncePerMonth,
],
action,
})
```
Here, the `signer` will be able to perform `action` if all `policies` are met.
Now let's dive into these plugin types.
### Permission Plugins
Because permissions are plugins, **you can write your own permissions** if the default ones provided by ZeroDev don't meet your needs.
#### Signers
Signers specify the keys and the algorithms the keys use. ZeroDev provides signers for:
* ECDSA
* WebAuthn (passkeys)
* Multisig
#### Policies
Policies are the conditions under which the keys can be used. ZeroDev provides the following policies:
* [Sudo policy](/smart-accounts/permissions/policies/sudo): you can do anything
* [Call policy](/smart-accounts/permissions/policies/call): you can only call certain contracts or functions (and only with certain params)
* [Gas policy](/smart-accounts/permissions/policies/gas): you can only spend up to X amount of gas
* [Signature policy](/smart-accounts/permissions/policies/signature): you can only sign certain messages
* [Rate limit policy](/smart-accounts/permissions/policies/rate-limit): you can only send UserOps within a given rate limit
* [Timestamp policy](/smart-accounts/permissions/policies/timestamp): you can only send UserOps within certain timeframes
#### Actions
Actions are arbitrary functions that the smart account will `delegatecall` to. They give you perfect flexibility over the execution logic.
Note that actions are NOT to be confused with the calls you actually want to execute. For example, if you want to interact with Uniswap, that's just the call you want to execute. "Action" here specifically refers to the execution function by which Uniswap is called.
If that's confusing, just forget about actions. Mostly commonly you will only be setting up signers and policies, and the `action` will default to Kernel's default `execute()` function, which is enough for most needs.
### Next Steps
* [Learn to automate transactions for users with permissions.](/smart-accounts/permissions/transaction-automation)
## Session Keys
### EntryPoint v0.7 (Kernel v3)
:::info
Impatient? Check out [complete examples here](https://github.com/zerodevapp/zerodev-examples/blob/main/session-keys).
:::
In EntryPoint 0.7 (Kernel v3), session keys have been upgraded into a more powerful "permissions system." [Please refer to these docs.](/smart-accounts/permissions/intro)
### EntryPoint v0.6 (Kernel v2)
:::info
Impatient? Check out [complete examples here](https://github.com/zerodevapp/zerodev-examples/tree/main/session-keys/v2-old).
:::
The following document is for session keys for EntryPoint 0.6 (Kernel v2). If you are using EntryPoint 0.7 (Kernel v3), [please refer to permissions instead.](/smart-accounts/permissions/intro)
Session keys are keys assigned with specific permissions. Some examples are:
* A key that can only interact with Uniswap
* A key that can only use up to 1000 USDC
* A key that expires in 3 days
Of course, the permissions can be composed, so you can create a key that can only interact with Uniswap, while only using up to 1000 USDC, while expiring in 3 days, for instance.
Session keys have two primary use cases:
* **Skipping confirmations**: if you don't want your users to have to confirm every single transaction, you can create a session key that's only allowed to send specific transactions, and store the key in local storage. Now, your user can interact with your app with the session key without dealing with signing prompts. This experience is sometimes known as "one-click trading."
* **Automating transactions**: if you want to execute transactions for your users automatically, they can create a session key and give it to you. You can then store the session keys on your server and execute transactions for your users. Your users don't have to fully trust you since the session keys are bounded by permissions.
The possibility with transaction automation is endless. Some examples are:
* Subscriptions
* Stop orders
* Automatically paying back loans when the user is in danger of liquidation
### Installation
:::code-group
```bash [npm]
npm i @zerodev/session-key
```
```bash [yarn]
yarn add @zerodev/session-key
```
```bash [pnpm]
pnpm i @zerodev/session-key
```
```bash [bun]
bun i @zerodev/session-key
```
:::
### API
When using session keys, it's helpful to distinguish between the **owner** and the **agent**.
* The **owner** is whoever controls the master key of the account. The owner is the person that is able to create session keys.
* The **agent** is whoever using the session key.
There are two typical flows for how the owner and the agent interact:
* **Owner-created**: The owner creates the session key and shares it with the agent.
* **Agent-created**: The agent creates a key pair and shares the public key with the owner. The owner creates a partial session key based on the public key, then shares the partial session key with the agent. Finally, the agent combines the private key wih the partial session key to form a full session key.
Let's walk through how each flow works.
#### Owner-created
:::info
Check out [the code example](https://github.com/zerodevapp/zerodev-examples/blob/main/session-keys/owner-created.ts) for the owner-created pattern.
:::
We assume that you have [created a Kernel account](/smart-accounts/create-a-smart-account#create-a-kernel-account). If you only have a `kernelClient`, the Kernel account can be accessed as `kernelClient.account`.
First, create a signer for the session key:
```typescript
import { generatePrivateKey, privateKeyToAccount } from "viem/accounts"
const sessionPrivateKey = generatePrivateKey()
const sessionKeySigner = privateKeyToAccount(sessionPrivateKey)
```
Note that while we are using a local private key in this example, the session key signer can be any [Viem account object](https://viem.sh/docs/accounts/local).
Now, create a session key validator:
```typescript
const sessionKeyValidator = await signerToSessionKeyValidator(publicClient, {
signer: sessionKeySigner,
validatorData: {
// Set session key params
},
})
```
:::info
Refer to [the session key params section](#session-key-parameters) to learn about session key params.
:::
Now, construct a Kernel account using your sudo validator and the session key validator:
```typescript
const sessionKeyAccount = await createKernelAccount(publicClient, {
plugins: {
sudo: ecdsaValidator,
regular: sessionKeyValidator,
},
})
```
In this example, the sudo validator is `ecdsaValidator`.
If you want to use the session key on the same node, you can already [construct a Kernel client from this Kernel account](/smart-accounts/create-a-smart-account#create-an-account-client) and start using it. If you want to share the session key with an agent or store it for use later, you can serialize the session key:
```typescript
import { serializeSessionKeyAccount } from "@zerodev/session-key"
const serializedSessionKey = await serializeSessionKeyAccount(sessionKeyAccount, sessionPrivateKey)
```
Now, when the agent needs to use the session key (or when you want to use your stored session key later), deserialize it:
```typescript
const sessionKeyAccount = await deserializeSessionKeyAccount(publicClient, serializedSessionKey)
```
Now you can [create a Kernel client](/smart-accounts/create-a-smart-account#create-an-account-client) using the `sessionKeyAccount` as you normally would.
#### Agent-created
:::info
Check out [the code example](https://github.com/zerodevapp/zerodev-examples/blob/main/session-keys/agent-created.ts) for the agent-created pattern.
:::
In the agent-created pattern, the agent creates a public-private key pair and shares the public key with the owner. The owner authorizes the public key (by signing it), and shares the signed data with the agent. Finally, the agent creates the full session key by combining the signed data with the private key. This pattern is powerful because **the agent never had to share the private part of the session key with anyone**.
First, the agent creates a key pair:
```typescript
import { generatePrivateKey, privateKeyToAccount } from "viem/accounts"
const sessionPrivateKey = generatePrivateKey()
const sessionKeySigner = privateKeyToAccount(sessionPrivateKey)
const sessionKeyAddress = sessionKeySigner.address
```
Note that while we are using a local private key in this example, the session key signer can be any [Viem account object](https://viem.sh/docs/accounts/local).
Then, the agent shares the public key (address) of this signer with the owner. In this case, it would be `sessionKeySigner.address`.
With this address, the owner can authorize the session key as such:
```typescript
// Construct an "empty signer" that only has the address
const emptySessionKeySigner = addressToEmptyAccount(sessionKeyAddress)
const sessionKeyValidator = await signerToSessionKeyValidator(publicClient, {
signer: emptySessionKeySigner,
validatorData: {
// Set session key params
},
})
```
:::info
Refer to [the session key params section](#session-key-parameters) to learn about session key params.
:::
Now, the owner can construct a Kernel account using the sudo validator and the session key validator:
```typescript
const sessionKeyAccount = await createKernelAccount(publicClient, {
plugins: {
sudo: ecdsaValidator,
regular: sessionKeyValidator,
},
})
```
Finally, the owner can serialize the session key and share it with the agent.
```typescript
import { serializeSessionKeyAccount } from "@zerodev/session-key"
const serializedSessionKey = await serializeSessionKeyAccount(sessionKeyAccount)
```
Now, when the agent needs to use the session key, they deserialize it:
```typescript
const sessionKeyAccount = await deserializeSessionKeyAccount(publicClient, serializedSessionKey, sessionKeySigner)
```
Note how we pass `sessionKeySigner` to `deserializeSessionKeyAccount`. This is the private part of the session key that only the agent knows about.
Now you can [create a Kernel client](/smart-accounts/create-a-smart-account#create-an-account-client) using the `sessionKeyAccount` as you normally would.
#### Revoking Session Keys
```typescript
import { revokeSessionKey } from "@zerodev/session-key"
// Revoke all session keys
const userOpHash = await revokeSessionKey(kernelClient)
// Revoke a specific session key
const userOpHash = await revokeSessionKey(kernelClient, sessionKeySigner.address)
```
Note that `kernelClient` in this case must be using the master signer (instead of the session key signer). If you want to revoke session keys using the session key signer itself, you must explicitly set up the session key permissions so that it's allowed to revoke itself. You can do so by including this permission:
```ts
import { SESSION_KEY_VALIDATOR_ADDRESS } from "@zerodev/session-key"
import { parseAbi } from "viem"
const sessionKeyValidator = await signerToSessionKeyValidator(publicClient, {
// other options...
validatorData: {
// other options...
permissions: [
// other permissions...
// Allow the session key to revoke itself
{
target: SESSION_KEY_VALIDATOR_ADDRESS,
abi: parseAbi([
'function disable(bytes calldata _data)',
]),
functionName: 'disable',
args: [
{
operator: ParamOperator.EQUAL,
value: sessionKeySigner.address,
},
],
},
],
},
})
```
### Session Key Parameters
When creating a session key validator, you specify parameters under the `validatorData` flag:
```typescript
const sessionKeyValidator = await signerToSessionKeyValidator(publicClient, {
signer: sessionKeySigner,
validatorData: {
validUntil,
validAfter,
paymaster,
permissions,
},
})
```
Now we go over each parameter.
#### `validUntil`
`validUntil` is a UNIX timestamp (in seconds) that specifies when the session key should expire.
If not set or set to `0`, then the session key will never expire.
#### `validAfter`
`validAfter` is a UNIX timestamp (in seconds) that specifies when the session key should start taking effect.
If not set or set to `0`, then the session key will be valid immediately.
#### `paymaster`
`paymaster` specifies whether the session key must be used with a paymaster. **It's highly recommended that you set this flag unless 1) you fully trust the agent holding the session key, or 2) you don't expect your users to hold any ETH (or whatever native token for the network).** Otherwise, a malicious agent can set arbitrarily high gas price for UserOps sent with the session key, and then submit the UserOps themselves in order to profit from the gas, completely draining the user of ETH in the process.
By setting the `paymaster` flag to a non-zero value, you ensure that the session key can only be used with a paymaster, and the paymaster (if properly set up) should have defense against arbitrarily high gas prices.
If not set or set to `address(0)` (you can use `zeroAddress` from `viem`), the session key will work with or without paymaster.
If set to `address(1)` (you can use `oneAddress` from `@zerodev/session-key`), the session key will only work with a paymaster, but it can be any paymaster.
If set to a specific paymaster address, then the session key can only be used with that paymaster.
#### `permissions`
Permissions are at the core of session keys. By specifying permissions, you limit the types of transactions that the session key can send.
Permissions look like this:
```typescript
import { ParamOperator } from "@zerodev/session-key"
const sessionKeyValidator = await signerToSessionKeyValidator(publicClient, {
signer: sessionKeySigner,
validatorData: {
permissions: [
{
// Target contract to interact with
target: contractAddress,
// Maximum value that can be transferred. In this case we
// set it to zero so that no value transfer is possible.
valueLimit: 0,
// Contract ABI
abi: contractABI,
// Function name
functionName: 'mint',
// An array of conditions, each corresponding to an argument for
// the function.
args: [
{
// Argument operator and value.
operator: ParamOperator.EQUAL,
value: argumentValue,
}
],
// (optional) whether this is a call or a delegatecall. Defaults to call
operation: Operation.Call,
},
{
// another permission...
},
]
},
})
```
Here's what each flag means:
* `target`: the target contract to call or address to send ETH to. If this is `zeroAddress`, then the target can be any contract as long as the ABI matches (or it can be any address if no ABI is specified).
* `valueLimit`: the maximum [value](https://coinmarketcap.com/alexandria/glossary/ethereum-transaction#:~\:text=The%20value%20is%20the%20amount%20of%20Ether%20to%20transfer%20from%20the%20sender%20to%20the%20recipient%2C%20and%20this%20can%20even%20be%20zero.) that can be transmitted.
* `abi`: the contract ABI
* `functionName`: the function name
* `args`: an array of conditions, each corresponding to an argument, in the order that the arguments are laid out. use `null` to skip an argument.
* `operator`: this can be `EQUAL`, `GREATER_THAN`, `LESS_THAN`, `GREATER_THAN_OR_EQUAL`, `LESS_THAN_OR_EQUAL`, `NOT_EQUAL`.
* `value`: the value of the argument to use with the operator. For instance, `operator = EQUAL` and `value = 2` would mean "the value must be equal to 2".
* `operation`: (optional) whether this is a call or a delegatecall. Defaults to call.
#### Batching and Delegatecall
To use session keys with [batching](/smart-accounts/batch-transactions), specify the following `action` when constructing the account:
```ts
import { zeroAddress, toFunctionSelector } from "viem"
import { KernelAccountAbi } from "@zerodev/sdk"
const sessionKeyAccount = await createKernelAccount(publicClient, {
plugins: {
sudo: ecdsaValidator,
regular: sessionKeyValidator,
action: { // [!code focus]
address: zeroAddress, // [!code focus]
selector: toFunctionSelector(getAbiItem({ abi: KernelAccountAbi, name: "executeBatch" })), // [!code focus]
}, // [!code focus]
},
})
```
Then you can send batched UserOps with `sendUserOperation([userops])` as usual.
To use session keys with `delegatecall`:
```ts
import { zeroAddress, toFunctionSelector } from "viem"
const sessionKeyAccount = await createKernelAccount(publicClient, {
plugins: {
sudo: ecdsaValidator,
regular: sessionKeyValidator,
action: { // [!code focus]
address: zeroAddress, // [!code focus]
selector: toFunctionSelector("executeDelegateCall(address, bytes)"), // [!code focus]
}, // [!code focus]
},
})
```
#### Transferring ETH
If you want to transfer ETH with a session key, specify the `data` field as such:
```ts
import { pad } from 'viem'
await sessionKeyAccountClient.sendTransaction({
to: address,
data: pad("0x", { size: 4 }),
value: amountToTransfer,
})
```
### FAQs
#### Does creating session keys cost gas?
No. Creating a session key entails simply signing a message, which is done off-chain and doesn't involve any gas cost.
#### Is it possible to use session keys with a not-yet-deployed account?
Yes. If you do so, the first UserOp sent with the session key will deploy the account.
## Tutorial -- Transaction Automation
In this tutorial, you will learn how to automate transactions for your users using [session keys](/smart-accounts/permissions/intro). This is useful when you want to send transactions for your users from your server, for instance.
Refer to [this code example](https://github.com/zerodevapp/zerodev-examples/blob/main/session-keys/transaction-automation.ts) while you follow along the tutorial. You can run the example by following instructions of [the examples repo](https://github.com/zerodevapp/zerodev-examples).
### Installation
Session keys are enabled through the `@zerodev/permissions` package. The examples repo already installed this, but normally you would install permissions with:
:::code-group
```bash [npm]
npm i @zerodev/permissions
```
```bash [yarn]
yarn add @zerodev/permissions
```
```bash [pnpm]
pnpm i @zerodev/permissions
```
```bash [bun]
bun add @zerodev/permissions
```
:::
### The Architecture of Transaction Automation
In the typical architecture for transaction automation, there's an "owner" and an "agent":
* The "owner" is the entity that controls the user's master key.
* The "agent" is the entity that automates transactions for the owner.
For instance, your user might be using an embedded wallet (master key) with your frontend, and you might want to automate transactions for your users from your server. In this case, the frontend would be the "owner" and your server would be the "agent."
From a high level, this is how transaction automation works:
* The agent creates a session key.
* At this point, the session key has not been approved by the owner.
* The agent sends the "address" of the session key to the owner for approval.
* The owner signs the address and returns the approval (signature) to the agent.
* The agent can now send transactions for users using the approval and the session key.
### Code Flow
#### Agent: creating a session key
From the agent's side, create a [ECDSA signer](/smart-accounts/permissions/signers/ecdsa) as the session key:
```ts
const sessionPrivateKey = generatePrivateKey()
const sessionKeySigner = await toECDSASigner({
signer: privateKeyToAccount(sessionPrivateKey),
})
```
Note that if you do not wish to store the private key of the session key, you could use a [remote signer](https://docs.zerodev.app/sdk/advanced/key-storage) instead:
```ts
const remoteSigner = await toRemoteSigner({
apiKey,
mode: RemoteSignerMode.Create
})
const sessionKeySigner = await toECDSASigner({
signer: remoteSigner,
})
```
#### Agent: send session key "address" to the owner
For the owner to approve the session key, the agent must send the "address" of the session key to the owner. Note that the private key is never sent -- it's only the address which is the public key of the session key that's sent.
To obtain the session key address:
```ts
const sessionKeyAddress = sessionKeySigner.account.address
```
Send this address to the owner.
#### Owner: approving the session key
Now, on the owner side, approve the session key with [policies](/smart-accounts/permissions/intro#policies):
```ts
const ecdsaValidator = await signerToEcdsaValidator(publicClient, {
entryPoint,
kernelVersion,
signer,
})
// Create an "empty account" as the signer -- you only need the public
// key (address) to do this.
const emptyAccount = addressToEmptyAccount(sessionKeyAddress)
const emptySessionKeySigner = await toECDSASigner({ signer: emptyAccount })
const permissionPlugin = await toPermissionValidator(publicClient, {
entryPoint,
kernelVersion,
signer: emptySessionKeySigner,
policies: [
// your policies
],
})
const sessionKeyAccount = await createKernelAccount(publicClient, {
entryPoint,
kernelVersion,
plugins: {
sudo: ecdsaValidator,
regular: permissionPlugin,
},
})
const approval = await serializePermissionAccount(sessionKeyAccount)
```
Now, send the serialized approval back to the agent.
#### Agent: using the session key
When the agent wants to use the session key, first recreate the signer. Presumably, you would've stored the session key somewhere:
```ts
// Using a stored private key
const sessionKeySigner = await toECDSASigner({
signer: privateKeyToAccount(sessionPrivateKey),
})
```
Or if you were using a remote signer:
```ts
const remoteSignerWithGet = await toRemoteSigner({
apiKey,
keyAddress: remoteSignerAddress // you should've stored this
mode: RemoteSignerMode.Get
})
const sessionKeySigner = await toECDSASigner({
signer: remoteSigner,
})
```
Now create an account object by combining the approval (which you should've stored somewhere) with the `sessionKeySigner`:
```ts
const sessionKeyAccount = await deserializePermissionAccount(
publicClient,
entryPoint,
kernelVersion,
approval,
sessionKeySigner
)
```
Finally, [construct a Kernel client](https://docs.zerodev.app/sdk/core-api/create-account#create-an-account-client) as usual:
```ts
const kernelClient = createKernelAccountClient({
account: sessionKeyAccount,
// the other params
})
```
Now you can send transactions with the Kernel client.
#### Revoking a Session Key
After a session key has been used, or if it's no longer needed, it's a good security practice to revoke it to ensure it cannot be used for any further transactions. Here's how you can revoke a session key:
First, prepare your environment for the revocation process. This involves creating a "sudo" account capable of performing privileged operations, such as uninstalling plugins.
```ts
const sudoAccount = await createKernelAccount(publicClient, {
plugins: {
sudo: ecdsaValidator,
},
// other params
});
const sudoKernelClient = createKernelAccountClient({
account: sudoAccount,
// other params
})
```
Now to revoke the session key by uninstalling its associated permission plugin, call `uninstallPlugin` on `sudoKernelClient`.
```ts
const txHash = await sudoKernelClient.uninstallPlugin({
plugin: permissionPlugin,
});
```
#### Creating multiple session keys on multiple chains in one signature
[Refer to this page.](/advanced/multi-chain-signing)
#### Using session keys with 7702
If you want to create session keys for a session key account, instead of doing this:
```ts
const ecdsaValidator = await signerToEcdsaValidator(publicClient, {
entryPoint,
kernelVersion,
signer,
})
const sessionKeyAccount = await createKernelAccount(publicClient, {
entryPoint,
kernelVersion,
plugins: {
sudo: ecdsaValidator,
regular: permissionPlugin,
},
})
```
Do this instead:
```ts
const sessionKeyAccount = await createKernelAccount(publicClient, {
entryPoint,
kernelVersion
eip7702Account: signer,
plugins: {
regular: permissionPlugin
},
})
```
That is, instead of creating a ECDSA validator, simply pass the EOA (the 7702 account) as `eip7702Account` into `createKernelAccount`, and don't set a `sudo` validator.
## Android (Kotlin) SDK
The ZeroDev Kotlin SDK is part of the [Omni SDK](https://github.com/zerodevapp/zerodev-omni-sdk) — a single Zig core shipped with first-class bindings for Kotlin, Swift, Go, Rust, Python, and C. The Android AAR bundles native libraries for arm64-v8a and x86\_64; the JVM JAR extracts the right native at runtime. It supports smart-account creation, signing, sponsored transactions, and EIP-7702 delegation on any EVM chain.
:::info
The Kotlin binding is currently in alpha.
:::
### Install
In your module's `build.gradle.kts`:
```kotlin
dependencies {
// Android (AAR with bundled native libraries)
implementation("app.zerodev:zerodev-aa:0.0.1-alpha.6")
// Desktop JVM (JAR; extracts native library at runtime)
implementation("app.zerodev:zerodev-aa-jvm:0.0.1-alpha.6")
}
```
Requires Android `minSdk 24` (or JDK 11+ for the JVM artifact).
### Setup
```kotlin
import dev.zerodev.aa.*
Context.create(
projectId,
chainId = 11155111, // Sepolia
gas = GasMiddleware.ZERODEV,
paymaster = PaymasterMiddleware.ZERODEV
).use { ctx ->
Signer.local(privateKey).use { signer ->
ctx.newAccount(signer, KernelVersion.V3_3).use { account ->
// ...
}
}
}
```
`Signer.generate()` is useful for demos when you don't need to reuse a key. It requires a working OS CSPRNG; on hardened sandboxes where `getrandom(2)` is blocked the call throws rather than producing a weak key, so production paths in those environments should pass a real key via `Signer.local(privateKey)`. All handles implement `AutoCloseable` — use Kotlin's `use { }` to release native resources deterministically.
### Example — sponsored UserOp
```kotlin
import dev.zerodev.aa.*
Context.create(projectId, chainId = 11155111,
gas = GasMiddleware.ZERODEV,
paymaster = PaymasterMiddleware.ZERODEV).use { ctx ->
Signer.local(privateKey).use { signer ->
ctx.newAccount(signer, KernelVersion.V3_3).use { account ->
val recipient = Address.fromHex("0x...")
val hash = account.sendUserOp(listOf(Call(target = recipient)))
val receipt = account.waitForUserOperationReceipt(hash)
println("Success: ${receipt.success}")
println("Tx: ${receipt.transactionHash}")
}
}
}
```
### Custom signers
Implement `SignerImpl` to integrate any signing backend (Privy, HSM, MPC, custom keystore):
```kotlin
val signer = Signer.custom(object : SignerImpl {
override fun signHash(hash: ByteArray): ByteArray = TODO()
override fun signMessage(msg: ByteArray): ByteArray = TODO()
override fun signTypedDataHash(hash: ByteArray): ByteArray = TODO()
override fun getAddress(): ByteArray = TODO()
})
```
### EIP-7702 delegation
EIP-7702 lets an EOA delegate its code to a Kernel contract so its address **is** the smart-account address — no CREATE2, no init code, no index. The SDK signs an authorization tuple on the first UserOp and attaches it via the `eip7702Auth` field; subsequent ops skip the auth once delegation is installed on-chain.
```kotlin
Context.create(projectId, chainId = 11155111,
gas = GasMiddleware.ZERODEV,
paymaster = PaymasterMiddleware.ZERODEV).use { ctx ->
Signer.generate().use { signer -> // fresh EOA
ctx.newAccount7702(signer, KernelVersion.V3_3).use { account ->
// account.getAddress() == signer's EOA address
val hash = account.sendUserOp(listOf(Call(target = account.getAddress())))
account.waitForUserOperationReceipt(hash)
}
}
}
```
Custom signers can override `SignerImpl.signAuthorization` (and set `providesSignAuthorization = true`) to sign EIP-7702 tuples natively. Otherwise the SDK falls back to hashing the tuple and calling `signHash`.
### Next steps
* [Sample app: omni-sdk-android-example](https://github.com/zerodevapp/omni-sdk-android-example) — Jetpack Compose + Privy embedded wallet + gasless transactions
* [Omni SDK source](https://github.com/zerodevapp/zerodev-omni-sdk)
* [Create a Smart Account](/smart-accounts/create-a-smart-account)
* [Bundler & Paymaster RPCs](/api-and-toolings/infrastructure/rpcs)
## iOS (Swift) SDK
The ZeroDev Swift SDK is part of the [Omni SDK](https://github.com/zerodevapp/zerodev-omni-sdk) — a single Zig core shipped with first-class bindings for Swift, Kotlin, Go, Rust, Python, and C. It supports smart-account creation, signing, sponsored transactions, and EIP-7702 delegation on any EVM chain.
:::info
The Swift binding is currently in alpha.
:::
### Install
In Xcode, choose **File → Add Packages…** and add:
```
https://github.com/zerodevapp/zerodev-omni-sdk
```
Or add to your `Package.swift`:
```swift
.package(url: "https://github.com/zerodevapp/zerodev-omni-sdk.git", from: "0.0.1-alpha")
```
The package ships a precompiled xcframework — no native build step required.
### Setup
```swift
import ZeroDevAA
let ctx = try Context(
projectID: projectID,
chainID: 11155111, // Sepolia
gasMiddleware: .zeroDev,
paymasterMiddleware: .zeroDev
)
let signer = try Signer.local(privateKey: pk)
let account = try ctx.newAccount(signer: signer, version: .v3_3)
```
`Signer.generate()` is useful for demos when you don't need to reuse a key. It requires a working OS CSPRNG; on hardened sandboxes where `getrandom(2)` is blocked the call returns an error rather than producing a weak key, so production paths in those environments should pass a real key via `Signer.local(privateKey:)`.
### Example — sponsored UserOp
```swift
import ZeroDevAA
let ctx = try Context(
projectID: projectID,
chainID: 11155111,
gasMiddleware: .zeroDev,
paymasterMiddleware: .zeroDev
)
let signer = try Signer.local(privateKey: pk)
let account = try ctx.newAccount(signer: signer, version: .v3_3)
let recipient = try Address(hex: "0x...")
let hash = try await account.sendUserOp(calls: [
Call(target: recipient)
])
let receipt = try await account.waitForUserOperationReceipt(useropHash: hash)
print("Success:", receipt.success)
print("Tx:", receipt.transactionHash)
```
### Custom signers
For wallet providers (Privy, WalletConnect, Web3Auth) that expose async APIs, use `Signer.async`:
```swift
let signer = try Signer.async(myAsyncSignerImpl) // AsyncSignerProtocol
```
For synchronous integrations (HSM, MPC, custom secure enclave), use `Signer.custom`:
```swift
let signer = try Signer.custom(MySignerImpl()) // SignerProtocol
```
### EIP-7702 delegation
EIP-7702 lets an EOA delegate its code to a Kernel contract so its address **is** the smart-account address — no CREATE2, no init code, no index. The SDK signs an authorization tuple on the first UserOp and attaches it via the `eip7702Auth` field; subsequent ops skip the auth once delegation is installed on-chain.
```swift
let signer = try Signer.generate()
let account = try ctx.newAccount7702(signer: signer, version: .v3_3)
// account.getAddress() == signer's EOA address
let hash = try await account.sendUserOp(calls: [
Call(target: try account.getAddress())
])
```
Custom signers can implement `SignerProtocol.signAuthorization(chainId:address:nonce:)` (and conform to `SignerProvidesAuthorization` returning `true`) to sign EIP-7702 tuples natively. Otherwise the SDK falls back to hashing `keccak256(0x05 || rlp([chainId, address, nonce]))` and calling `signHash`.
### Next steps
* [Sample app: omni-sdk-swift-example](https://github.com/zerodevapp/omni-sdk-swift-example) — SwiftUI + Privy embedded wallet + gasless transactions
* [Omni SDK source](https://github.com/zerodevapp/zerodev-omni-sdk)
* [Create a Smart Account](/smart-accounts/create-a-smart-account)
* [Bundler & Paymaster RPCs](/api-and-toolings/infrastructure/rpcs)
## TypeScript / JavaScript SDK
The ZeroDev TypeScript SDK (`@zerodev/sdk`) is the core package for building smart-account apps in JavaScript/TypeScript. This tutorial walks you through minting an NFT without paying gas.
:::info
Impatient? Check out [the complete example here](https://github.com/zerodevapp/zerodev-examples/tree/main/tutorial/completed.ts).
:::
Before you start, [set up a ZeroDev project](/get-started/sdks/setup-project) so you have an RPC URL with a gas-sponsorship policy.
### Write the code
Clone the [ZeroDev examples repo](https://github.com/zerodevapp/zerodev-examples). Then, inside the directory, install all dependencies:
```bash
npm install
```
Create a `.env` file with the following line, using the RPC URL from your ZeroDev project:
```
ZERODEV_RPC=
```
If all goes well, you should be able to run:
```bash
npx ts-node tutorial/completed.ts
```
Now open the [`tutorial/template.ts`](https://github.com/zerodevapp/zerodev-examples/blob/main/tutorial/template.ts) file in your editor. This will be the template where you will write your code. You can always refer to [`tutorial/completed.ts`](https://github.com/zerodevapp/zerodev-examples/blob/main/tutorial/completed.ts) to see the completed tutorial code.
#### Create a signer
Kernel accounts support many different signing methods, including ECDSA keys and passkeys. In this tutorial, we will use ECDSA keys which are the same type of keys that MetaMask and other Ethereum wallets use.
Let's start by generating a random key. Add the following code to the `main` function:
```typescript
import { generatePrivateKey, privateKeyToAccount } from "viem/accounts"
const main = async () => {
const privateKey = generatePrivateKey() // [!code focus]
const signer = privateKeyToAccount(privateKey) // [!code focus]
}
```
#### Create a validator
Each Kernel account handles validation through a smart contract known as a "validator." In this case, we will be using the ECDSA validator.
Add the following code to create the ECDSA validator:
```typescript
import { signerToEcdsaValidator } from "@zerodev/ecdsa-validator"
const main = async () => {
// other code...
const ecdsaValidator = await signerToEcdsaValidator(publicClient, { // [!code focus]
signer, // [!code focus]
entryPoint, // [!code focus]
}) // [!code focus]
}
```
#### Create an account
We are now ready to create an account. Add the following code:
```typescript
import { createKernelAccount } from "@zerodev/sdk"
const main = async () => {
// other code...
const account = await createKernelAccount(publicClient, { // [!code focus]
plugins: { // [!code focus]
sudo: ecdsaValidator, // [!code focus]
}, // [!code focus]
entryPoint, // [!code focus]
}) // [!code focus]
}
```
#### Creating a Kernel client
Finally, we are going to create an "account client" which serves as the connection between your account and some AA infra (i.e. bundlers and paymasters). The connection is necessary for you to actually send UserOps.
Add the following code:
```typescript
const main = async () => {
// ... other code
const zerodevPaymaster = createZeroDevPaymasterClient({
chain,
transport: http(ZERODEV_RPC),
})
const kernelClient = createKernelAccountClient({
account,
chain,
bundlerTransport: http(ZERODEV_RPC),
client: publicClient,
paymaster: {
getPaymasterData(userOperation) {
return zerodevPaymaster.sponsorUserOperation({userOperation})
}
},
})
const accountAddress = kernelClient.account.address
console.log("My account:", accountAddress)
}
```
Run this script with `npx ts-node tutorial/template.ts` and confirm that it prints an address.
#### Send a UserOp
Now that you have an account client, it's time to send your first UserOp! For this tutorial, we will mint an NFT from a contract deployed on Sepolia.
Add the following import and code:
```typescript
import { encodeFunctionData } from "viem"
const main = async () => {
// ... other code
const userOpHash = await kernelClient.sendUserOperation({
callData: await kernelClient.account.encodeCalls([{
to: contractAddress,
value: BigInt(0),
data: encodeFunctionData({
abi: contractABI,
functionName: "mint",
args: [accountAddress],
})
}])
})
console.log("Submitted UserOp:", userOpHash)
}
```
There's quite a bit of code going on, so let's go through it.
* We start by calling `kernelClient.sendUserOperation`, which takes a `userOperation` argument.
* Inside `userOperation`, we specify a `callData` field. This is the equivalent of the calldata field for a normal Ethereum transaction.
* Since we want to call the `mint(address)` function on the NFT contract, we use Viem's helper function `encodeFunctionData` and give it the ABI, function name, and function argument.
* `kernelClient.sendUserOperation` returns a "UserOperation hash." This is the equivalent of a transaction hash but for a UserOp.
Run the script again with `npx ts-node tutorial/template.ts` and confirm that it prints the UserOp hash. At this point, you can go to a UserOp explorer such as [JiffyScan](https://jiffyscan.xyz/) and find your UserOp with the hash!
#### Waiting for the UserOp
When you call `sendUserOperation`, the call returns as soon as the UserOp has been submitted to the bundler, but it doesn't wait for the UserOp to be "confirmed" on-chain. To wait for the UserOp to be confirmed, add the following import and code:
```typescript
const main = async () => {
// ... other code
const receipt = await kernelClient.waitForUserOperationReceipt({
hash: userOpHash,
})
console.log("UserOp confirmed:", receipt.userOpHash)
}
```
Let's break down the code:
* `waitForUserOperationReceipt` is a bundler action. If you are unfamiliar with the concept of "actions," you can read more about it on [Viem's documentation](https://viem.sh/docs/actions/public/introduction).
* This function returns a "receipt" object. If you are curious, you can print the full object and see what it contains.
#### Read contract state
Now let's confirm that we actually minted an NFT. Add the following import and code:
```typescript
import { publicActions } from "viem"
const main = async () => {
// ... other code
const nftBalance = await publicClient.readContract({
address: contractAddress,
abi: contractABI,
functionName: 'balanceOf',
args: [accountAddress],
})
console.log(`NFT balance: ${nftBalance}`)
}
```
Run the script again. You should see that it prints `NFT balance: 1`, confirming that you have minted an NFT!
### Next steps
In this tutorial, we were able to mint an NFT without paying gas, thanks to gas sponsorship.
For next steps:
* Check out [the core API](/smart-accounts/create-a-smart-account) to learn more about the SDK
* Read some [code examples](https://github.com/zerodevapp/zerodev-examples) of using ZeroDev
## C SDK (FFI)
The ZeroDev C SDK is the FFI surface of the [Omni SDK](https://github.com/zerodevapp/zerodev-omni-sdk) — a Zig core exposed as a C-compatible shared library. Use it to embed ZeroDev smart-account functionality from any language that can call C, including languages without a first-class Omni binding. It supports smart-account creation, signing, sponsored transactions, and EIP-7702 delegation on any EVM chain.
:::info
The C FFI is currently in alpha. Built from source.
:::
### Install
#### Prerequisites
* [Zig 0.15+](https://ziglang.org/download/)
* macOS: `brew install secp256k1`
* A [ZeroDev project ID](https://dashboard.zerodev.app)
#### Build
```bash
git clone https://github.com/zerodevapp/zerodev-omni-sdk
cd zerodev-omni-sdk
make build
```
Artifacts:
* Static: `zig-out/lib/libzerodev_aa.a` and `libsecp256k1.a`
* Shared: `zig-out/lib/libzerodev_aa.{so,dylib}`
* Header: `include/aa.h`
### Setup
```c
#include "aa.h"
aa_context_t *ctx;
aa_context_create(project_id, "", "", 11155111 /* Sepolia */, &ctx);
// Plug in ZeroDev middleware for gas pricing and paymaster sponsorship.
aa_context_set_gas_middleware(ctx, &aa_gas_zerodev);
aa_context_set_paymaster_middleware(ctx, &aa_paymaster_zerodev);
aa_signer_t *signer;
aa_signer_local(private_key, &signer);
aa_account_t *account;
aa_account_create(ctx, signer, AA_KERNEL_V3_3, 0 /* index */, &account);
```
### Example — sponsored UserOp
```c
#include "aa.h"
#include
#include
int main(void) {
aa_context_t *ctx;
aa_context_create(project_id, "", "", 11155111, &ctx);
aa_context_set_gas_middleware(ctx, &aa_gas_zerodev);
aa_context_set_paymaster_middleware(ctx, &aa_paymaster_zerodev);
aa_signer_t *signer;
aa_signer_local(private_key, &signer);
aa_account_t *account;
aa_account_create(ctx, signer, AA_KERNEL_V3_3, 0, &account);
uint8_t recipient[20] = { /* ... */ };
aa_call_t call = { 0 };
memcpy(call.target, recipient, 20);
uint8_t hash[32];
if (aa_send_userop(account, &call, 1, hash) != AA_OK) {
fprintf(stderr, "send failed: %s\n", aa_get_last_error());
return 1;
}
char *receipt_json = NULL;
size_t receipt_len = 0;
aa_wait_for_user_operation_receipt(account, hash, 0, 0, &receipt_json, &receipt_len);
printf("Receipt: %.*s\n", (int)receipt_len, receipt_json);
aa_free(receipt_json);
aa_account_destroy(account);
aa_signer_destroy(signer);
aa_context_destroy(ctx);
return 0;
}
```
### Custom signers
Provide a vtable to integrate any signing backend (Privy, HSM, MPC, custom keystore):
```c
static int my_sign_hash(void *ctx, const uint8_t hash[32], uint8_t sig_out[65]) { /* ... */ return 0; }
static int my_sign_message(void *ctx, const uint8_t *msg, size_t msg_len, uint8_t sig_out[65]) { /* ... */ return 0; }
static int my_sign_typed_data_hash(void *ctx, const uint8_t hash[32], uint8_t sig_out[65]) { /* ... */ return 0; }
static int my_get_address(void *ctx, uint8_t addr_out[20]) { /* ... */ return 0; }
// Zero-initialize so the optional 5th slot (sign_authorization) is NULL,
// letting the SDK fall back to computing the auth hash + calling sign_hash.
aa_signer_vtable vtable = {
.sign_hash = my_sign_hash,
.sign_message = my_sign_message,
.sign_typed_data_hash = my_sign_typed_data_hash,
.get_address = my_get_address,
};
aa_signer_t *signer;
aa_signer_custom(&vtable, /* user ctx */ NULL, &signer);
```
### EIP-7702 delegation
EIP-7702 lets an EOA delegate its code to a Kernel contract so its address **is** the smart-account address — no CREATE2, no init code, no index. The SDK signs an authorization tuple on the first UserOp and attaches it via the `eip7702Auth` field; subsequent ops skip the auth once delegation is installed on-chain.
```c
aa_signer_t *signer;
aa_signer_generate(&signer); // fresh EOA
aa_account_t *account;
aa_context_new_account_7702(ctx, signer, AA_KERNEL_V3_3, &account);
uint8_t addr[20];
aa_account_get_address(account, addr); // == signer's EOA address
aa_call_t call = { 0 };
memcpy(call.target, addr, 20);
uint8_t hash[32];
aa_send_userop(account, &call, 1, hash);
```
Custom signers can populate the optional `sign_authorization` slot of `aa_signer_vtable` to sign EIP-7702 tuples natively. Leave it NULL and the SDK falls back to hashing the tuple and calling `sign_hash`.
### Next steps
* [Omni SDK source](https://github.com/zerodevapp/zerodev-omni-sdk) — full header reference in `include/aa.h`
* [Runnable examples (Zig)](https://github.com/zerodevapp/zerodev-omni-sdk/tree/main/test/e2e) — live E2E tests exercising the same C API
* [Bundler & Paymaster RPCs](/api-and-toolings/infrastructure/rpcs)
## Go SDK
The ZeroDev Go SDK is part of the [Omni SDK](https://github.com/zerodevapp/zerodev-omni-sdk) — a single Zig core shipped with first-class bindings for Go, Swift, Kotlin, Rust, Python, and C. The module bundles precompiled static libraries for darwin/linux × arm64/amd64, so `go get` works without a Zig toolchain. It supports smart-account creation, signing, sponsored transactions, and EIP-7702 delegation on any EVM chain.
:::info
The Go binding is currently in alpha.
:::
### Install
```bash
go get github.com/zerodevapp/zerodev-omni-sdk/bindings/go
```
Then import:
```go
import "github.com/zerodevapp/zerodev-omni-sdk/bindings/go/aa"
```
Requires Go 1.21+ with CGo enabled (the default on the supported platforms).
### Setup
```go
import "github.com/zerodevapp/zerodev-omni-sdk/bindings/go/aa"
ctx, err := aa.NewContext(
projectID,
"", // RPC URL (empty → derive from project_id)
"", // Bundler URL (empty → derive from project_id)
11155111, // Sepolia
aa.GasZeroDev,
aa.PaymasterZeroDev,
)
if err != nil { panic(err) }
defer ctx.Close()
signer, err := aa.LocalSigner(privateKey)
if err != nil { panic(err) }
defer signer.Close()
account, err := ctx.NewAccount(signer, aa.KernelV3_3, 0)
if err != nil { panic(err) }
defer account.Close()
```
`aa.GenerateSigner()` is useful for demos when you don't need to reuse a key. It requires a working OS CSPRNG; on hardened sandboxes where `getrandom(2)` is blocked the call returns an error rather than producing a weak key, so production paths in those environments should pass a real key via `aa.LocalSigner(pk)`.
### Example — sponsored UserOp
```go
package main
import (
"fmt"
"os"
"github.com/zerodevapp/zerodev-omni-sdk/bindings/go/aa"
)
func main() {
projectID := os.Getenv("ZERODEV_PROJECT_ID")
ctx, _ := aa.NewContext(projectID, "", "", 11155111,
aa.GasZeroDev, aa.PaymasterZeroDev)
defer ctx.Close()
signer, _ := aa.LocalSigner(privateKey)
defer signer.Close()
account, _ := ctx.NewAccount(signer, aa.KernelV3_3, 0)
defer account.Close()
recipient := [20]byte{ /* ... */ }
hash, _ := account.SendUserOp([]aa.Call{{Target: recipient}})
receipt, _ := account.WaitForUserOperationReceipt(hash, 60_000, 2_000)
fmt.Println("Success:", receipt.Success)
fmt.Println("Tx:", receipt.Receipt["transactionHash"])
}
```
### Custom signers
Pass callbacks for any signing backend (Privy, HSM, MPC, custom keystore):
```go
signer, _ := aa.CustomSigner(aa.SignerFuncs{
SignHash: func(hash [32]byte) ([65]byte, error) { /* ... */ },
SignMessage: func(msg []byte) ([65]byte, error) { /* ... */ },
SignTypedDataHash: func(hash [32]byte) ([65]byte, error) { /* ... */ },
GetAddress: func() [20]byte { /* ... */ },
// Optional — omit to let the SDK hash the auth tuple and call SignHash.
SignAuthorization: func(chainID uint64, address [20]byte, nonce uint64) (aa.Authorization, error) {
/* ... */
},
})
```
### EIP-7702 delegation
EIP-7702 lets an EOA delegate its code to a Kernel contract so its address **is** the smart-account address — no CREATE2, no init code, no index. The SDK signs an authorization tuple on the first UserOp and attaches it via the `eip7702Auth` field; subsequent ops skip the auth once delegation is installed on-chain.
```go
signer, _ := aa.GenerateSigner() // fresh EOA
defer signer.Close()
account, _ := ctx.NewAccount7702(signer, aa.KernelV3_3)
defer account.Close()
addr, _ := account.GetAddress() // == signer's EOA address
hash, _ := account.SendUserOp([]aa.Call{{Target: addr}})
```
Custom signers can populate `SignerFuncs.SignAuthorization` to sign EIP-7702 tuples natively. Leave it `nil` and the SDK falls back to hashing the tuple and calling `SignHash`.
### Next steps
* [Runnable example: gasless-transfer-7702/go](https://github.com/zerodevapp/zerodev-omni-sdk/tree/main/examples/gasless-transfer-7702/go)
* [Omni SDK source](https://github.com/zerodevapp/zerodev-omni-sdk)
* [Create a Smart Account](/smart-accounts/create-a-smart-account)
* [Bundler & Paymaster RPCs](/api-and-toolings/infrastructure/rpcs)
## Node.js / TypeScript SDK
{/* TODO(authoring): fill this stub. Same package as browser TypeScript (@zerodev/sdk), but server-specific patterns: signer key handling, no localStorage, RPC config from env. */}
:::info
🚧 **This page is a stub.** Content is being written.
:::
The ZeroDev SDK runs in Node.js for backend services, scripts, and agents. The package is the same as the browser SDK (`@zerodev/sdk`) — but server-side patterns around signer key handling, RPC configuration, and concurrency differ.
For browser-side usage, see [TypeScript / JavaScript](/get-started/sdks/client-side/typescript).
### Install
{/* TODO(authoring): confirm whether Node version constraints, polyfills, or extra deps (e.g. crypto) are needed. */}
```bash
npm i @zerodev/sdk
```
Requires Node {/* TODO: minimum version */}.
### Setup
{/* TODO(authoring): show env-driven config — bundler RPC, paymaster RPC, signer private key from process.env. */}
```ts
// TODO: server-side initialization with env-driven config
```
### Example
{/* TODO(authoring): "Hello World" — create a smart account, send a transaction from a backend service. */}
```ts
// TODO: end-to-end backend example
```
### Next steps
* [Bundler & Paymaster RPCs](/api-and-toolings/infrastructure/rpcs)
* [Sponsor Gas](/smart-accounts/sponsor-gas/evm)
* [Create a Smart Account](/smart-accounts/create-a-smart-account)
## Python SDK
The ZeroDev Python SDK is part of the [Omni SDK](https://github.com/zerodevapp/zerodev-omni-sdk) — a single Zig core shipped with first-class bindings for Python, Swift, Kotlin, Go, Rust, and C. Published to PyPI as `zerodev-aa`, with native libraries bundled in the wheel for macOS (arm64, x86\_64) and Linux (x86\_64). It supports smart-account creation, signing, sponsored transactions, and EIP-7702 delegation on any EVM chain — ideal for backend services, scripts, and AI agents.
:::info
The Python binding is currently in alpha.
:::
### Install
```bash
pip install zerodev-aa
```
Requires Python 3.10+.
### Setup
```python
from zerodev_aa import Context, Signer, KernelVersion, GasMiddleware, PaymasterMiddleware
with Context(
project_id,
chain_id=11155111, # Sepolia
gas=GasMiddleware.ZERODEV,
paymaster=PaymasterMiddleware.ZERODEV,
) as ctx:
with Signer.local(private_key) as signer:
with ctx.new_account(signer, KernelVersion.V3_3) as account:
# ...
pass
```
`Signer.generate()` is useful for demos when you don't need to reuse a key. It requires a working OS CSPRNG; on hardened sandboxes where `getrandom(2)` is blocked the call raises rather than producing a weak key, so production paths in those environments should pass a real key via `Signer.local(pk)`. Use `with` blocks (or call `.close()`) to release native resources.
### Example — sponsored UserOp
```python
from zerodev_aa import Context, Signer, Call, KernelVersion, GasMiddleware, PaymasterMiddleware
with Context(
project_id,
chain_id=11155111,
gas=GasMiddleware.ZERODEV,
paymaster=PaymasterMiddleware.ZERODEV,
) as ctx:
with Signer.local(private_key) as signer:
with ctx.new_account(signer, KernelVersion.V3_3) as account:
recipient = bytes.fromhex("...") # 20 bytes
hash = account.send_user_op([Call(target=recipient)])
receipt = account.wait_for_receipt(hash)
print("Success:", receipt.success)
print("Tx:", receipt.transaction_hash)
```
### Custom signers
Implement any class with the four signer methods (Python uses duck typing — no inheritance required):
```python
class MySigner:
def sign_hash(self, hash: bytes) -> bytes: ...
def sign_message(self, msg: bytes) -> bytes: ...
def sign_typed_data_hash(self, hash: bytes) -> bytes: ...
def get_address(self) -> bytes: ...
# Optional — implement to sign EIP-7702 auth tuples natively.
# Omit and the SDK falls back to sign_hash over keccak256(0x05 || rlp(...)).
def sign_authorization(self, chain_id: int, address: bytes, nonce: int): ...
signer = Signer.custom(MySigner())
```
### EIP-7702 delegation
EIP-7702 lets an EOA delegate its code to a Kernel contract so its address **is** the smart-account address — no CREATE2, no init code, no index. The SDK signs an authorization tuple on the first UserOp and attaches it via the `eip7702Auth` field; subsequent ops skip the auth once delegation is installed on-chain.
```python
from zerodev_aa import Context, Signer, Call, KernelVersion, GasMiddleware, PaymasterMiddleware
with Context(
project_id,
chain_id=11155111,
gas=GasMiddleware.ZERODEV,
paymaster=PaymasterMiddleware.ZERODEV,
) as ctx:
with Signer.generate() as signer: # fresh EOA
with ctx.new_account_7702(signer, KernelVersion.V3_3) as account:
# account.get_address().bytes == signer's EOA address
hash = account.send_user_op([Call(target=account.get_address().bytes)])
account.wait_for_receipt(hash)
```
Custom signers can implement `sign_authorization` on their class to sign EIP-7702 tuples natively. Otherwise the SDK falls back to hashing the tuple and calling `sign_hash`.
### Next steps
* [Runnable example: gasless-transfer-7702/python](https://github.com/zerodevapp/zerodev-omni-sdk/tree/main/examples/gasless-transfer-7702/python)
* [Omni SDK source](https://github.com/zerodevapp/zerodev-omni-sdk)
* [Create a Smart Account](/smart-accounts/create-a-smart-account)
* [Bundler & Paymaster RPCs](/api-and-toolings/infrastructure/rpcs)
## Rust SDK
The ZeroDev Rust SDK is part of the [Omni SDK](https://github.com/zerodevapp/zerodev-omni-sdk) — a single Zig core shipped with first-class bindings for Rust, Swift, Kotlin, Go, Python, and C. Published to crates.io as `zerodev-aa`. The crate's `build.rs` auto-downloads precompiled native libraries from GitHub Releases — no Zig toolchain required to build. It supports smart-account creation, signing, sponsored transactions, and EIP-7702 delegation on any EVM chain.
:::info
The Rust crate is currently in alpha.
:::
### Install
```bash
cargo add zerodev-aa
```
Or add to `Cargo.toml` directly:
```toml
[dependencies]
zerodev-aa = "0.0.1-alpha.2"
```
### Setup
```rust
use zerodev_aa::{Context, Signer, KernelVersion, GasMiddleware, PaymasterMiddleware};
let ctx = Context::new(
project_id,
"", // RPC URL (empty → derive from project_id)
"", // Bundler URL (empty → derive from project_id)
11155111, // Sepolia
GasMiddleware::ZeroDev,
PaymasterMiddleware::ZeroDev,
)?;
let signer = Signer::local(&private_key)?;
let account = ctx.new_account(&signer, KernelVersion::V3_3, 0)?;
```
`Signer::generate()` is useful for demos when you don't need to reuse a key. It requires a working OS CSPRNG; on hardened sandboxes where `getrandom(2)` is blocked the call returns an error rather than producing a weak key, so production paths in those environments should pass a real key via `Signer::local(&pk)`. All handles implement `Drop` — native resources are released automatically.
### Example — sponsored UserOp
```rust
use zerodev_aa::{Context, Signer, Call, KernelVersion, GasMiddleware, PaymasterMiddleware};
let ctx = Context::new(project_id, "", "", 11155111,
GasMiddleware::ZeroDev, PaymasterMiddleware::ZeroDev)?;
let signer = Signer::local(&private_key)?;
let account = ctx.new_account(&signer, KernelVersion::V3_3, 0)?;
let recipient = /* 20-byte address */;
let hash = account.send_user_op(&[Call {
target: recipient,
value: [0u8; 32],
calldata: vec![],
}])?;
let receipt = account.wait_for_user_operation_receipt(&hash, 60, 2)?;
println!("Success: {}", receipt.success);
println!("Tx: {}", receipt.transaction_hash);
```
### Custom signers
Implement the `SignerImpl` trait to integrate any signing backend (Privy, HSM, MPC, custom keystore):
```rust
use zerodev_aa::{Signer, SignerImpl};
struct MySigner { /* ... */ }
impl SignerImpl for MySigner {
fn sign_hash(&self, hash: [u8; 32]) -> Result<[u8; 65], _> { todo!() }
fn sign_message(&self, msg: &[u8]) -> Result<[u8; 65], _> { todo!() }
fn sign_typed_data_hash(&self, hash: [u8; 32]) -> Result<[u8; 65], _> { todo!() }
fn get_address(&self) -> [u8; 20] { todo!() }
}
let signer = Signer::custom(MySigner { /* ... */ })?;
```
### EIP-7702 delegation
EIP-7702 lets an EOA delegate its code to a Kernel contract so its address **is** the smart-account address — no CREATE2, no init code, no index. The SDK signs an authorization tuple on the first UserOp and attaches it via the `eip7702Auth` field; subsequent ops skip the auth once delegation is installed on-chain.
```rust
let signer = Signer::generate()?; // fresh EOA
let account = ctx.new_account_7702(&signer, KernelVersion::V3_3)?;
// account.get_address()? == signer's EOA address
let hash = account.send_user_op(&[Call {
target: account.get_address()?,
value: [0u8; 32],
calldata: vec![],
}])?;
```
Custom signers can override `SignerImpl::sign_authorization` (and set `provides_sign_authorization()` to return `true`) to sign EIP-7702 tuples natively. Otherwise the SDK falls back to hashing the tuple and calling `sign_hash`.
### Next steps
* [Runnable example: gasless-transfer-7702/rust](https://github.com/zerodevapp/zerodev-omni-sdk/tree/main/examples/gasless-transfer-7702/rust)
* [Omni SDK source](https://github.com/zerodevapp/zerodev-omni-sdk)
* [Create a Smart Account](/smart-accounts/create-a-smart-account)
* [Bundler & Paymaster RPCs](/api-and-toolings/infrastructure/rpcs)
import VersionWarning from "../VersionWarning"
## ZeroDev Audits
All ZeroDev contracts and plugins are audited unless otherwise noted.
Please check out [our audits repo](https://github.com/zerodevapp/kernel/tree/dev/audits) for the reports.
import VersionWarning from "../VersionWarning"
## Supported Networks
ZeroDev supports EVM networks including:
* Arbitrum One
* Mainnet
* Sepolia
* Arbitrum Nova
* Mainnet
* Avalanche
* Mainnet
* Fuji
* Base
* Mainnet
* Sepolia
* Binance Smart Chain
* Mainnet
* Build on Bitcoin (BOB)
* Mainnet
* Testnet
* Ethereum
* Mainnet
* Sepolia
* Gnosis
* Mainnet
* Optimism
* Mainnet
* Sepolia
* Polygon
* Mainnet
* Mumbai
* Amoy
* Linea
* Mainnet
* Testnet
* opBNB
* Mainnet
* Astar zkevm
* Mainnet
* Testnet
* Blast
* Mainnet
* Testnet
* Celo
* Mainnet
* Testnet
* Open campus codex
* Testnet
* Mantle
* Mainnet
* Testnet
* Camp network
* Testnet
* Aleph Zero EVM
* Mainnet
* Testnet
* Cyber
* Mainnet
* Testnet
* Degen
* Mainnet
* Gelato OP
* Testnet
* Mode
* Mainnet
* Testnet
* Ethernity
* Mainnet
* Testnet
* Ink
* Testnet
* Re.al
* Mainnet
* unreal Testnet
If you don't see a EVM network that you'd like support for, feel free to reach out to us on [Discord](https://discord.gg/KS9MRaTSjx).
import VersionWarning from "../VersionWarning"
## Debugging UserOps with Tenderly
In account abstraction (ERC-4337), the transactions sent by smart accounts are known as "UserOps." UserOps are similar to but not the same as regular transactions, so it may not be clear how to debug them.
In this guide, we will be using [Tenderly](https://dashboard.tenderly.co/) to debug UserOps. Make sure you have signed up and created a Tenderly account.
### The UserOp Structure
Let's begin by examining a typical UserOp example:
```json
{
"sender": "0xd2f1a28cc13c95ac4671cee806593c920d81c1f8",
"nonce": "330",
"initCode": "0x",
"callData": "0x51945447000000000000000000000000a02cddfa44b8c01b4257f54ac1c43f75801e81750000000000000000000000000000000000000000000000000000000000000000000000000000000000000000000000000000000000000000000000000000008000000000000000000000000000000000000000000000000000000000000000000000000000000000000000000000000000000000000000000000000000000000",
"callGasLimit": "55000",
"verificationGasLimit": "1000000",
"preVerificationGas": "100000",
"maxFeePerGas": "39459600032",
"maxPriorityFeePerGas": "39459600000",
"paymasterAndData": "0x",
"signature": "0x00000000bb864a968f25011aeb6574bef934726c066e9b47c261f6e40a49a3065da7deb57b0b40fffe70ec9ff0c1572358cd09d14cf8e671fdb66facfae0cb0a2db3a9cb1c"
}
```
This UserOp structure will be our reference point as we navigate through the process of simulating and debugging UserOps. Understanding the components of this example is key to effectively using Tenderly's tools for our debugging needs.
### UserOp Lifecycle
Before delving into the nuances of debugging UserOps, it's helpful to learn the lifecycle of a UserOp. Here it is:
If this looks daunting, let's focus on only the high level:
* A UserOp, with no gas estimates nor signature, is sent to a paymaster server, who simulates the UserOp and returns the gas estimates.
* If the UserOp has any errors in the validation or execution phase, the paymaster server will return an error since it can't properly simulate it.
* Now, the UserOp, with gas estimates and a proper signature, is sent to the bundler.
* At this point, the UserOp is not expected to revert during the validation phase, but it may nevertheless revert during the execution phase due to the on-chain state having changed between when the UserOp was sent to the paymaster and when it's submitted by the bundler.
### Understanding UserOp Failures
A UserOp can fail at various stages, including during the paymaster call (if sponsored), the gas estimation call, or the final execution call. Identifying the failure point is straightforward by examining the method indicated in the error log of the failed UserOp. For instance:
* **Paymaster Call Failures** might involve methods such as **`zd_sponsorUserOperation`** (ZeroDev meta-paymaster), **`pm_sponsorUserOperation`** (Pimlico), or **`alchemy_requestPaymasterAndData`** (Alchemy).
* **Gas Estimation Call Failures** are indicated by the **`eth_estimateUserOperationGas`** method.
* **Execution Call Failures** are marked by the **`eth_sendUserOperation`** method.
Failures are generally classified into two categories:
* **Validation Errors**: These occur during the validation phase when transactions are deemed invalid due to issues like incorrect signatures or nonce values. They typically present as EntryPoint error codes (e.g., AA23: XXXX).
* **Execution Errors**: These occur during the execution phase when transactions are valid, but the contract interaction is reverted, often noted as **`execution reverted`**.
### Using Tenderly for Simulation and Debugging
#### Adjusting Gas Limits for Simulation
For failures during paymaster or gas estimation calls, the UserOp gas limits (**`preVerificationGas`**, **`callGasLimit`**, **`verificationGasLimit`**) may default to **`0x`**. Before simulating the UserOp, adjust these gas limits as shown below. Increase these values based on error feedback if the simulation fails:
```json
{
"preVerificationGas": "0x186A0",
"callGasLimit": "0xD6D8",
"verificationGasLimit": "0xF4240"
}
```
If the failure occurs during **`eth_sendUserOperation`**, the UserOp should already contain all necessary values for accurate simulation.
#### Debugging Execution Errors
To simulate a UserOp in Tenderly, follow these steps:
1. Log in to your Tenderly account.
2. Navigate to **`Simulator`** and click **`New Simulation`**.
3. Enter the EntryPoint contract address in `Insert any address` input and select the appropriate chain.
* The EntryPoint address is `0x5FF137D4b0FDCD49DcA30c7CF57E578a026d2789` for v0.6 (default for ZeroDev SDK v5.1.x or below) and `0x0000000071727De22E5E9d8BAf0edAc6f37da032` for v0.7 (default for ZeroDev SDK v5.2.x or above)
4. Choose **`simulateHandleOp`**, input the UserOp into the tuple field, and commence the simulation.
If the simulation fails, it typically indicates a problem with the end contract. Verify the initial calldata thoroughly.
#### Simulating End Contract Calls
To simulate an end contract call:
1. Insert the Smart Contract Wallet address in `Insert any address` input (**`sender`** field from UserOp).
2. Select the chain and enter the EntryPoint contract address in the **`From`** field.
3. Enter the **`calldata`** field from UserOp into the **`Raw input data`** field and simulate the transaction.
#### Debugging Validation Errors
For validation errors, simulate the validation process by:
1. Inserting the EntryPoint contract address and selecting the chain.
2. Choosing **`simulateValidation`**, inputting the UserOp into the tuple field, and filling in the **`sender`** and **`calldata`** fields accordingly before simulating the transaction.
When simulating the validation process for a UserOp in Tenderly, the output can provide insightful details into potential issues. For instance, after simulating a UserOp, you might receive a **`ValidationResult`** like the one below:
```json
ValidationResult[{"preOpGas":"437497","prefund":"2118037380807816","sigFailed":true,"validAfter":"0","validUntil":"1708466460","paymasterContext":"0x"},{"stake":"0","unstakeDelaySec":"0"},{"stake":"0","unstakeDelaySec":"0"},{"stake":"100000000000000000000","unstakeDelaySec":"86400"}]
```
On Tenderly, it might look like this:
This result indicates various aspects of the validation process, with a particular focus on the failure due to signature validation (**`"sigFailed": true`**). Such output suggests that the UserOp failed validation because the signature did not match the expected parameters or was otherwise invalid.
### Other resources
There are some resources that we find helpful:
* [StackUp's UserOp debugger](https://userop.dev/)
* [Pimlico's UserOp debugger/simulator](https://dashboard.pimlico.io/debugging)
* [StackUp docs on AA error codes](https://docs.stackup.sh/docs/entrypoint-errors)
* [Pimlico error codes](https://docs.pimlico.io/bundler/reference/entrypoint-errors/aa10)
import VersionWarning from "../VersionWarning"
## Can I Use a KernelClient with Ethers?
Our KernelClient implements the Viem WalletClient interface. Although it is not directly compatible with Ethers.js, we have developed an EIP1193Provider that accepts a KernelClient as a constructor parameter. This provider enables the use of KernelClient with Ethers.js in a similar manner to how window\.ethereum is utilized with Ethers.js.
Below is an example demonstrating how to use a KernelClient with the EIP1193Provider. This example assumes you are familiar with the creating of a KernelClient. For detailed instructions on creating a KernelClient, please refer to our [API docs](https://docs.zerodev.app/sdk/core-api/create-account).
```typescript
import { KernelEIP1193Provider } from '@zerodev/sdk/providers';
import { ethers } from 'ethers';
// Ensure to initialize your KernelClient here
const kernelClient = …;
// Initialize the KernelEIP1193Provider with your KernelClient
const kernelProvider = new KernelEIP1193Provider(kernelClient);
// Use the KernelProvider with ethers
const ethersProvider = new ethers.BrowserProvider(kernelProvider);
const signer = await ethersProvider.getSigner();
```
import VersionWarning from "../VersionWarning"
## Using ZeroDev with Gelato
Gelato's has a unique approach to handling transaction fees without the need for an EntryPoint deposit or an on-chain paymaster. Instead, transaction fees are settled post-execution via [1Balance](https://docs.gelato.network/web3-services/relay/subscriptions-and-payments/1balance-and-relay) across all supported networks, ensuring accurate charging of gas consumed without necessitating per-chain user deposits. This method relies on setting `maxFeePerGas=0`, thereby eliminating the need for upfront fee payments (`requiredPrefund=0`).
For a deeper understanding of Gelato's capabilities, refer to [their comprehensive documentation](https://docs.gelato.network/web3-services/account-abstraction/advantages-and-highlights).
### ZeroDev SDK with Gelato
Integrating Gelato with our SDK necessitates specific configurations, diverging from conventional bundler setups due to Gelato's distinct fee management mechanism.
#### Essentail Configurations
* **Omit Paymaster**: Unlike other services, Gelato's transactions are sponsored without specifying a paymaster. Thus, your account will directly bear the gas fees incurred through Gelato's operations.
Initialization with Preset Options
```typescript
const kernelClient = await createEcdsaKernelAccountClient({
// Mandatory fields
chain,
projectId,
signer,
// Gelato-specific optional fields
provider: "GELATO",
paymaster: 'NONE', // Explicitly omit the use of a paymaster
})
```
Manual Setup without Presets
If opting for a manual configuration, ensure the sponsorUserOperation middleware is not used, as illustrated below (commented out for clarity):
```typescript
const kernelClient = createKernelAccountClient({
account,
chain,
transport: http(process.env.BUNDLER_RPC),
// The following is omitted for Gelato integration:
// sponsorUserOperation: async ({ userOperation }): Promise => {
// const paymasterClient = createZeroDevPaymasterClient({
// chain,
// transport: http(process.env.PAYMASTER_RPC),
// })
// return paymasterClient.sponsorUserOperation({
// userOperation,
// })
// },
})
```
#### Transaction Configuration
When dispatching transactions or user operations through Gelato, it's crucial to set both `maxFeePerGas` and `maxPriorityFeePerGas` to `0x0`. This ensures compatibility with Gelato's fee settlement approach.
* Sending a Transaction
```typescript
const txnHash = await kernelClient.sendTransaction({
to: zeroAddress,
value: BigInt(0),
data: "0x",
// Gelato-specific configurations (you may need to ignore typescript errors)
maxFeePerGas: "0x0",
maxPriorityFeePerGas: "0x0",
})
```
* Dispatching a User Operation
```typescript
const userOpHash = await kernelClient.sendUserOperation({
userOperation: {
callData: await account.encodeCallData({
to: zeroAddress,
value: BigInt(0),
data: "0x",
}),
// Gelato-specific configurations (you may need to ignore typescript errors)
maxFeePerGas: "0x0",
maxPriorityFeePerGas: "0x0",
},
})
```
import VersionWarning from "../VersionWarning"
## Using ZeroDev with React Native
ZeroDev works great in React Native. Our user Stephen Gordon has helpfully made starter templates for:
* [ZeroDev with React Native.](https://github.com/stephen-gordon/zerodev-expo-starter)
* [ZeroDev + Privy with Expo.](https://github.com/Stephen-Gordon/zerodev-privy-expo)
import VersionWarning from "../VersionWarning"
## Chain Abstraction
:::info
Chain Abstraction is in public alpha and undergoing audit. Please [contact us](https://t.me/derek_chiang) if you plan on going live with it.
:::
ZeroDev is the first smart account solution to support *chain abstraction*.
With ZeroDev, you can turn a token balance into a "**chain-abstracted balance**" (CAB). Instead of thinking about "USDC on Ethereum" vs "USDC on Arbitrum," your user can just look at their "USDC balance" as a single balance that can be spent on any chain.
### Demo
[Try this demo of chain abstraction](https://demo.magicaccount.io/).
### Features
#### One unified balance
As aforementioned, CAB (chain-abstracted balance) is a single balance that can be spent on any chain.
For example, if you deposit 100 USDC to a ZeroDev account on Base, then deposit 200 USDC to the account on Polygon, the account will now hold 300 "chain-abstracted USDC" that can be spent on any chain.
#### No bridging latency
Amazingly, CAB can be spent at the speed of the destination chain -- just like a regular transaction. This is unlike a traditional bridge where the user has to wait for confirmations on both the source chain and the destination chain.
#### Spending as any tokens
CAB can be spent as any supported tokens; ZeroDev automatically handles the swapping. For example, if you have 500 USDC in CAB but you need to spend 500 USDT, you can do that.
Currently, we support swapping USDC to USDT/DAI/WETH/WBTC. Contact us if you are looking to support any specific tokens.
### Code example
Here are [complete code examples](https://github.com/zerodevapp/zerodev-examples/blob/main/chain-abstraction) for using CAB. To run the example you need to set the environment variable `CAB_PAYMASTER_URL` which you can find [here](#setting-up-the-cab-client).
### Usage
#### Installation
:::code-group
```bash [npm]
npm i @zerodev/cab
```
```bash [yarn]
yarn add @zerodev/cab
```
```bash [pnpm]
pnpm i @zerodev/cab
```
```bash [bun]
bun add @zerodev/cab
```
:::
#### Setting up the Kernel account
Skip to the next section if your ZeroDev app is already live. This section is for developers who can still change how they set up their Kernel accounts.
For the best experience with CAB, we recommend setting up your Kernel account with a *multi-chain validator*, which is a [validator](https://docs.zerodev.app/sdk/core-api/using-plugins) that can sign messages for multiple chains in one signature. This is useful for CAB because CAB needs to be enabled for each chain, so with a multi-chain validator you can enable CAB with just one signature, whereas with a regular validator you'd need to sign once per chain.
To set up a multi-chain ECDSA validator ([code example](https://github.com/zerodevapp/zerodev-examples/blob/main/chain-abstraction/multichain-validator.ts)):
```tsx
import { toMultiChainECDSAValidator } from "@zerodev/multi-chain-validator"
const ecdsaValidator = await toMultiChainECDSAValidator(publicClient, {
signer,
entryPoint,
kernelVersion,
})
```
To set up a multi-chain passkeys validator, check out [this example](https://gist.github.com/derekchiang/4e458e299d833166dcded2d4b9180f5a#file-passkey-cab-ts-L55-L84).
Once you have created a validator, you can [set up a Kernel client with this validator as usual](https://docs.zerodev.app/sdk/core-api/create-account#create-a-kernel-account).
#### Setting up the CAB client
To use CAB, wrap the [kernel client](/sdk/v5_3_x/core-api/create-account#create-an-account-client) into a CAB client:
```tsx
import { createKernelCABClient } from "@zerodev/cab"
const cabClient = createKernelCABClient(kernelClient, {
transport: http(CAB_PAYMASTER_URL),
})
```
For testing, you can use `https://cab-paymaster-service.onrender.com/paymaster/api` as the `CAB_PAYMASTER_URL`. You need to [contact us](https://t.me/derek_chiang) to obtain a CAB paymaster URL for production.
#### Enabling chain-abstracted balance
Before using CAB, you need to enable CAB for the smart account, by specifying a list of tokens you wish to support. Currently, CAB supports USDC only. Please let us know if there are specific tokens you wish us to support.
```tsx
await cabClient.enableCAB({
tokens: [{
name: "USDC",
// networks: [arbitrum.id, base.id],
}]
})
```
You can optionally specify the list of networks to enable CAB for. If you don't specify it, CAB is enabled for all supported networks.
If you are not using a multi-chain validator, you need to enableCAB for each network, one at a time:
```tsx
await cabClient.enableCAB({
tokens: [{
name: "USDC",
networks: [arbitrum.id],
}]
})
```
#### Spending chain-abstracted balance
There are three steps to spending CAB:
* Construct the calls
* Prepare the CAB UserOp and token info
* Send the UserOp
First, start by constructing the calls. You can include multiple calls if you'd like to send a batch.
```tsx
// In this example, we are performing a USDC transfer
const calls = [
{
to: usdcContractAddress,
data: encodeFunctionData({
abi: erc20Abi,
functionName: "transfer",
args: [account.address, BigInt(1000)]
}),
value: BigInt(0),
}
]
```
Then, prepare the CAB UserOp by specifying the calls and repay tokens. Note that the call can spend a different token than the repay token. Currently the repay token can only be USDC, but the call can spend USDC/USDT/DAI/WETH/WBTC. If the repay token and the spent token are different, the ZeroDev SDK automatically performs the swapping.
```tsx
const { userOperation, repayTokensInfo, sponsorTokensInfo } =
await cabClient.prepareUserOperationRequestCAB({
calls,
repayTokens: ['USDC'],
})
```
Here you have three pieces of data which you can display to users for them to confirm the transaction, if you wish:
* `userOperation` is the full UserOp that will be sent.
* `repayTokensInfo` is information for the repay tokens (the tokens the user is paying solvers)
* `sponsorTokensInfo` is information for the sponsor tokens (the tokens the user is spending, aka the tokens paid by solvers)
Finally, send the CAB UserOp:
```tsx
const userOpHash = await cabClient.sendUserOperationCAB({
userOperation,
})
```
#### Reading chain-abstracted balance
To read the CAB balance for an account:
```tsx
const cabBalance = await cabClient.getCabBalance({
address: account.address,
token: 'USDC',
})
```
import VersionWarning from "../VersionWarning"
## DeFi Integrations
ZeroDev partners with [Enso](https://www.enso.finance/) to support seamless token swaps and DeFi integrations, even across chains.
The API deals with two types of tokens:
* **Base tokens** are normal tokens that do not represent a DeFi position. Examples are ETH, USDC, etc.
* **DeFi tokens** are ERC20 tokens that represent a DeFi position, such as in a [ERC-4626 vault](https://ethereum.org/en/developers/docs/standards/tokens/erc-4626/). For example, depositing ETH into Lido gets you `stETH` that represents staked ETH.
By allowing you to swap between base tokens and DeFi tokens, you can easily:
* Swap between any token pairs.
* Entering and exiting DeFi positions (staking, lending, etc.)
ZeroDev leverages [batching](/sdk/v5_3_x/core-api/batch-transactions) and [delegatecall](/sdk/v5_3_x/core-api/delegatecall) internally to ensure that even complex routes are executed in one atomic UserOp, providing the user with low latency, low gas cost, and high safety.
### Supported Tokens
See the full lists of supported base tokens and DeFi tokens:
* [Base tokens](/sdk/v5_3_x/advanced/supported-base-tokens)
* [DeFi tokens (protocols)](/sdk/v5_3_x/advanced/supported-defi-tokens)
### Installation
:::code-group
```bash [npm]
npm i @zerodev/defi
```
```bash [yarn]
yarn add @zerodev/defi
```
```bash [pnpm]
pnpm i @zerodev/defi
```
```bash [bun]
bun add @zerodev/defi
```
:::
### API
:::info
Check out [these code examples](https://github.com/zerodevapp/zerodev-examples/tree/main/defi).
:::
#### Creating a DeFi client
All DeFi APIs are exposed through a "DeFi client":
```ts
import { createKernelDefiClient } from "@zerodev/defi"
const defiClient = createKernelDefiClient(kernelClient, projectId)
```
Where:
* `kernelClient` is the [account client](/sdk/v5_3_x/core-api/create-account#create-an-account-client) object.
* `projectId` is your ZeroDev project ID, obtained from the dashboard.
#### Swapping Tokens
Suppose you want to swap 100 USDC to USDT:
```ts
import { baseTokenAddresses } from "@zerodev/defi"
import { parseUnits } from "viem"
import { arbitrum } from "viem/chains"
// Replace this with your network
const chain = arbitrum
const userOpHash = await defiClient.sendSwapUserOp({
fromToken: baseTokenAddresses[chain.id].USDC,
fromAmount: parseUnits('100', 6), // USDC uses 6 decimals
toToken: baseTokenAddresses[chain.id].USDT,
gasToken: 'sponsored',
})
```
Where:
* `fromToken` is the input token.
* `fromAmount` is a `bigint` representing the input token amount. Note that this uses the smallest unit for the token, e.g. Wei for Ether.
* `toToken` is the output token.
* `toAddress`: defaults to the account's own address. If specified, it will send the output token to that address instead.
* `gasToken`: [see below.](#gas-tokens)
#### Entering / Exiting DeFi positions
Entering a DeFi position simply means swapping a token into a DeFi token.
You can get a DeFi token address through the `defiTokenAddresses` constant, which is a map with three keys: `chainId => tokenName => protocolName`. For example, the DeFi token representing the USDC vault on AAVE v3 on Arbitrum would be `defiTokenAddresses[arbitrum.id]['USDC']['aave-v3']`. So, to enter the vault:
```ts
import { defiTokenAddresses } from "@zerodev/defi"
import { arbitrum } from "viem/chains"
const chain = arbitrum
const userOpHash = await defiClient.sendSwapUserOp({
fromToken: baseTokenAddresses[chain.id].USDC,
fromAmount: 1_000_000,
toToken: defiTokenAddresses[chain.id]['USDC']['aave-v3'],
gasToken: 'sponsored',
})
```
Similarly, exiting a DeFi position is just swapping a DeFi token into another token.
#### Cross-chain Swaps
To swap tokens across chains, use `sendSwapUserOpCrossChain`. For example, to swap USDC on Arbitrum to DAI on Polygon:
```ts
// Convert mainnet DAI to USDC, and lend it through AAVE on Arbitrum
const userOpHash = await defiClient.sendSwapUserOpCrossChain({
fromToken: baseTokenAddresses[mainnet.id].DAI,
fromAmount: 1_000_000,
toToken: defiTokenAddresses[arbitrum.id]['USDC']['aave-v3'],
toChainId: arbitrum.id,
// Pay gas with input token
gasToken: "fromToken"
})
```
Where:
* `fromToken` is the input token.
* `fromAmount` is a `bigint` representing the input token amount. Note that this uses the smallest unit for the token, e.g. Wei for Ether.
* `toToken` is the output token.
* `toChainId`: the chain for `toToken`,
* `toAddress`: defaults to the account's own address. If specified, it will send the output token to that address instead.
* `gasToken`: [see below.](#gas-tokens)
#### Listing Tokens
You can list all ERC20 tokens an account owns with the `listTokenBalances` function:
```ts
const accountBalances = await defiClient.listTokenBalances({
account: account.address,
chainId: chain.id,
})
```
#### Gas Tokens
The `gasToken` flag specifies how gas is paid for the UserOp. It can be one of the following values:
* `sponsored`: sponsor the UserOp.
* `fromToken`: pays gas in the input token, using a [ERC20 paymaster](/sdk/v5_3_x/core-api/pay-gas-with-erc20s).
* `toToken`: pays gas in the output token, using a [ERC20 paymaster](/sdk/v5_3_x/core-api/pay-gas-with-erc20s).
* `native`: pays gas in the native token, using the account's balance.
* You can also specify an `Address` for a ERC20 token, to pay gas with that token using a [ERC20 paymaster](/sdk/v5_3_x/core-api/pay-gas-with-erc20s).
#### Getting the UserOp without sending
If you want to just construct a UserOp but not send it immediately, use:
* `getSwapUserOp` instead of `sendSwapUserOp`
* `getSwapUserOpCrossChain` instead of `sendSwapUserOpCrossChain`
If you want to get regular transaction data instead of UserOps (presumably because you want to send the transaction through a EOA), use `getSwapUserOpCrossChain`.
import VersionWarning from "../VersionWarning"
## Fallback Providers
:::info
Impatient? Check out [a complete example here](https://github.com/zerodevapp/zerodev-examples/blob/main/fallback-clients/main.ts).
:::
When you use ZeroDev, you can pick [a specific infrastructure provider](/api-and-toolings/infrastructure/rpcs#bundler-rpc). If you don't pick one, we pick one for you.
However, sometimes an infra provider may experience downtime. We have developed a "fallbacks" feature that allows you to set up multiple providers, so that when one fails, another takes over.
### API
Start by creating multiple account clients:
```ts
// Get these from your ZeroDev dashboard
const PAYMASTER_RPC = 'your ZeroDev paymaster RPC'
const BUNDLER_RPC = 'your ZeroDev bundler RPC'
const PAYMASTER_RPC_ALCHEMY = PAYMASTER_RPC + '?provider=ALCHEMY'
const BUNDLER_RPC_ALCHEMY = BUNDLER_RPC + '?provider=ALCHEMY'
const PAYMASTER_RPC_PIMLICO = PAYMASTER_RPC + '?provider=PIMLICO'
const BUNDLER_RPC_PIMLICO = BUNDLER_RPC + '?provider=PIMLICO'
// Create an account client with alchemy as provider
const kernelClient1 = createKernelAccountClient({
account,
chain,
bundlerTransport: http(BUNDLER_RPC_ALCHEMY),
middleware: {
sponsorUserOperation: async ({ userOperation }) => {
const zeroDevPaymasterClient = createZeroDevPaymasterClient({
chain,
transport: http(PAYMASTER_RPC_ALCHEMY),
entryPoint
})
return zeroDevPaymasterClient.sponsorUserOperation({
userOperation,
entryPoint
})
}
},
entryPoint
})
// Create an account client with pimlico as provider
const kernelClient2 = createKernelAccountClient({
account,
chain,
bundlerTransport: http(BUNDLER_RPC_PIMLICO),
middleware: {
sponsorUserOperation: async ({ userOperation }) => {
const zeroDevPaymasterClient = createZeroDevPaymasterClient({
chain,
transport: http(PAYMASTER_RPC_PIMLICO),
entryPoint
})
return zeroDevPaymasterClient.sponsorUserOperation({
userOperation,
entryPoint
})
}
},
entryPoint
})
```
Then combine the Kernel clients with the `createFallbackKernelAccountClient` function:
```ts
const kernelClient = createFallbackKernelAccountClient([
kernelClient1,
kernelClient2,
])
```
Now you can use `kernelClient` as usual. Your `kernelClient` will use `kernelClient1` by default, and if it runs into any issues with it, it will fallback to `kernelClient2`.
### Using non-ZeroDev infra as fallbacks
In the previous example, we used different providers as fallbacks through ZeroDev. If you are worried that ZeroDev itself might go down, you can also sign up directly with providers like Pimlico and set them up as fallback providers.
To do that, simply:
* [Set up a Kernel account client with Pimlico](/sdk/v5_3_x/infra/pimlico).
Then combine them with `createFallbackKernelAccountClient`:
```ts
const kernelClient = createFallbackKernelAccountClient([
zerodevKernelClient,
pimlicoKernelClient,
])
```
import VersionWarning from "../VersionWarning"
## Key Storage
:::warning
The remote signer feature is a paid add-on. Please [contact us](https://t.me/derek_chiang) before you use this feature in production, in order to avoid service disruptions.
:::
Sometimes you might want to manage session keys or even actual private keys for your users, but you may not want to store the keys on your database.
ZeroDev offers a key management API you can use to generate private keys and sign with them. The private key is never transmitted to you or stored on your server -- the API executes the signing remotely.
### Code Example
Check out [a complete example here](https://github.com/zerodevapp/zerodev-examples/blob/main/remote-signer/main.ts).
### Installation
:::code-group
```bash [npm]
npm i @zerodev/remote-signer
```
```bash [yarn]
yarn add @zerodev/remote-signer
```
```bash [pnpm]
pnpm i @zerodev/remote-signer
```
```bash [bun]
bun add @zerodev/remote-signer
```
:::
### API
First, obtain the ZeroDev API key from [your dashboard](https://dashboard.zerodev.app/account). Remember: you must secure this API key. Whoever has access to this API key effectively controls all the private keys you manage with the key management API.
#### Generating a private key
```ts
import { toRemoteSigner, RemoteSignerMode } from "@zerodev/remote-signer"
const remoteSigner = await toRemoteSigner({
apiKey,
mode: RemoteSignerMode.Create
})
```
`remoteSigner` is a [Viem account](https://viem.sh/docs/accounts/privateKey) which you can use for signing.
Note that if you want to get this key later, you must store its "address" which is basically its public key: `remoteSigner.address`.
#### Getting an existing private key
When getting an existing key, specify the "address" of the key.
```ts
import { toRemoteSigner, RemoteSignerMode } from "@zerodev/remote-signer"
const remoteSigner = await toRemoteSigner({
apiKey,
keyAddress: remoteSignerAddress,
mode: RemoteSignerMode.Get
})
```
#### Signing with the key
Since `remoteSigner` is a [Viem account](https://viem.sh/docs/accounts/privateKey), you can use it wherever a Viem account is expected.
For example, to use the remote signer as a [session key](/sdk/v5_3_x/permissions/intro):
```ts
const ecdsaSigner = toECDSASigner({ signer: remoteSigner })
const permissionPlugin = await toPermissionValidator(publicClient, {
entryPoint,
kernelVersion,
signer: ecdsaSigner,
policies: [
// ...
]
})
```
import VersionWarning from "../VersionWarning"
## Multi-chain Signing
You can use Kernel with a "multi-chain validator" which can sign multiple UserOps in one signature, even if the UserOps are on different chains. For example, if you want to bridge some assets from chain A, and then execute a transaction on chain B with the bridged assets, you can sign both the bridging transaction and the target transaction in a single signature.
### Examples
#### Sending multi-chain transactions
If you want to send transactions across multiple chains with a single signature, [refer to this code example.](https://github.com/zerodevapp/zerodev-examples/blob/main/multi-chain/main.ts)
#### Creating multi-chain session keys
If you want to create multiple session keys across different chains, with a single signature, [refer to this code example](https://github.com/zerodevapp/zerodev-examples/blob/main/multi-chain/useSessionKeyWithApproval.ts).
#### Enabling plugins across chains
If you want to enable validators across chains (e.g. to enable recovery), with a single signature, [refer to this code example](https://github.com/zerodevapp/zerodev-examples/blob/main/multi-chain/sendUserOpsWithEnable.ts).
import VersionWarning from "../VersionWarning"
## Multisig
:::info
Impatient? Check out [complete examples here](https://github.com/zerodevapp/zerodev-examples/tree/main/multisig).
:::
With Kernel, it's possible to configure multiple signers for your smart account. The plugin that supports this functionality is named `WeightedECDSAValidator`, for the fact that it supports multiple ECDSA signers, each having a specific "weight."
### How it works
Each signer is set up with a **weight**, and for any given signature, there must be enough combined weight to reach or surpass the **threshold** for the signature to be considered valid.
For example, let's say we have:
* Threshold: 100
* Weights:
* Signer A: 100
* Signer B: 50
* Signer C: 50
In this case, we are setting up a multisig where either signer A alone (100 = 100), or signer B and C together (50 + 50 = 100) can provide a valid signature.
### Installation
:::code-group
```bash [npm]
npm i @zerodev/weighted-ecdsa-validator
```
```bash [yarn]
yarn add @zerodev/weighted-ecdsa-validator
```
```bash [pnpm]
pnpm i @zerodev/weighted-ecdsa-validator
```
```bash [bun]
bun i @zerodev/weighted-ecdsa-validator
```
:::
### Setting up a new multisig account
To set up a new multisig account, start by creating a validator:
```ts
import { createWeightedECDSAValidator } from "@zerodev/weighted-ecdsa-validator"
const multisigValidator = await createWeightedECDSAValidator(publicClient, {
entryPoint,
kernelVersion,
config: {
threshold: 100,
signers: [
{ address: signerA.address, weight: 100 },
{ address: signerB.address, weight: 50 },
{ address: signerC.address, weight: 50 },
]
},
signers: [signerB, signerC],
})
```
In `config`, you specify the `threshold` and an list of signer addresses, as well as their weights.
In `signers`, you specify the list of signers ([Viem accounts](https://viem.sh/docs/accounts/local)) that will be signing for this account. The combined weight of these signers must reach the threshold.
After creating the validator, you can [set up a Kernel account using the validator](/sdk/v5_3_x/core-api/create-account#create-a-kernel-account) as usual.
### Using an existing multisig account
If a multisig account has already been deployed, you can skip the multisig config but specify the deployed multisig address when you create the account:
```ts
const multisigValidator = await createWeightedECDSAValidator(publicClient, {
entryPoint,
kernelVersion,
signers: [signerB, signerC],
})
const account = await createKernelAccount(publicClient, {
entryPoint,
kernelVersion,
deployedAccountAddress: '',
plugins: {
sudo: multisigValidator,
}
})
```
### Updating multisig config
In many use cases, you may need to add and remove signers over time. To do so, send a UserOp that updates the config:
```ts
import { getUpdateConfigCall } from "@zerodev/weighted-ecdsa-validator"
// getUpdateConfigCall can be used with either sendTransaction or sendUserOperation
await kernelClient.sendTransaction(
getUpdateConfigCall({
threshold: 100,
signers: [
{ address: signer1.address, weight: 50 },
{ address: signer2.address, weight: 50 },
{ address: signer3.address, weight: 50 },
]
}),
)
```
Note that `kernelClient` here must itself be a correctly set-up instance of a multisig account client.
import VersionWarning from "../VersionWarning"
## Parallel UserOps
:::info
Impatient? Check out [a complete example here](https://github.com/zerodevapp/zerodev-examples/blob/main/send-transactions/with-2d-nonce.ts).
:::
With a EOA, the nonce is sequential: 1, 2, 3, ... This means that transactions must be ordered sequentially, and a transaction cannot be processed unless a previous transaction was completed.
With smart accounts, the nonce can be two-dimensional, which allows for *parallel UserOps*. Imagine that your user wants to place three trades:
1. Swap 100 USDC to DAI
2. Swap 100 DAI to USDT
3. Swap 1WETH to USDT
In this example, assuming the user did not have DAI to start with, the first two trades have dependencies, since the user needs to wait for the first trade to complete before they can do the second trade. However, the third trade doesn't depend on either of the first two trades, so it ought to be able to be placed in parallel.
### API
To send parallel UserOps, use "nonce keys" to compute nonces:
```ts
const nonceKey = getCustomNonceKeyFromString(
"nonce key",
entryPoint,
)
const nonce = await account.getNonce(nonceKey)
await kernelClient.sendUserOperation({
userOperation: {
callData,
nonce: nonce,
},
})
// This UserOp won't wait for the previous one, because it uses
// a different nonce key.
const nonceKey2 = getCustomNonceKeyFromString(
"nonce key 2",
entryPoint,
)
const nonce2 = await account.getNonce(nonceKey2)
await kernelClient.sendUserOperation({
userOperation: {
callData,
nonce: nonce2,
},
})
```
All UserOps using the same nonce key will be ordered sequentially. UserOps using different nonce keys will be parallel to each other.
For example, if you want to order all UserOps that interact with Uniswap, and order all UserOps that interact with AAVE, but you want the Uniswap UserOps and the AAVE UserOps to be parallel to each other, you can use the string "Uniswap" and "AAVE" as the nonce keys for their UserOps respectively.
import VersionWarning from "../VersionWarning"
## Passkeys
Passkeys are cryptographic key pairs created on end-user devices. [Apple](https://developer.apple.com/passkeys) and [Google](https://developers.google.com/identity/passkeys) are two major industry players pushing for the passkeys standard, which means that passkeys are widely available on consumer devices such as:
* iPhones / iPads / Macbooks
* Android phones / tablets
* Chrome (on Windows / Mac / Android)
[See here for a full list of systems that support passkeys.](https://passkeys.dev/device-support/#matrix)
The biggest value-add of passkeys, in the context of Web3, is **saving users from manually managing and securing their private keys.** Instead of writing down 12-word seed phrases, your user can simply use a passkey-enabled device to manage their wallet, and trust that the hardware will safely store the passkey, and the hardware vendor (e.g. Apple/Google) will [securely backup the keys](#how-are-passkeys-sync-ed-and-recovered).
### Demo
* Passkeys
* [Demo](https://passkey-demo.zerodev.app)
* [Source code](https://github.com/zerodevapp/passkey-tutorial/tree/deployed)
* Passkeys + Session Keys
* [Demo](https://passkey-session-key-demo.zerodev.app)
* [Source code](https://github.com/zerodevapp/passkey-session-key-example)
* [Read here](#can-i-use-passkeys-with-session-keys) for why you want to use passkeys with session keys.
### How ZeroDev supports passkeys
ZeroDev/Kernel supports using passkeys as signers. The support comes in two flavors:
* **Native passkeys** using the [ERC-7212 precompile](https://github.com/ethereum/RIPs/blob/master/RIPS/rip-7212.md). Native passkeys are the best option when available, since it uses the least amount of gas (only 3450 gas for verifying a P256 signature). Currently only a small number of networks support ERC-7212, but it's expected that most networks will support it over time.
* **Smart contract passkeys** using either the [Daimo](https://github.com/daimo-eth/p256-verifier) or [FCL](https://github.com/rdubois-crypto/FreshCryptoLib) implementation. Smart contract passkeys can work on all EVM networks, but they are expensive (300-400k gas for verifying a P256 signature).
ZeroDev implements passkey supports through a **progressive passkey validator**, which uses native passkeys if ERC-7212 is available, and falls back to smart contract passkeys otherwise. Notably, this means that if you use passkeys on a network where ERC-7212 isn't available, and the network later adds support for ERC-7212, you don't need to upgrade your validator -- it will automatically start taking advantage of the ERC-7212 precompile.
### Quickstart
[Follow this tutorial](/sdk/v5_3_x/getting-started/tutorial-passkeys) to get started with passkey smart accounts.
### Installation
:::code-group
```bash [npm]
npm i @zerodev/passkey-validator
```
```bash [yarn]
yarn add @zerodev/passkey-validator
```
```bash [pnpm]
pnpm i @zerodev/passkey-validator
```
```bash [bun]
bun add @zerodev/passkey-validator
```
:::
### API
#### Setting up passkey server
In this tutorial, we will be using ZeroDev's passkey server. If you want to use your own passkey server, [read this](#how-do-i-use-my-own-passkeys-server). If you wonder why a passkey server is needed at all, [read this](#why-do-we-need-a-passkeys-server).
Head to the [ZeroDev dashboard](https://dashboard.zerodev.app), select a project, and copy the passkey server URL:
We will be using the "Project ID" in the next steps.
### Set up a gas policy
With ZeroDev, by default you are not sponsoring UserOps. To sponsor UserOps, you need to set up a gas policy.
Go to the "Gas Policies" section of your dashboard and create a new "Project Policy":
From now on, when you use the paymaster RPC from the previous step, the paymaster will sponsor UserOps according to the policy you just set up, which in this case is up to 100 UserOps per minute.
### Write the code
Clone the [ZeroDev examples repo](https://github.com/zerodevapp/zerodev-examples). Then, inside the directory, install all dependencies:
```bash
npm install
```
Create a `.env` file with the following line:
```
ZERODEV_PROJECT_ID=
```
Replacing `` with your actual project ID from the dashboard, and make sure you are using a project ID for Sepolia.
If all goes well, you should be able to run:
```bash
npx ts-node tutorial/completed.ts
```
Now open the [`tutorial/template.ts`](https://github.com/zerodevapp/zerodev-examples/blob/main/tutorial/template.ts) file in your editor. This will be the template where you will write your code. You can always refer to [`tutorial/completed.ts`](https://github.com/zerodevapp/zerodev-examples/blob/main/tutorial/completed.ts) to see the completed tutorial code.
#### Create a signer
Kernel accounts support many different signing methods, including ECDSA keys and passkeys. In this tutorial, we will use ECDSA keys which are the same type of keys that MetaMask and other Ethereum wallets use.
Let's start by generating a random key. Add the following code to the `main` function:
```typescript
import { generatePrivateKey, privateKeyToAccount } from "viem/accounts"
const main = async () => {
const privateKey = generatePrivateKey() // [!code focus]
const signer = privateKeyToAccount(privateKey) // [!code focus]
}
```
#### Create a validator
Each Kernel account handles validation through a smart contract known as a "validator." In this case, we will be using the ECDSA validator.
Add the following code to create the ECDSA validator:
```typescript
import { signerToEcdsaValidator } from "@zerodev/ecdsa-validator"
const main = async () => {
// other code...
const ecdsaValidator = await signerToEcdsaValidator(publicClient, { // [!code focus]
signer, // [!code focus]
entryPoint, // [!code focus]
}) // [!code focus]
}
```
#### Create an account
We are now ready to create an account. Add the following code:
```typescript
import { createKernelAccount } from "@zerodev/sdk"
const main = async () => {
// other code...
const account = await createKernelAccount(publicClient, { // [!code focus]
plugins: { // [!code focus]
sudo: ecdsaValidator, // [!code focus]
}, // [!code focus]
entryPoint, // [!code focus]
}) // [!code focus]
}
```
#### Creating a Kernel client
Finally, we are going to create an "account client" which serves as the connection between your account and some AA infra (i.e. bundlers and paymasters). The connection is necessary for you to actually send UserOps.
Add the following code:
```typescript
const main = async () => {
// ... other code
const kernelClient = createKernelAccountClient({
account,
chain,
entryPoint,
bundlerTransport: http(BUNDLER_RPC),
middleware: {
sponsorUserOperation: async ({ userOperation }) => {
const zerodevPaymaster = createZeroDevPaymasterClient({
chain,
entryPoint,
transport: http(PAYMASTER_RPC),
})
return zerodevPaymaster.sponsorUserOperation({
userOperation,
entryPoint,
})
}
}
})
const accountAddress = kernelClient.account.address
console.log("My account:", accountAddress)
}
```
Run this script with `npx ts-node tutorial/template.ts` and confirm that it prints an address.
#### Send a UserOp
Now that you have an account client, it's time to send your first UserOp! For this tutorial, we will mint an NFT from a contract deployed on Sepolia.
Add the following import and code:
```typescript
import { encodeFunctionData } from "viem"
const main = async () => {
// ... other code
const userOpHash = await kernelClient.sendUserOperation({
userOperation: {
callData: await kernelClient.account.encodeCallData({
to: contractAddress,
value: BigInt(0),
data: encodeFunctionData({
abi: contractABI,
functionName: "mint",
args: [accountAddress],
})
})
}
})
console.log("Submitted UserOp:", userOpHash)
}
```
There's quite a bit of code going on, so let's go through it.
* We start by calling `kernelClient.sendUserOperation`, which takes a `userOperation` argument.
* Inside `userOperation`, we specify a `callData` field. This is the equivalent of the calldata field for a normal Ethereum transaction.
* Since we want to call the `mint(address)` function on the NFT contract, we use Viem's helper function `encodeFunctionData` and give it the ABI, function name, and function argument.
* `kernelClient.sendUserOperation` returns a "UserOperation hash." This is the equivalent of a transaction hash but for a UserOp.
Run the script again with `npx ts-node tutorial/template.ts` and confirm that it prints the UserOp hash. At this point, you can go to a UserOp explorer such as [JiffyScan](https://jiffyscan.xyz/) and find your UserOp with the hash!
#### Waiting for the UserOp
When you call `sendUserOperation`, the call returns as soon as the UserOp has been submitted to the bundler, but it doesn't wait for the UserOp to be "confirmed" on-chain. To wait for the UserOp to be confirmed, add the following import and code:
```typescript
import { bundlerActions } from "permissionless"
const main = async () => {
// ... other code
const bundlerClient = kernelClient.extend(bundlerActions(entryPoint))
const receipt = await bundlerClient.waitForUserOperationReceipt({
hash: userOpHash,
})
console.log("UserOp confirmed:", receipt.userOpHash)
}
```
Let's break down the code:
* Since `waitForUserOperationReceipt` is a bundler action, we need to first `extend` the `kernelClient` with `bundlerActions`. If you are unfamiliar with the concept of "actions," you can read more about it on [Viem's documentation](https://viem.sh/docs/actions/public/introduction).
* Now, we can call `waitForUserOperationReceipt`. This function returns a "receipt" object. If you are curious, you can print the full object and see what it contains.
#### Read contract state
Now let's confirm that we actually minted an NFT. Add the following import and code:
```typescript
import { publicActions } from "viem"
const main = async () => {
// ... other code
const nftBalance = await publicClient.readContract({
address: contractAddress,
abi: contractABI,
functionName: 'balanceOf',
args: [accountAddress],
})
console.log(`NFT balance: ${nftBalance}`)
}
```
Run the script again. You should see that it prints `NFT balance: 1`, confirming that you have minted an NFT!
### Next steps
In this tutorial, we were able to mint an NFT without paying gas, thanks to gas sponsorship.
For next steps:
* Check out [the core API](/sdk/v5_3_x/core-api/create-account) to learn more about the SDK
* Read some [code examples](https://github.com/zerodevapp/zerodev-examples) of using ZeroDev
import VersionWarning from "../VersionWarning"
## Batching Transactions
:::info
Impatient? Check out [complete examples here](https://github.com/zerodevapp/zerodev-examples/tree/main/batch-transactions).
:::
Smart accounts like Kernel support *batching* transactions -- rolling multiple transactions into one. This is very useful for simplifying Web3 interactions for your users. For instance, instead of doing `approve()` followed by `transfer()`, your user can do both in one transaction.
Batching transactions has a number of important benefits:
* Your user waits for only 1 transaction instead of multiple.
* Your user pays less gas.
* If any transaction in the batch reverts, the entire batch reverts. This ensures that your user won't be stuck in an inconsistent state.
* This is known as "atomicity."
### API
There are two ways to send batched transactions. `sendTransactions` is a simple API that's good enough for most use cases. If you need fine-grained control over your UserOp, you can use `sendUserOperation`.
#### `sendTransactions`
```typescript
const txHash = await kernelClient.sendTransactions({
transactions: [
{
to: "0xADDRESS",
value: value,
data: "0xDATA",
},
{
to: "0xADDRESS",
value: value,
data: "0xDATA",
},
],
})
```
#### `sendUserOperation`
You can learn more about the `sendUserOperation` API [here](/sdk/v5_3_x/core-api/send-transactions#sending-raw-userops).
To send a UserOp with batching, simply pass an array of calls into `encodeCallData`.
```typescript
const userOpHash = await kernelClient.sendUserOperation({
userOperation: {
callData: account.encodeCallData([
{
to,
value,
data,
},
{
to,
value,
data,
},
]),
// other UserOp params
},
})
```
import VersionWarning from "../VersionWarning"
## Creating a Smart Account
:::info
Impatient? Check out [a complete example here](https://github.com/zerodevapp/zerodev-examples/blob/main/create-account/main.ts).
:::
At the core of account abstraction is the *smart account* -- an account powered by a smart contract. ZeroDev is built on [Kernel](https://github.com/zerodevapp/kernel), a *modular smart account* that can be customized with plugins.
When you create a Kernel account, you set it up with a *validator*, which is a type of plugin that handles how the account validates UserOps. In this tutorial, we will be using the ECDSA validator, which works like a normal EOA by validating signatures from a ECDSA private key. ZeroDev supports other validators such as [passkeys](/sdk/v5_3_x/advanced/passkeys) and [multisig](/sdk/v5_3_x/advanced/multisig).
We will be using a local private key, but the ECDSA validator also works with [third-party auth providers](/sdk/v5_3_x/signers/intro).
### Installation
:::code-group
```bash [npm]
npm i @zerodev/sdk @zerodev/ecdsa-validator permissionless
```
```bash [yarn]
yarn add @zerodev/sdk @zerodev/ecdsa-validator permissionless
```
```bash [pnpm]
pnpm i @zerodev/sdk @zerodev/ecdsa-validator permissionless
```
```bash [bun]
bun add @zerodev/sdk @zerodev/ecdsa-validator permissionless
```
:::
### API
#### Picking an EntryPoint
Currently there are two versions of ERC-4337 that are used in production. They are referred to as "EntryPoint 0.6" and "EntryPoint 0.7", where "EntryPoint" refers to the singleton ERC-4337 contract.
If you are building a new application, we recommend using EntryPoint 0.7 (Kernel v3), which gives you the latest and greatest features and optimizations. If you already have an application using EntryPoint 0.6 (Kernel v2), just stick with it -- it will be supported indefinitely.
In this tutorial, we will use EntryPoint 0.7. Start by selecting an EntryPoint:
```ts
import { ENTRYPOINT_ADDRESS_V07 } from "permissionless"
const entryPoint = ENTRYPOINT_ADDRESS_V07
```
#### Picking a Kernel version
[Kernel](https://github.com/zerodevapp/kernel) is the smart account that ZeroDev builds on. ZeroDev SDK used to implicitly use the latest version of Kernel, which has caused some compatibility issues when people upgrade the SDK. Therefore, starting from ZeroDev SDK v5.3, we require that you explicitly specify the Kernel version. This is how you generally should choose:
* If you had already been in production with ZeroDev SDK v4 or lower, use Kernel version 2.4 with EntryPoint 0.6.
* If you had already been in production with ZeroDev SDK v5, use Kernel version 3.0 with EntryPoint 0.7.
* If you are still in development or starting a new project, use Kernel version 3.1 with EntryPoint 0.7.
```ts
import { KERNEL_V3_1 } from "@zerodev/sdk/constants"
const kernelVersion = KERNEL_V3_1
```
#### Creating a public client
In Viem, a [public client](https://viem.sh/docs/clients/public.html) is an interface to a JSON-RPC API such as Infura or Alchemy.
```typescript
import { createPublicClient, http } from "viem"
import { base } from 'viem/chains'
const publicClient = createPublicClient({
// Use your own RPC provider (e.g. Infura/Alchemy).
transport: http("RPC_URL"),
chain: base,
})
```
#### Creating a signer
As aforementioned, a Kernel account using a ECDSA validator is "owned" by a signer, which is anything that can sign messages with a private key.
Since Kernel is built on top of Viem, we can use any [Viem account](https://viem.sh/docs/accounts/local/toAccount) as the signer. In this example, we create a signer from a private key:
```typescript
import { Hex } from "viem"
import { privateKeyToAccount } from "viem/accounts"
const signer = privateKeyToAccount("PRIVATE_KEY" as Hex)
```
Replace `PRIVATE_KEY` with an actual private key. You can [generate a random one here](https://privatekeys.pw/keys/ethereum/random).
#### Creating a ECDSA validator
Then create a ECDSA validator from the signer:
```typescript
import { signerToEcdsaValidator } from "@zerodev/ecdsa-validator"
const ecdsaValidator = await signerToEcdsaValidator(publicClient, {
signer,
entryPoint,
kernelVersion
})
```
#### Create a Kernel account
Next, create a Kernel account with the ECDSA validator:
```typescript
import { createKernelAccount } from "@zerodev/sdk"
const account = await createKernelAccount(publicClient, {
plugins: {
sudo: ecdsaValidator,
},
entryPoint,
kernelVersion
})
```
#### Create an account client
Now that we have an account, we can finally construct an "account client," which is the equivalent of a [wallet client in Viem](https://viem.sh/docs/clients/wallet.html) that allows you to send UserOps to bundlers.
```typescript
import { createKernelAccountClient } from "@zerodev/sdk"
import { http } from "viem"
import { base } from 'viem/chains'
const kernelClient = createKernelAccountClient({
account,
entryPoint,
// Replace with your chain
chain: base,
// Replace with your bundler RPC.
// For ZeroDev, you can find the RPC on your dashboard.
bundlerTransport: http('BUNDLER_RPC'),
// Optional -- only if you want to use a paymaster
middleware: {
sponsorUserOperation,
},
})
```
Note that:
* You need to replace the `BUNDLER_RPC` with an actual bundler RPC.
* For ZeroDev, you can find the RPC on your dashboard.
* You need to make sure to set the right `chain`.
* `sponsorUserOperation` only needs to be specified if you want to [use a paymaster](/sdk/v5_3_x/core-api/sponsor-gas).
Now you are ready to do things with your smart account, like [sending UserOps](/sdk/v5_3_x/core-api/send-transactions)!
### FAQs
#### When I create an account, is it deployed on-chain?
No. If your account hasn't been deployed yet, we simply use [`CREATE2`](https://eips.ethereum.org/EIPS/eip-1014) to compute the address that the account *would* be deployed to. Your account is deployed automatically with the first UserOp it sends.
In other words, "creating" accounts with the SDK is free -- you can create an infinite number of such account objects without paying any gas. It's only when you send the first UserOp that the account is deployed automatically.
#### Can I create multiple accounts from the same EOA signer?
Yes, you can do so by providing an `index` when you create the account object.
```typescript
import { createKernelAccount } from "@zerodev/sdk"
const account = createKernelAccount(publicClient, {
// other options...
// optionally specify the index; different indexes will yield different accounts
index: 1,
})
```
#### How do I compute the smart account address from the EOA signer address?
Sometimes you only know the address of the EOA signer but you don't have the signer itself. In that case, you can still compute the address of the smart account with this helper function:
```ts
import { getKernelAddressFromECDSA } from "@zerodev/ecdsa-validator"
// index is 0 by default
const smartAccountAddress = await getKernelAddressFromECDSA(publicClient, eoaAddress, index)
```
#### How do I create a Kernel account object with a specific address?
Normally, you don't need to manually specify an address because the smart account address is computed from your signer data. However, if you have changed the signer, then you may need to manually specify the smart account address.
You can do it like this:
```ts
const account = await createKernelAccount(publicClient, {
deployedAccountAddress: "address",
// ...other args
})
```
import VersionWarning from "../VersionWarning"
## Delegatecall
:::warning
`delegatecall` is very dangerous. Unless you know exactly what you are doing, don't do it, or you might risk losing all your funds.
:::
:::info
Impatient? Check out [complete examples here](https://github.com/zerodevapp/zerodev-examples/blob/main/delegatecall/main.ts).
:::
`delegatecall` is a powerful EVM opcode that allows the calling contract to execute code in another contract, while keeping the storage context. [You can read more about `delegatecall` here](https://solidity-by-example.org/delegatecall/).
### API
To send a UserOp that uses `delegatecall`, simply specify the `callType` of the UserOp:
```typescript
const userOpHash = await kernelClient.sendUserOperation({
userOperation: {
callData: await kernelClient.account.encodeCallData({
to: targetAdress,
data: callData,
value: 0n,
callType: "delegatecall",
}),
},
})
```
import VersionWarning from "../VersionWarning"
## Deploying Contracts
:::info
Impatient? Check out [complete examples here](https://github.com/zerodevapp/zerodev-examples/blob/main/deploy-contract/main.ts).
:::
To deploy smart contracts from your smart account, use the `deployContract` function:
```typescript
const txnHash = await kernelClient.deployContract({
abi,
bytecode,
})
```
import VersionWarning from "../VersionWarning"
## Paying Gas with ERC20s
:::info
Impatient? Check out [complete examples here](https://github.com/zerodevapp/zerodev-examples/tree/main/pay-gas-with-erc20).
:::
:::warning
**Important:** Our ERC20 Paymaster currently supports USDC on Ethereum Mainnet, Polygon, Base, Optimism, and Arbitrum networks, including both their mainnet and testnet environments.
:::
A smart account can pay gas with ERC20 tokens. As a result, your users don't have to own any native gas tokens (e.g. ETH) in order to use Web3. Instead, they can just use stablecoins or even your project's own tokens. When your users pay gas with ERC20 tokens, we add 5% to the exchange rate to make a profit.
:::warning
Using your project's own tokens to pay for gas is a beta feature. If you are interested, please reach out.
:::
On a high level, you need to do two things to enable a smart account to pay gas in a particular ERC20 token:
* Set up the Kernel client with the ERC20 paymaster.
* Ensure that enough ERC20 tokens have been approved for the ERC20 paymaster.
* This step is necessary because the ERC20 paymaster needs to withdraw ERC20 tokens from the smart account.
Let's go through these two steps next.
### Set up Kernel Client
When you [set up an account](/sdk/v5_3_x/core-api/create-account#create-an-account-client), do this:
```typescript
import {
createZeroDevPaymasterClient,
createKernelAccountClient,
gasTokenAddresses,
} from "@zerodev/sdk"
import { mainnet } from "viem/chains"
import { UserOperation } from "permissionless"
// use whatever chain you want
const chain = mainnet.id
const entryPoint = ENTRYPOINT_ADDRESS_V07
const paymasterClient = createZeroDevPaymasterClient({
chain,
entryPoint,
transport: http('ZERODEV_PAYMASTER_RPC'), // get the RPC on ZeroDev dashboard
})
const kernelClient = createKernelAccountClient({
// other options...
middleware: {
sponsorUserOperation: async ({ userOperation }) => {
return paymasterClient.sponsorUserOperation({
userOperation,
entryPoint,
gasToken: gasTokenAddresses[chain.id]['USDC'],
})
},
},
})
```
### Approve ERC20 tokens for paymaster
Use the `getERC20PaymasterApproveCall` function to construct a call that approves the paymaster with the ERC20 tokens:
```typescript
import { getERC20PaymasterApproveCall } from "@zerodev/sdk"
const userOpHash = await kernelClient.sendUserOperation({
userOperation: {
callData: await kernelClient.account.encodeCallData(
await getERC20PaymasterApproveCall(paymasterClient, {
gasToken: gasTokenAddresses[chain.id]['USDC'],
approveAmount: parseEther('0.1'),
entryPoint,
}),
),
},
})
```
Thanks to [batching](/sdk/v5_3_x/core-api/batch-transactions), it's possible to batch the approval with the UserOp you want to send:
```typescript
const userOpHash = await kernelClient.sendUserOperation({
userOperation: {
callData: await account.encodeCallData([
// The approval
await getERC20PaymasterApproveCall(paymasterClient, {
gasToken: gasTokenAddresses[chain.id]['USDC'],
approveAmount: parseEther('0.1'),
entryPoint,
}),
// The actual call
{
to: '0x...'
data: "0x...",
value: BigInt(0),
},
]),
},
})
```
Note that you only have to approve once, as long as the approval amount is sufficient for many UserOps. The [paymaster contract by Pimlico](https://github.com/pimlicolabs/erc20-paymaster/blob/main/src/ERC20PaymasterV07.sol) has been audited, it's widely used and generally considered safe.
### Estimate Gas in ERC20s
If you need to estimate gas in terms of a ERC20 token, do this:
```ts
const userOperation = await kernelClient.prepareUserOperationRequest({
userOperation: {
// replace this with your actual calldata
callData: await account.encodeCallData({
to: zeroAddress,
value: BigInt(0),
data: "0x"
})
},
account: kernelClient.account,
})
const erc20Amount = await paymasterClient.estimateGasInERC20({
userOperation,
// replace this with the token you want
gasTokenAddress: gasTokenAddresses[chain.id]["USDC"]
})
```
You can also see [a code example for estimating gas here](https://github.com/zerodevapp/zerodev-examples/blob/main/pay-gas-with-erc20/estimate-gas.ts).
### Supported Tokens
Currently, our ERC20 Paymaster supports USDC on the following networks:
* **Ethereum Mainnet**
* **Polygon**
* **Base**
* **Optimism**
* **Arbitrum**
If you want to use a different token, you can either reach out to us or deploy your own Self-Funded ERC20 Paymaster.
### Deploy Your Own ERC20 Paymaster
If you want to support a custom ERC20 token, you can deploy and manage your own ERC20 paymaster contract. To do this:
1. Visit the ZeroDev dashboard to deploy a self-funded ERC20 paymaster contract
2. Fund the contract with the native currency (e.g., ETH)
3. Set a conversion rate for the ERC20 token you would like to enable for the paymaster
Once deployed, you can use your custom paymaster by copying the paymaster URL from the dashboard and using it as the `transport` parameter when creating the paymaster client:
```typescript
const paymasterClient = createZeroDevPaymasterClient({
chain,
entryPoint,
transport: http('YOUR_CUSTOM_PAYMASTER_URL'), // from the self-funded paymaster page on the dashboard
})
```
The rest of the integration remains the same as described above.
import VersionWarning from "../VersionWarning"
## Sending Transactions
:::info
Impatient? Check out [complete examples here](https://github.com/zerodevapp/zerodev-examples/tree/main/send-transactions).
:::
In ERC-4337, a transaction is known as a "UserOp." A UserOp looks mostly like a regular transaction, but it contains some extra information specific to AA, such as whether the UserOp should be sponsored.
There are two ways to send UserOps:
* Sending raw UserOps
* Sending regular transactions through the Viem API, which ZeroDev then "translates" into UserOps
The former enables the highest degree of flexibility, whereas the latter is more interoperable with existing libraries like Viem that deal only with transactions and not UserOps.
We will now describe both approaches. We assume that you have already [created a Kernel account](/sdk/v5_3_x/core-api/create-account).
### Using the Viem API
Since the Kernel account client implements [Viem's wallet client interface](https://viem.sh/docs/clients/wallet.html), you can send UserOps with standard Viem methods.
#### Sending Transactions
```typescript
const txnHash = await kernelClient.sendTransaction({
to: "TO_ADDRESS",
value: VALUE, // default to 0
data: "0xDATA", // default to 0x
})
```
This function returns the transaction hash of the ERC-4337 bundle that contains the UserOp. Due to the way that ERC-4337 works, by the time we get the transaction hash, the ERC-4337 bundle (and therefore the UserOps includeded within) will have already been mined, meaning that you don't have to [wait with the hash](https://viem.sh/docs/actions/public/waitForTransactionReceipt.html).
If you need to separate the sending from the waiting of the UserOp, try [sending raw UserOps](#sending-raw-userops).
#### Interacting with Contracts
First, construct a [Viem contract instance](https://viem.sh/docs/contract/getContract.html) by passing the Kernel account client as the `walletClient`:
```typescript
import { getContract } from 'viem'
const contract = getContract({
address: '0xADDRESS',
abi: abi,
publicClient: publicClient,
walletClient: kernelClient,
})
```
Then, interact with the contract like how you normally would:
```typescript
// Example code from Viem
const balance = await contract.read.balanceOf([
'0xa5cc3c03994DB5b0d9A5eEdD10CabaB0813678AC',
])
const hash = await contract.write.mint([69420])
const logs = await contract.getEvents.Transfer()
const unwatch = contract.watchEvent.Transfer(
{
from: '0xd8da6bf26964af9d7eed9e03e53415d37aa96045',
to: '0xa5cc3c03994db5b0d9a5eedd10cabab0813678ac'
},
{ onLogs: logs => console.log(logs) }
)
```
### Sending UserOps
#### UserOp API
Sending raw UserOps affords you with the highest degree of control. To send a raw UserOp, use `sendUserOperation`:
```typescript
const userOpHash = await kernelClient.sendUserOperation({
userOperation: {
callData: "0x..."
},
})
```
While `callData` is the only required field, there are many other fields that you can read about on the [ERC-4337 spec](https://github.com/eth-infinitism/account-abstraction/blob/develop/erc/ERCS/erc-4337.md):
```typescript
const userOpHash = await kernelClient.sendUserOperation({
userOperation: {
sender: "0x0C123D90Da0a640fFE54a2359D159629065775C5",
nonce: 3n,
initCode: "0x",
callData: "0x18dfb3c7000000000000000000000000000000000000000000000000000000000000004000000000000000000000000000000000000000000000000000000000000000a00000000000000000000000000000000000000000000000000000000000000002000000000000000000000000d2f598c826429eee7c071c02735549acd88f2c09000000000000000000000000d2f598c826429eee7c071c02735549acd88f2c090000000000000000000000000000000000000000000000000000000000000002000000000000000000000000000000000000000000000000000000000000004000000000000000000000000000000000000000000000000000000000000000c00000000000000000000000000000000000000000000000000000000000000044a9059cbb00000000000000000000000043a4eacb7839f202d9cab465dbdd77d4fabe0a1800000000000000000000000000000000000000000000000003782dace9d90000000000000000000000000000000000000000000000000000000000000000000000000000000000000000000000000000000000000000000000000044a9059cbb000000000000000000000000982e148216e3aa6b38f9d901ef578b5c06dd750200000000000000000000000000000000000000000000000005d423c655aa000000000000000000000000000000000000000000000000000000000000",
callGasLimit: 50305n,
verificationGasLimit: 80565n,
preVerificationGas: 56135n,
maxFeePerGas: 113000000n,
maxPriorityFeePerGas: 113000100n,
paymasterAndData: "0xe93eca6595fe94091dc1af46aac2a8b5d79907700000000000000000000000000000000000000000000000000000000065133b6f0000000000000000000000000000000000000000000000000000000000000000000000000000000000000000000000000000000000000000000000000000000000000000000000000000000000000000000000000000000000000000000000005d3d07ae8973ba1b8a26d0d72d8882dfa97622942a63c4b655f4928385ce587f6aa2fa1ab347e615d5f39e1214d18f426375da8a01514fb126eb0bb29f0c319d1b",
signature: "0xf1513a8537a079a4d728bb87099b2c901e2c9034e60c95a4d41ac1ed75d6ee90270d52b48af30aa036e9a205ea008e1c62b317e7b3f88b3f302d45fb1ba76a191b"
},
})
```
Other than `callData`, every field has a sensible default:
* `sender` defaults to the Kernel account address
* `nonce` defaults to the next available nonce
* `initCode` defaults to `0x` if the account has been deployed, or the correct `initCode` if not.
* `callGasLimit`, `verificationGasLimit`, and `preVerificationGas` default to estimations provided by the underlying bundler and paymaster.
* `maxFeePerGas` and `maxPriorityFeePerGas` default to estimations provided by the public client.
* `paymasterAndData` defaults to `0x` if no paymaster was specified when you created the Kernel account object, or it will use the value provided by the paymaster.
* `signature` defaults to the signature provided by the signer.
#### Encoding callData
To encode the calldata, use the `encodeCallData` function from the account object:
```typescript
const userOpHash = await kernelClient.sendUserOperation({
userOperation: {
callData: kernelClient.account.encodeCallData({
to,
value,
data,
}),
},
})
```
You can use Viem's helper functions such as `encodeFunctionData` to encode function calls. For example:
```ts
const userOpHash = await kernelClient.sendUserOperation({
userOperation: {
callData: await kernelClient.account.encodeCallData({
to: contractAddress,
value: BigInt(0),
data: encodeFunctionData({
abi: contractABI,
functionName: "functionName",
args: [args1, args2],
}),
}),
},
})
```
#### Waiting for a UserOp to complete
To wait for a UserOp to complete, call `waitForUserOperationReceipt` using a bundler client:
```typescript
const receipt = await bundlerClient.waitForUserOperationReceipt({
hash: userOpHash,
})
```
Note that if you had constructed your `kernelClient` with a [preset](/sdk/v5_3_x/presets/intro), you may not have access to a bundler client. Instead, you can extend your `kernelClient` with bundler actions:
```typescript
import { ENTRYPOINT_ADDRESS_V07, bundlerActions } from "permissionless"
const bundlerClient = kernelClient.extend(bundlerActions(ENTRYPOINT_ADDRESS_V07))
const receipt = await bundlerClient.waitForUserOperationReceipt({
hash: userOpHash,
})
```
#### Constructing a UserOp for sending later
In some applications, you might want to construct a UserOp but not immediately send it. There are two possible flows:
* If you want to separate signing and sending:
* Create and sign a UserOp with `kernelClient.signUserOperation()`
* Send the UserOp with `bundlerClient.sendUserOperation()`
* If you want to separate the constructing, signing, and sending:
* Create an unsigned UserOp with `kernelClient.prepareUserOperationRequest()`
* Sign the UserOp with `kernelClient.account.signUserOperation()` and manually set the `userOp.signature` field
* Send the UserOp with `bundlerClient.sendUserOperation()`
import VersionWarning from "../VersionWarning"
## Signing and Verifying Messages
Signing and verifying messages for smart accounts is different than with EOAs. There are a few reasons why:
* With an EOA, the address is effectively the public key of the private key used for signing. Therefore, verifying a EOA signature is as simple as [recovering](https://soliditydeveloper.com/ecrecover) the signature and compare the recovered public key with the address.
* With a smart account, the address is the address of a smart contract that has no cryptographic link to the signing private key. Therefore, you must use [ERC-1271](https://eips.ethereum.org/EIPS/eip-1271) to validate the message.
* With an EOA, you don't have to deploy the account. It just exists.
* Since smart accounts need to be deployed, it may not be clear how you can validate messages against a smart account not yet deployed. However, that's actually possible thanks to [ERC-6492](https://eips.ethereum.org/EIPS/eip-6492).
If you are impatient, head straight to [the API](#api). Otherwise, read on to learn more about ERC-1271 and ERC-6492.
### Understanding ERC-1271 and ERC-6492
TODO
### API
#### Signing messages
Both [the account and account client objects](/sdk/v5_3_x/core-api/create-account#create-a-kernel-account) are able to sign messages:
```ts
const signature = await account.signMessage({
message: 'hello world',
})
const signature = await kernelClient.signMessage({
message: 'hello world',
})
```
If the account hasn't been deployed, a ERC-6492 signature will be generated.
#### Validating signatures
While you can validate signatures with ERC-1271, it's recommended that you use ERC-6492 since it works just like ERC-1271 if the account has been deployed, but it can also validate signatures for undeployed accounts.
To validate signatures with ERC-6492:
```ts
import { verifyEIP6492Signature } from '@zerodev/sdk'
import { hashMessage } from "viem"
await verifyEIP6492Signature({
signer: account.address, // your smart account address
hash: hashMessage('hello world'),
signature: signature,
client: publicClient,
})
```
import VersionWarning from "../VersionWarning"
## Sponsoring Gas
With account abstraction, you can pay gas for users so they don't have to acquire native tokens in order to interact with your DApp.
When you sponsor gas through ZeroDev, there are two ways to pay for the gas:
* Put down your credit card. We front the gas for your users, and then at the end of the billing cycle (once a month) we charge your credit card.
* Buy gas credits from us.
### Setting up gas sponsoring policies
To avoid over-spending gas on sponsoring, you must set up gas-sponsoring policies. Sign up on the ZeroDev dashboard if you haven't already, then [set up gas policies](/api-and-toolings/infrastructure/gas-policies).
### API
:::info
Impatient? Check out [complete examples here](https://github.com/zerodevapp/zerodev-examples/blob/main/create-account/main.ts).
:::
When [setting up an account](/sdk/v5_3_x/core-api/create-account), you can specify a `sponsorUserOperation` function when you [create the account client](/sdk/v5_3_x/core-api/create-account#create-an-account-client).
The `sponsorUserOperation` function essentially takes a UserOp and then returns a UserOp with the `paymasterAndData` field set. For example, if you are using the ZeroDev paymaster, use the `createZeroDevPaymasterClient` helper function:
```typescript
import { http } from "viem"
import { ENTRYPOINT_ADDRESS_V07 } from "permissionless"
import { createZeroDevPaymasterClient, createKernelAccountClient } from "@zerodev/sdk"
const entryPoint = ENTRYPOINT_ADDRESS_V07
const kernelClient = createKernelAccountClient({
// other options...
middleware: {
sponsorUserOperation: async ({ userOperation }) => {
const zerodevPaymaster = createZeroDevPaymasterClient({
chain,
entryPoint,
// Get this RPC from ZeroDev dashboard
transport: http(PAYMASTER_RPC),
})
return zerodevPaymaster.sponsorUserOperation({
userOperation,
entryPoint,
})
}
}
})
```
### Using other paymaster providers
If you want to use Pimlico paymasters, you can use these helper functions:
```ts
import { createPimlicoPaymasterClient } from "permissionless/clients/pimlico"
```
Then, simply replace `createZeroDevPaymasterClient` with one of these functions, and make sure to use the corresponding paymaster RPC for these infra providers.
import VersionWarning from "../VersionWarning"
## Using Plugins
ZeroDev is built on [Kernel](https://github.com/zerodevapp/kernel), a *modular smart account* that can be extended with *plugins* (sometimes also called *modules*).
While there are many types of plugins, we will focus on *validators*, which modify the logic for validating UserOps. Validators are used for most of the major use cases of AA, including:
* Alternative signature schemes, such as passkeys and multisig.
* Dynamic access control, such as guardians and session keys.
### Sudo vs regular validators
For any given Kernel account, it will have one **sudo validator** and any number of **regular validators**.
* The **sudo validator** is the "owner" of the account. It's the only validator that can enable other validators.
* A **regular validator** represents an alternative form of access to the smart account. For example, a session key or a guardian would be a regular validator. Regular validators cannot enable other validators.
When you set up a [Kernel account object](/sdk/v5_3_x/core-api/create-account#create-a-kernel-account) with the SDK, you must specify a sudo validator, a regular validator, or both. Let's walk through the three cases:
#### Using only a sudo validator
In the most common case, you set up a Kernel account that is powered by a single sudo validator. For example, to set up an account owned by a ECDSA key:
```ts
const account = await createKernelAccount(publicClient, {
plugins: {
sudo: ecdsaValidator,
},
entryPoint,
kernelVersion
})
```
Here, when you send a UserOp, the ECDSA key will be used for signing the UserOp, and the ECDSA key has sudo access to the smart account (meaning it can do anything).
#### Enabling a regular validator
If you have access to the sudo validator, you can enable a regular validator. For example, to enable a [session key](/sdk/v5_3_x/advanced/session-keys):
```ts
const account = await createKernelAccount(publicClient, {
plugins: {
sudo: ecdsaValidator,
regular: sessionKeyValidator,
},
entryPoint,
kernelVersion
})
```
Now, when you send a UserOp with this `account`, the regular validator will be enabled, and the regular validator (in this case the session key) will be used for signing the UserOp.
Note that Kernel plugins are enabled "lazily" -- you don't have to explicitly enable them. That is, whenever you send the first UserOp with an `account` object with a `regular` plugin, the plugin will be enabled as a part of that UserOp. The UserOp itself can do whatever it needs to do.
#### Using only a regular validator
If a regular validator has already been enabled, you can use it without access to the sudo validator.
For example, continuing the session key example above, if the session key has already been enabled, you can simply do:
```ts
const account = await createKernelAccount(publicClient, {
plugins: {
regular: sessionKeyValidator,
},
entryPoint,
kernelVersion
})
```
### Next Steps
Learn more about plugins such as [passkeys](/sdk/v5_3_x/advanced/passkeys) and [permissions](/sdk/v5_3_x/permissions/intro).
import VersionWarning from "../VersionWarning"
## Coinbase Developer Platform
[Coinbase Developer Platform](https://docs.cdp.coinbase.com/) (CDP) offers bundler and paymaster services that you can use with ZeroDev.
Generally speaking, Coinbase bundlers & paymasters speak the same interface as Pimlico, so you can follow [this guide](/sdk/v5_3_x/infra/pimlico) and simply replace the Pimlico bundler/paymaster URLs with the CDP bundler/paymaster URLs.
You can also refer to [CDP's official examples for ZeroDev](https://github.com/coinbase/paymaster-bundler-examples/tree/master/examples/zerodev).
import VersionWarning from "../VersionWarning"
## Choosing an infra provider
ZeroDev is compatible with any account abstraction infra provider. Check out these guides for integrating with a specific provider:
* [ZeroDev](/api-and-toolings/infrastructure/intro)
* [Pimlico](/sdk/v5_3_x/infra/pimlico)
Read on to learn how to integrate with a custom provider.
### Interop with Bundlers
For the most part, bundlers are perfectly interoperable between different providers. You simply specify the bundler RPC when you construct a Kernel client:
```typescript
import { createKernelAccountClient } from "@zerodev/sdk"
import { http } from "viem"
const kernelClient = createKernelAccountClient({
// other options...
transport: http('BUNDLER_RPC'),
})
```
### Interop with Paymasters
Paymasters are not perfectly interoperable between providers. To integrate with a paymaster, you need to implement the `sponsorUserOperation` function:
```typescript
import { createKernelAccountClient } from "@zerodev/sdk"
const kernelClient = createKernelAccountClient({
// other options...
sponsorUserOperation: async ({ userOperation }) => {
// return a UserOperation with the `paymasterAndData` field filled
},
})
```
Check out Permissionless's documentation for [integrating with a custom paymaster](https://docs.pimlico.io/permissionless/how-to/paymasters/use-custom-paymaster).
import VersionWarning from "../VersionWarning"
## Pimlico
[Pimlico](https://www.pimlico.io/) is a leading AA infra provider with a wide coverage of networks.
Note that ZeroDev is built on top of Pimlico's [Permissionless](https://docs.pimlico.io/permissionless/reference) SDK, so if you were already using Permissionless, it's easy to switch to ZeroDev to take full advantage of the power of [Kernel](https://github.com/zerodevapp/kernel).
### Using Pimlico bundler
Simply specify Pimlico's bundler RPC when [constructing a Kernel client](/sdk/v5_3_x/core-api/create-account#standard-api):
```typescript
import { createKernelAccountClient } from "@zerodev/sdk"
import { http } from "viem"
const kernelClient = createKernelAccountClient({
// other options...
transport: http('PIMLICO_BUNDLER_RPC'),
})
```
### Using Pimlico paymaster
Construct the Kernel client with Pimlico's paymaster client:
```typescript
import { http } from "viem"
import { polygonMumbai } from 'viem/chains'
import { createKernelAccountClient } from "@zerodev/sdk"
import { createPimlicoPaymasterClient } from "permissionless/clients/pimlico"
const kernelClient = createKernelAccountClient({
account,
chain: polygonMumbai,
transport: http('PIMLICO_BUNDLER_RPC'),
sponsorUserOperation: async ({ userOperation }) => {
const paymaster = createPimlicoPaymasterClient({
chain: polygonMumbai,
transport: http('PIMLICO_PAYMASTER_RPC'),
})
return paymaster.sponsorUserOperation({
userOperation
})
}
})
```
import VersionWarning from "../VersionWarning"
## ZeroDev
ZeroDev provides a meta infrastructure that proxies traffic to multiple infra providers including Alchemy, Gelato and Pimlico. [Read more here](/api-and-toolings/infrastructure/intro).
import VersionWarning from "../VersionWarning"
## Presets
ZeroDev is highly modular and composable thanks to building on top of Viem and Permissionless, but sometimes it can feel like you are writing a lot of boilerplate code before you can set up a functional Kernel account. **Presets** are helper functions that help you set up Kernel accounts with common configurations, including connections to bundlers and paymasters.
Generally speaking, there will be a preset for each `` pair. For example, the `` preset will create a ECDSA Kernel account using ZeroDev's infrastructure.
Click the links below to see presets for different infra providers:
* [ZeroDev](/sdk/v5_3_x/presets/zerodev)
* Pimlico
* Alchemy
* Gelato
import VersionWarning from "../VersionWarning"
## ZeroDev Presets
### ECDSA Validator
To set up a Kernel account using ECDSA for validation (mimicking EOAs):
```typescript
import { createEcdsaKernelAccountClient } from "@zerodev/presets/zerodev"
import { polygonMumbai } from "viem/chains"
const kernelClient = await createEcdsaKernelAccountClient({
// required
chain: polygonMumbai,
projectId: ZERODEV_PROJECT_ID,
signer: SIGNER,
// optional
provider: "PIMLICO", // defaults to a recommended provider
index: BigInt(1), // defaults to 0
paymaster: 'SPONSOR', // defaults to SPONSOR
})
```
* `chain` is a [Viem chain object](https://viem.sh/docs/clients/chains.html)
* `projectId` is a ZeroDev project ID from the [ZeroDev dashboard](https://dashboard.zerodev.app/).
* `signer` is a [Viem account](https://viem.sh/docs/accounts/local.html).
* (optional) `provider` can be [any provider that ZeroDev supports](/api-and-toolings/infrastructure/intro).
* (optional) `index` can be any positive integer. Different indexes will yield different accounts.
* (optional) `paymaster` can be:
* `'NONE'`: not using any paymaster (the user pays their own gas).
* `'SPONSOR'` (default): sponsor gas for users according to [gas policies](/api-and-toolings/infrastructure/gas-policies).
* A ERC20 token address: use the specified ERC20 token as gas tokens. See the [ERC20 gas token docs](/sdk/v5_3_x/core-api/pay-gas-with-erc20s) for details.
is a boolean flag that determines whether ZeroDev will use [the sponsoring paymaster](/api-and-toolings/infrastructure/intro).
import VersionWarning from "../VersionWarning"
## Tutorial -- Transaction Automation
In this tutorial, you will learn how to enable 1-click trading for your app using session keys.
Refer to [this code example](https://github.com/zerodevapp/zerodev-examples/blob/main/session-keys/1-click-trading.ts) while you follow along the tutorial. You can run the example by following instructions of [the examples repo](https://github.com/zerodevapp/zerodev-examples).
### Installation
The examples repo already installed this, but normally you would install permissions with:
:::code-group
```bash [npm]
npm i @zerodev/permissions
```
```bash [yarn]
yarn add @zerodev/permissions
```
```bash [pnpm]
pnpm i @zerodev/permissions
```
```bash [bun]
bun add @zerodev/permissions
```
:::
### Owner-Agent Architecture
There are multiple ways to use session keys. In this tutorial, we will use the popular "owner-agent" pattern:
* The "owner" is the owner of the master key.
* The "agent" is the entity that wants to use the session key.
In a typical setup, you might be wishing to automate transactions for your users from your server.
your user's master key might be connected to your DApp frontend, in which case your frontend is the "owner." You might be wishing
### API
:::info
You can reference this [complete code example](https://github.com/zerodevapp/zerodev-examples/blob/main/permissions/main.ts) as you go through the tutorial.
:::
With a permissions validator, you are putting together:
* One signer
* Any number of policies
* (optionally) one action
#### Creating a signer
Start by creating a [ECDSA signer](/sdk/v5_3_x/permissions/signers/ecdsa):
```ts
const sessionPrivateKey = generatePrivateKey()
const sessionKeyAccount = privateKeyToAccount(sessionPrivateKey)
const sessionKeySigner = await toECDSASigner({
signer: sessionKeyAccount,
})
```
#### Creating a number of policies
Now, let's create two policies:
* A "call policy" that checks that the user is minting an NFT.
* A "rate limit policy" that checks that the user executes this action once per month.
```ts
const sessionPrivateKey = generatePrivateKey()
const sessionKeyAccount = privateKeyToAccount(sessionPrivateKey)
const callPolicy = toCallPolicy({
policyVersion: CallPolicyVersion.V0_0_2,
permissions: [
{
target: contractAddress,
valueLimit: BigInt(0),
abi: contractABI,
functionName: "mint",
},
],
})
const rateLimitPolicy = toRateLimitPolicy({
count: 1,
interval: 60 * 60 * 24 * 30, // month in seconds
}),
```
#### Composing signer and policies
Here comes the fun part -- we "compose" the signer and policies together into a single validator:
```ts
const sessionKeyValidator = await toPermissionValidator(publicClient, {
entryPoint,
kernelVersion,
signer: sessionKeySigner,
policies: [
callPolicy,
rateLimitPolicy,
],
}),
```
Now, we have created a ECDSA session key that's subject to a call policy and a rate limit policy. Just like that!
#### Using the session key
Finally, we can set up the account with this session key as the signer. Note that if this is the first time that the session key is used, we need to [enable the plugin](/sdk/v5_3_x/core-api/using-plugins#enabling-a-regular-validator).
```ts
const account = await createKernelAccount(publicClient, {
plugins: {
sudo: ecdsaValidator,
regular: sessionKeyValidator,
},
entryPoint,
kernelVersion,
})
```
Now you can [set up a Kernel client](/sdk/v5_3_x/core-api/create-account#create-an-account-client) using this account, and start minting NFTs with this session key -- but only up to once a month!
Try running [this script](https://github.com/zerodevapp/zerodev-examples/blob/main/permissions/main.ts) and see for yourself.
### Storing Session Keys
Session keys (and permission validators in general) can be stored, by serializing them and then deserializing them later.
#### Code examples
There are two general patterns with storing session keys.
* The owner creates a session key for another agent to store & use. Check out [this example](https://github.com/zerodevapp/zerodev-examples/blob/main/session-keys/owner-created.ts).
* The agent creates a session key and asks the owner to "approve" it as a session key. Check out [this example](https://github.com/zerodevapp/zerodev-examples/blob/main/session-keys/agent-created.ts).
* In this flow, the owner never sees the private part of the session key, so it may be better for security.
#### Serializing a session key
```ts
const serializedSessionKey = await serializePermissionAccount(sessionKeyAccount, sessionPrivateKey)
```
Note that `sessionPrivateKey` is optional. If the private key is not included, then you must provide the private key when you deserialize the session key.
#### De-serializing a session key
```ts
const sessionKeySigner = await toECDSASigner({
signer: privateKeyToAccount(sessionPrivateKey),
})
const sessionKeyAccount = await deserializePermissionAccount(
publicClient,
entryPoint,
kernelVersion,
serializedSessionKey,
sessionKeySigner,
)
```
Note that `sessionKeySigner` is only needed if you did not include the private key in the serialized session key.
import VersionWarning from "../VersionWarning"
## Permissions (Session Keys)
With Kernel, you can assign different permissions to different keys. Some of these keys might be owned by the owner(s) of the smart account, and some might be short-lived keys that you share with others to delegate transactions. The latter are also commonly known as "session keys."
To set up permissions for a key, you must answer three questions: who, when, and what.
* **Who** (what key) can perform the action?
* **When** (under what condition) can the action be performed?
* **What** is the action anyways?
These three questions correspond to three types of "permissions plugins":
* **Signers** (who) specify the key and the algorithm (ECDSA, WebAuthn) it uses.
* **Policies** (when) specify the *conditions* under which the keys can be used. Some example conditions are:
* Only if interacting with Uniswap
* Only if spending USDC
* Only once a month
* **Actions** (what) specify the execution function the key uses.
### Composing Permissions
Kernel is the first smart account to support *composable permissions*. That is, you can build up fine-grained permissions from putting together signers, policies, and actions. Here's the formula:
```
Permission = 1 signer + N policies + 1 action
```
In pseudo-code, this is what it looks like:
```ts
const account = createKernelAccount({
signer: passkeySigner,
policies: [
onlyUSDC,
onlyUniswap,
oncePerMonth,
],
action,
})
```
Here, the `signer` will be able to perform `action` if all `policies` are met.
Now let's dive into these plugin types.
### Permission Plugins
Because permissions are plugins, **you can write your own permissions** if the default ones provided by ZeroDev don't meet your needs.
#### Signers
Signers specify the keys and the algorithms the keys use. ZeroDev provides signers for:
* ECDSA
* WebAuthn (passkeys)
* Multisig
#### Policies
Policies are the conditions under which the keys can be used. ZeroDev provides the following policies:
* [Sudo policy](/sdk/v5_3_x/permissions/policies/sudo): you can do anything
* [Call policy](/sdk/v5_3_x/permissions/policies/call): you can only call certain contracts or functions (and only with certain params)
* [Gas policy](/sdk/v5_3_x/permissions/policies/gas): you can only spend up to X amount of gas
* [Signature policy](/sdk/v5_3_x/permissions/policies/signature): you can only sign certain messages
* [Rate limit policy](/sdk/v5_3_x/permissions/policies/rate-limit): you can only send UserOps within a given rate limit
* [Timestamp policy](/sdk/v5_3_x/permissions/policies/timestamp): you can only send UserOps within certain timeframes
#### Actions
Actions are arbitrary functions that the smart account will `delegatecall` to. They give you perfect flexibility over the execution logic.
Note that actions are NOT to be confused with the calls you actually want to execute. For example, if you want to interact with Uniswap, that's just the call you want to execute. "Action" here specifically refers to the execution function by which Uniswap is called.
If that's confusing, just forget about actions. Mostly commonly you will only be setting up signers and policies, and the `action` will default to Kernel's default `execute()` function, which is enough for most needs.
### Next Steps
* [Learn to automate transactions for users with permissions.](/sdk/v5_3_x/permissions/transaction-automation)
import VersionWarning from "../VersionWarning"
## Tutorial -- Transaction Automation
In this tutorial, you will learn how to automate transactions for your users using [session keys](/sdk/v5_3_x/permissions/intro). This is useful when you want to send transactions for your users from your server, for instance.
Refer to [this code example](https://github.com/zerodevapp/zerodev-examples/blob/main/session-keys/transaction-automation.ts) while you follow along the tutorial. You can run the example by following instructions of [the examples repo](https://github.com/zerodevapp/zerodev-examples).
### Installation
Session keys are enabled through the `@zerodev/permissions` package. The examples repo already installed this, but normally you would install permissions with:
:::code-group
```bash [npm]
npm i @zerodev/permissions
```
```bash [yarn]
yarn add @zerodev/permissions
```
```bash [pnpm]
pnpm i @zerodev/permissions
```
```bash [bun]
bun add @zerodev/permissions
```
:::
### The Architecture of Transaction Automation
In the typical architecture for transaction automation, there's an "owner" and an "agent":
* The "owner" is the entity that controls the user's master key.
* The "agent" is the entity that automates transactions for the owner.
For instance, your user might be using an embedded wallet (master key) with your frontend, and you might want to automate transactions for your users from your server. In this case, the frontend would be the "owner" and your server would be the "agent."
From a high level, this is how transaction automation works:
* The agent creates a session key.
* At this point, the session key has not been approved by the owner.
* The agent sends the "address" of the session key to the owner for approval.
* The owner signs the address and returns the approval (signature) to the agent.
* The agent can now send transactions for users using the approval and the session key.
### Code Flow
#### Agent: creating a session key
From the agent's side, create a [ECDSA signer](/sdk/v5_3_x/permissions/signers/ecdsa) as the session key:
```ts
const sessionPrivateKey = generatePrivateKey()
const sessionKeySigner = await toECDSASigner({
signer: privateKeyToAccount(sessionPrivateKey),
})
```
Note that if you do not wish to store the private key of the session key, you could use a [remote signer](https://docs.zerodev.app/sdk/advanced/key-storage) instead:
```ts
const remoteSigner = await toRemoteSigner({
apiKey,
mode: RemoteSignerMode.Create
})
const sessionKeySigner = toECDSASigner({
signer: remoteSigner,
})
```
#### Agent: send session key "address" to the owner
For the owner to approve the session key, the agent must send the "address" of the session key to the owner. Note that the private key is never sent -- it's only the address which is the public key of the session key that's sent.
To obtain the session key address:
```ts
const sessionKeyAddress = sessionKeySigner.account.address
```
Send this address to the owner.
#### Owner: approving the session key
Now, on the owner side, approve the session key with [policies](/sdk/v5_3_x/permissions/intro#policies):
```ts
const ecdsaValidator = await signerToEcdsaValidator(publicClient, {
entryPoint,
kernelVersion,
signer,
})
// Create an "empty account" as the signer -- you only need the public
// key (address) to do this.
const emptyAccount = addressToEmptyAccount(sessionKeyAddress)
const emptySessionKeySigner = await toECDSASigner({ signer: emptyAccount })
const permissionPlugin = await toPermissionValidator(publicClient, {
entryPoint,
kernelVersion,
signer: emptySessionKeySigner,
policies: [
// your policies
],
})
const sessionKeyAccount = await createKernelAccount(publicClient, {
entryPoint,
kernelVersion,
plugins: {
sudo: ecdsaValidator,
regular: permissionPlugin,
},
})
const approval = await serializePermissionAccount(sessionKeyAccount)
```
Now, send the serialized approval back to the agent.
#### Agent: using the session key
When the agent wants to use the session key, first recreate the signer. Presumably, you would've stored the session key somewhere:
```ts
// Using a stored private key
const sessionKeySigner = await toECDSASigner({
signer: privateKeyToAccount(sessionPrivateKey),
})
```
Or if you were using a remote signer:
```ts
const remoteSignerWithGet = await toRemoteSigner({
apiKey,
keyAddress: remoteSignerAddress // you should've stored this
mode: RemoteSignerMode.Get
})
const sessionKeySigner = toECDSASigner({
signer: remoteSigner,
})
```
Now create an account object by combining the approval (which you should've stored somewhere) with the `sessionKeySigner`:
```ts
const sessionKeyAccount = await deserializePermissionAccount(
publicClient,
entryPoint,
kernelVersion,
approval,
sessionKeySigner
)
```
Finally, [construct a Kernel client](https://docs.zerodev.app/sdk/core-api/create-account#create-an-account-client) as usual:
```ts
const kernelClient = createKernelAccountClient({
account: sessionKeyAccount,
// the other params
})
```
Now you can send transactions with the Kernel client.
#### Revoking a Session Key
After a session key has been used, or if it's no longer needed, it's a good security practice to revoke it to ensure it cannot be used for any further transactions. Here's how you can revoke a session key:
First, prepare your environment for the revocation process. This involves creating a "sudo" account capable of performing privileged operations, such as uninstalling plugins.
```ts
const sudoAccount = await createKernelAccount(publicClient, {
plugins: {
sudo: ecdsaValidator,
},
// other params
});
const sudoKernelClient = createKernelAccountClient({
account: sudoAccount,
// other params
})
```
Now to revoke the session key by uninstalling its associated permission plugin, call `uninstallPlugin` on `sudoKernelClient`.
```ts
const txHash = await sudoKernelClient.uninstallPlugin({
plugin: permissionPlugin,
});
```
import VersionWarning from "../VersionWarning"
## Use Arcana Auth with ZeroDev
[Arcana Auth](https://www.arcana.network/) offers a self-custodial Web3 wallet embedded within applications, utilizing asynchronous distributed key generation algorithms for enhanced security and privacy. This wallet, accessible without the need for a browser extension, allows authenticated users to instantly access and sign blockchain transactions within the app environment.
### Set up
To use Arcana Auth with ZeroDev, first create an application that integrates with Arcana Auth.
* Refer to the [Arcana Auth documentation site](https://docs.arcana.network/) for instructions on setting up an application with the Arcana Auth.
* For a quick start, Arcana Auth provides a web app guide, available [here](https://docs.arcana.network/quick-start/web/).
### Integration
Integrating ZeroDev with Arcana Auth is straightforward after setting up the project. Arcana Auth provides an Externally Owned Account (EOA) wallet to use as a signer with Kernel.
#### Create the authProvider object
After following the Arcana Auth documentation, you will have access to a `authProvider` object as shown below:
```typescript
import {
AuthProvider,
type ConstructorParams,
} from "@arcana/auth";
// Param options here will be specific to your project. See the Arcana Auth docs for more info.
const params: ConstructorParams = {};
const authProvider = new AuthProvider(clientId, params);
```
#### Use with ZeroDev
Use the provider from Arcana to create a smart account signer, which can be passed to a validator. For detailed guidance on using a validator, refer to our documentation on [creating accounts](/sdk/v5_3_x/core-api/create-account#api).
```typescript
import { signerToEcdsaValidator } from "@zerodev/ecdsa-validator"
import { KERNEL_V3_1 } from "@zerodev/sdk/constants"
import { providerToSmartAccountSigner, ENTRYPOINT_ADDRESS_V07 } from 'permissionless';
import { createPublicClient } from "viem";
// Convert the authProvider to a SmartAccountSigner
const smartAccountSigner = await providerToSmartAccountSigner(authProvider.provider);
const publicClient = createPublicClient({
// Use your own RPC provider (e.g. Infura/Alchemy).
transport: http('https://rpc-amoy.polygon.technology'),
chain
})
// Pass your `smartAccountSigner` to the validator
const ecdsaValidator = await signerToEcdsaValidator(publicClient, {
signer: smartAccountSigner,
entryPoint: ENTRYPOINT_ADDRESS_V07,
kernelVersion: KERNEL_V3_1,
})
// You can now use this ECDSA Validator to create a Kernel account
```
import VersionWarning from "../VersionWarning"
## Use Capsule with ZeroDev
[Capsule](https://usecapsule.com/) offers a signing solution enabling the creation of secure, embedded MPC wallets accessible via email or social login. These wallets, compatible across different applications, offer portability, recoverability, and programmability, eliminating the need for users to establish separate signers or contract accounts for each application.
### Set up
To use Capsule with ZeroDev, first create an application that integrates with Capsule.
* Refer to the [Capsule documentation site](https://docs.usecapsule.com/) for instructions on setting up an application with the Capsule.
* For a quick start, Capsule provides an example hub, available [here](https://docs.usecapsule.com/getting-started/examples).
### Integration
:::info
Check out [this example](https://github.com/zerodevapp/zerodev-signer-examples/tree/main/capsule) for custom integration with Capsule.
:::
Integrating ZeroDev with Capsule is straightforward after setting up the project. Capsule provides an Externally Owned Account (EOA) wallet to use as a signer with Kernel.
#### Create the Capsule object
After following the Capsule documentation, you will have access to a `CapsuleWeb3Provider` object as shown below:
```typescript
import Capsule from "@usecapsule/web-sdk";
// Param options here will be specific to your project. See the Capsule docs for more info.
const capsule = new Capsule(env, apiKey, opts);
```
#### Use with ZeroDev
Use the WalletClient from Capsule to create a smart account signer, which can be passed to a validator. For detailed guidance on using a validator, refer to our documentation on [creating accounts](/sdk/v5_3_x/core-api/create-account#api).
```typescript
import { signerToEcdsaValidator } from "@zerodev/ecdsa-validator"
import { KERNEL_V3_1 } from "@zerodev/sdk/constants"
import { walletClientToSmartAccountSigner, ENTRYPOINT_ADDRESS_V07 } from 'permissionless';
import { createCapsuleViemClient } from '@usecapsule/web-sdk';
import { polygonAmoy } from 'viem/chains';
import { createPublicClient } from "viem";
// Convert a Capsule viem client to a SmartAccountSigner
// Follow the Capsule docs for more instructions on creating the Viem client https://docs.usecapsule.com/integration-guide/signing-transactions
const viemClient = createCapsuleViemClient(capsule, {
chain: polygonAmoy,
transport: http('https://rpc-amoy.polygon.technology'),
});
const smartAccountSigner = walletClientToSmartAccountSigner(viemClient);
const publicClient = createPublicClient({
// Use your own RPC provider (e.g. Infura/Alchemy).
transport: http('https://rpc-amoy.polygon.technology'),
chain: polygonAmoy,
})
// Pass your `smartAccountSigner` to the validator
const ecdsaValidator = await signerToEcdsaValidator(publicClient, {
signer: smartAccountSigner,
entryPoint: ENTRYPOINT_ADDRESS_V07,
kernelVersion: KERNEL_V3_1,
})
// You can now use this ECDSA Validator to create a Kernel account
```
import VersionWarning from "../VersionWarning"
## Custom Signer Integration
ZeroDev offers the flexibility to integrate various types of signers, catering to diverse application requirements.
### Using Externally Owned Accounts (EOAs)
Most commonly used signers are Externally Owned Accounts (EOAs). If you're using a signer that falls under this category and isn't explicitly covered in our documentation, we recommend visiting our dedicated [EOA integration section](/sdk/v5_3_x/signers/eoa). This section provides detailed guidance on integrating EOAs with ZeroDev.
### Implementing Custom Signers
If your requirements extend beyond standard EOAs, ZeroDev supports the integration of custom signers. Our signers conform to the `SmartAccountSigner` interface defined in permissionless.js. For developers looking to implement a custom solution, you can reference the `SmartAccountSigner` interface on their [GitHub repository](https://github.com/pimlicolabs/permissionless.js/blob/0b1cf0086b3fa131415a6a9bf398852c159fc181/packages/permissionless/accounts/types.ts#L60). This interface provides the necessary structure and guidelines to ensure compatibility with ZeroDev.
One easy way to implement a `SmartAccountSigner` is to implement Viem's account type, [by following this guide](https://viem.sh/docs/accounts/custom).
Once you've implemented the signer, you should be able to [use it with a validator](/sdk/v5_3_x/core-api/create-account#creating-a-ecdsa-validator).
import VersionWarning from "../VersionWarning"
## Use Dfns with ZeroDev
[Dfns](https://www.dfns.co/) is an MPC/TSS Wallet-as-a-Service API/SDK provider. Dfns aims to optimize the balance of security and UX by deploying key shares into a decentralized network on the backend while enabling wallet access via biometric open standards on the frontend like Webauthn. Reach out [here](https://www.dfns.co/learn-more) to set up a sandbox environment to get started.
### Set up
To use Dfns with ZeroDev, first create an application that integrates with Dfns.
* Refer to the [Dfns documentation site](https://docs.dfns.co/d/) for instructions on setting up an application with the Dfns.
### Integration
Integrating ZeroDev with Dfns is straightforward after setting up the project. Dfns provides an Externally Owned Account (EOA) wallet to use as a signer with Kernel.
#### Set up Dfns
After following the Dfns documentation, you will have access to a `dfnsWallet` object as shown below:
```typescript
import { DfnsWallet } from "@dfns/lib-viem";
import { DfnsApiClient } from "@dfns/sdk";
import { AsymmetricKeySigner } from "@dfns/sdk-keysigner";
// See the Dfns example https://github.com/dfns/dfns-sdk-ts/tree/m/examples/libs/viem/alchemy-aa-gasless for details on populating the environment variables.
const DFNS_PRIVATE_KEY = null;
const DFNS_CRED_ID = null;
const DFNS_APP_ORIGIN = null;
const DFNS_APP_ID = null;
const DFNS_AUTH_TOKEN = null;
const DFNS_API_URL = null;
const AMOY_WALLET_ID = null;
const initDfnsWallet = (walletId: string) => {
const signer = new AsymmetricKeySigner({
privateKey: DFNS_PRIVATE_KEY!,
credId: DFNS_CRED_ID!,
appOrigin: DFNS_APP_ORIGIN!,
});
const dfnsClient = new DfnsApiClient({
appId: DFNS_APP_ID!,
authToken: DFNS_AUTH_TOKEN!,
baseUrl: DFNS_API_URL!,
signer,
});
return DfnsWallet.init({
walletId,
dfnsClient,
maxRetries: 10,
});
};
```
#### Use with ZeroDev
Use the WalletClient from Dfns to create a smart account signer, which can be passed to a validator. For detailed guidance on using a validator, refer to our documentation on [creating accounts](/sdk/v5_3_x/core-api/create-account#api).
```typescript
import { signerToEcdsaValidator } from "@zerodev/ecdsa-validator"
import { KERNEL_V3_1 } from "@zerodev/sdk/constants"
import { walletClientToSmartAccountSigner, ENTRYPOINT_ADDRESS_V07 } from 'permissionless';
import { toAccount } from 'viem/accounts';
import { createWalletClient, createPublicClient } from 'viem';
import { polygonAmoy } from 'viem/chains';
// Convert the dfns wallet to a SmartAccountSigner
const amoyWallet = await initDfnsWallet(AMOY_WALLET_ID!);
const account = toAccount(amoyWallet)
const walletClient = createWalletClient({
account,
transport: http('https://rpc-amoy.polygon.technology'),
})
const smartAccountSigner = walletClientToSmartAccountSigner(walletClient);
const publicClient = createPublicClient({
// Use your own RPC provider (e.g. Infura/Alchemy).
transport: http('https://rpc-amoy.polygon.technology'),
chain: polygonAmoy,
})
// Pass your `smartAccountSigner` to the validator
const ecdsaValidator = await signerToEcdsaValidator(publicClient, {
signer: smartAccountSigner,
entryPoint: ENTRYPOINT_ADDRESS_V07,
kernelVersion: KERNEL_V3_1
})
// You can now use this ECDSA Validator to create a Kernel account
```
import VersionWarning from "../VersionWarning"
## Use Dynamic with ZeroDev
[Dynamic](https://www.dynamic.xyz/) is a platform that offers Web3 login solutions designed for easy integration and user-friendly experiences. It features [passkey embedded wallets](https://www.dynamic.xyz/features/embedded-wallets), crypto-native login, and profile and multi-wallet management. Additionally, the platform provides tools for authorization, orchestration, and more, aiming to streamline wallet-based authentication and identity management. Dynamic is built to cater to both casual users and crypto-savvy individuals, emphasizing non-custodial, passwordless, and flexible login options.
### Set up
To use Dynamic with ZeroDev, you have two options: Dynamic's native integration that utilizes ZeroDev, or a custom integration using Dynamic's Externally Owned Account (EOA) as a signer. Choose the approach that best fits your needs.
#### Native Integration
Dynamic natively supports account abstraction using ZeroDev. This integration allows you to sponsor gas fees, bundle transactions, recover and transfer accounts, utilize session keys.
* For more information and how to get started, visit the [Dynamic Account Abstraction documentation](https://docs.dynamic.xyz/smart-wallets/smart-wallet-providers/zerodev).
#### Custom Integration
If you would like to use ZeroDev directly with a Dynamic project, you can set up a custom integration using Dynamics's EOA as a signer.
* Begin by setting up your application with Dynamic, as detailed in the [Dynamic documentation](https://docs.dynamic.xyz/introduction/welcome).
* Dynamic also offers a quick start guide and sample apps, available [here](https://docs.dynamic.xyz/quickstart).
### Implementing Custom Integration
Integrating ZeroDev with Dynamic is straightforward once your application is set up. Dynamic provides an EOA wallet to use as a signer with Kernel.
#### Get the Dynamic wallet's Provider
To begin, ensure your application is integrated with Dynamic. Detailed guidance is available in the [Dynamic documentation](https://docs.dynamic.xyz/).
The following example demonstrates the use of Dynamic's React Core SDK. Ensure your React app is already configured with Dynamic; for setup instructions, refer to the [tutorial](https://docs.dynamic.xyz/react-sdk/tutorial).
```typescript
import { useDynamicContext } from "@dynamic-labs/sdk-react-core";
// Use the `useDynamicContext` hook to get the primary wallet
const { primaryWallet } = useDynamicContext();
// Get the dynamicWalletClient, we will use in the next section
const dynamicWalletClient = await primaryWallet?.connector?.getWalletClient();
```
#### Use with ZeroDev
Use the WalletClient from Dynamic to create a smart account signer, which can be passed to a validator. For detailed guidance on using a validator, refer to our documentation on [creating accounts](/sdk/v5_3_x/core-api/create-account#api).
```typescript
import { signerToEcdsaValidator } from "@zerodev/ecdsa-validator"
import { KERNEL_V3_1 } from "@zerodev/sdk/constants"
import { walletClientToSmartAccountSigner, ENTRYPOINT_ADDRESS_V07 } from 'permissionless';
import { createPublicClient } from "viem";
import { polygonAmoy } from 'viem/chains';
// Use the WalletClient from Dynamic to create a SmartAccountSigner
const smartAccountSigner = await walletClientToSmartAccountSigner(dynamicWalletClient);
const publicClient = createPublicClient({
// Use your own RPC provider (e.g. Infura/Alchemy).
transport: http('https://rpc-amoy.polygon.technology'),
chain: polygonAmoy,
})
// Pass your `smartAccountSigner` to the validator
const ecdsaValidator = await signerToEcdsaValidator(publicClient, {
signer: smartAccountSigner,
entryPoint: ENTRYPOINT_ADDRESS_V07,
kernelVersion: KERNEL_V3_1
})
// You can now use this ECDSA Validator to create a Kernel account
```
### Starter Template
A user has helpfully created a [starter template for Dynamic + ZeroDev](https://github.com/tantodefi/se2-dynamic-zerodev).
import VersionWarning from "../VersionWarning"
## Use an EOA with ZeroDev
An Externally Owned Account (EOA) is a standard Ethereum account operated via a private key. It's commonly used in wallets like MetaMask. ZeroDev is compatible with EOAs as signers, and the method of integrating an EOA varies based on your dApp's connection approach.
### Integration Methods
We'll explore three methods to integrate a signer with ZeroDev: using an EIP-1193 provider, using a viem WalletClient, and employing a Local Account.
#### EIP-1193 Provider Integration
EIP-1193 is a standard interface for Ethereum providers, such as MetaMask or hardware wallets, where the key material is hosted externally rather than on the local client. ZeroDev supports creating a signer from any provider that implements this interface.
```typescript
import { signerToEcdsaValidator } from "@zerodev/ecdsa-validator"
import { KERNEL_V3_1 } from "@zerodev/sdk/constants"
import { providerToSmartAccountSigner, ENTRYPOINT_ADDRESS_V07 } from 'permissionless';
import { createPublicClient } from "viem";
import { polygonAmoy } from 'viem/chains';
// `window.ethereum` is the provider object that is injected into the browser by a wallet, like metamask, that enables JSON RPC communication with the walelt.
const smartAccountSigner = await providerToSmartAccountSigner(window.ethereum);
const publicClient = createPublicClient({
// Use your own RPC provider (e.g. Infura/Alchemy).
transport: http('https://rpc-amoy.polygon.technology'),
chain: polygonAmoy,
})
// Pass your `smartAccountSigner` to the validator
const ecdsaValidator = await signerToEcdsaValidator(publicClient, {
signer: smartAccountSigner,
entryPoint: ENTRYPOINT_ADDRESS_V07,
kernelVersion: KERNEL_V3_1
})
// You can now use this ECDSA Validator to create a Kernel account
```
#### Viem Wallet Client Integration
A [Wallet Client](https://viem.sh/docs/clients/wallet.html) is an interface to interact with Ethereum Account(s) and provides the ability to retrieve accounts, execute transactions, sign messages, etc through Wallet Actions.
In this example, we assume that you have access to a WalletClient object.
```typescript
import { signerToEcdsaValidator } from "@zerodev/ecdsa-validator"
import { KERNEL_V3_1 } from "@zerodev/sdk/constants"
import { walletClientToSmartAccountSigner, ENTRYPOINT_ADDRESS_V07 } from 'permissionless';
const smartAccountSigner = walletClientToSmartAccountSigner(walletClient);
const publicClient = createPublicClient({
// Use your own RPC provider (e.g. Infura/Alchemy).
transport: http('https://rpc-amoy.polygon.technology'),
chain
})
// Pass your `smartAccountSigner` to the validator
const ecdsaValidator = await signerToEcdsaValidator(publicClient, {
signer: smartAccountSigner,
entryPoint: ENTRYPOINT_ADDRESS_V07,
kernelVersion: KERNEL_V3_1
})
// You can now use this ECDSA Validator to create a Kernel account
```
#### Local Account
A Local Account refers to an EOA where the private key is directly accessible on the client. In this example we assume you have access to the private key locally.
```typescript
import { signerToEcdsaValidator } from "@zerodev/ecdsa-validator"
import { KERNEL_V3_1 } from "@zerodev/sdk/constants"
import { ENTRYPOINT_ADDRESS_V07 } from 'permissionless';
import { privateKeyToAccount } from "viem/accounts"
import { Hex } from "viem"
// Create a signer
const smartAccountSigner = privateKeyToAccount(process.env.PRIVATE_KEY as Hex)
const publicClient = createPublicClient({
// Use your own RPC provider (e.g. Infura/Alchemy).
transport: http('https://rpc-amoy.polygon.technology'),
chain
})
// Pass your `smartAccountSigner` to the validator
const ecdsaValidator = await signerToEcdsaValidator(publicClient, {
signer: smartAccountSigner,
entryPoint: ENTRYPOINT_ADDRESS_V07,
kernelVersion: KERNEL_V3_1
})
// You can now use this ECDSA Validator to create a Kernel account
```
import VersionWarning from "../VersionWarning"
## Use Fireblocks with ZeroDev
[Fireblocks](https://www.fireblocks.com/) is a user-friendly platform designed for building blockchain-based products and managing digital asset operations. It uses a direct custody approach, combining high performance with zero counterparty risk and multi-layered security. The platform includes secure MPC-based digital asset wallets, a policy engine for governance and transaction rules, and comprehensive treasury management. Fireblocks' security framework features multiple layers, including MPC-CMP technology, secure enclaves, and a robust policy engine, ensuring protection against cyberattacks, internal threats, and human errors. It's widely used for various operations like treasury, trading, and managing NFTs, smart contracts, and user wallets.
### Set up
To use Fireblocks with ZeroDev, first create an application that integrates with Fireblocks.
* Refer to the [Fireblocks documentation site](https://developers.fireblocks.com/) for instructions on setting up an application with the Fireblocks.
* For a quick start, Fireblocks provides a guide, available [here](https://developers.fireblocks.com/docs/quickstart).
### Integration
Integrating ZeroDev with Fireblocks is straightforward after setting up the project. Fireblocks provides an Externally Owned Account (EOA) wallet to use as a signer with Kernel.
#### Create the Fireblocks object
After following the Fireblocks documentation, you will have access to a `FireblocksWeb3Provider` object as shown below:
```typescript
import { FireblocksWeb3Provider, type FireblocksProviderConfig } from "@fireblocks/fireblocks-web3-provider";
// Config options here will be specific to your project. See the Fireblocks docs for more info.
const fireblocksProviderConfig: FireblocksProviderConfig = { ... };
const fireblocksWeb3Provider = new FireblocksWeb3Provider(fireblocksProviderConfig);
```
#### Use with ZeroDev
Use the provider from Fireblocks to create a smart account signer, which can be passed to a validator. For detailed guidance on using a validator, refer to our documentation on [creating accounts](/sdk/v5_3_x/core-api/create-account#api).
```typescript
import { signerToEcdsaValidator } from "@zerodev/ecdsa-validator"
import { KERNEL_V3_1 } from "@zerodev/sdk/constants"
import { providerToSmartAccountSigner, ENTRYPOINT_ADDRESS_V07 } from 'permissionless';
import { createPublicClient } from "viem";
import { polygonAmoy } from 'viem/chains';
// Convert the FireblocksWeb3Provider to a SmartAccountSigner
const smartAccountSigner = providerToSmartAccountSigner(fireblocksWeb3Provider);
const publicClient = createPublicClient({
// Use your own RPC provider (e.g. Infura/Alchemy).
transport: http('https://rpc-amoy.polygon.technology'),
chain: polygonAmoy,
})
// Pass your `smartAccountSigner` to the validator
const ecdsaValidator = await signerToEcdsaValidator(publicClient, {
signer: smartAccountSigner,
entryPoint: ENTRYPOINT_ADDRESS_V07,
kernelVersion: KERNEL_V3_1
})
// You can now use this ECDSA Validator to create a Kernel account
```
import VersionWarning from "../VersionWarning"
## Auth Providers
Smart accounts, like EOAs, rely on signatures to validate transactions and messages. The difference with smart accounts is that it can use arbitrary signatures schemes, such as multisig, passkeys, etc.
It's possible to use third-party "wallet services" as signers for smart accounts. The end result is that your users will be interacting with the wallet UIs provided by these services, while using a smart account powered by ZeroDev.
ZeroDev has been integrated natively with many leading wallet services such as [Privy](https://docs.privy.io/guide/frontend/account-abstraction/zerodev), [Dynamic](https://docs.dynamic.xyz/account-abstraction/aa-providers/zerodev), [Portal](https://docs.portalhq.io/resources/account-abstraction-alpha), [JoyID](https://docs.joyid.dev/guide/evm/evm-aa), etc. However, even when a native integration doesn't exist, it's generally very easy to integrate ZeroDev with a wallet service as long as it's able to sign messages.
Check out the wallet services that are known to work with ZeroDev using the left sidebar. If the wallet service you want to use is not listed, check out the general guide for [integrating with EOA signers](/sdk/v5_3_x/signers/eoa), or try [building your own integration](/sdk/v5_3_x/signers/custom-signer).
import VersionWarning from "../VersionWarning"
## Use Lit Protocol with ZeroDev
[Lit Protocol](https://www.litprotocol.com/) is distributed cryptography for signing, encryption, and compute. A generalizable key management network, Lit provides you with a set of tools for managing sovereign identities on the open Web.
### Set up
To use Lit with ZeroDev, first create an application that integrates with Lit.
* Refer to the [Lit documentation site](https://developer.litprotocol.com/v3/) for instructions on setting up an application with the Lit.
* For a quick start, Lit provides examples, available [here](https://docs.Lit.com/getting-started/examples).
### Integration
Integrating ZeroDev with Lit is straightforward after setting up the project. Lit provides an Externally Owned Account (EOA) wallet to use as a signer with Kernel.
#### Create the pkpWallet
After following the Lit documentation, you will have access to a `pkpWallet`. An example is shown below:
```typescript
import { LitAbility, LitActionResource } from "@lit-protocol/auth-helpers";
import { LitNodeClient } from "@lit-protocol/lit-node-client";
import { PKPEthersWallet } from "@lit-protocol/pkp-ethers";
import { AuthCallbackParams } from "@lit-protocol/types";
const POLYGON_MUMBAI_RPC_URL = "";
const PKP_PUBLIC_KEY = "";
const litNodeClient = new LitNodeClient({
litNetwork: "cayenne",
debug: false,
});
await litNodeClient.connect();
const resourceAbilities = [
{
resource: new LitActionResource("*"),
ability: LitAbility.PKPSigning,
},
];
/**
* For provisioning keys and setting up authentication methods see documentation below
* https://developer.litprotocol.com/v2/pkp/minting
*/
const authNeededCallback = async (params: AuthCallbackParams) => {
const response = await litNodeClient.signSessionKey({
sessionKey: params.sessionKeyPair,
statement: params.statement,
authMethods: [],
pkpPublicKey: PKP_PUBLIC_KEY,
expiration: params.expiration,
resources: params.resources,
chainId: 1,
});
return response.authSig;
};
const sessionSigs = await litNodeClient
.getSessionSigs({
chain: "ethereum",
expiration: new Date(Date.now() + 1000 * 60 * 60 * 24 * 7).toISOString(),
resourceAbilityRequests: resourceAbilities,
authNeededCallback,
})
.catch((err) => {
console.log("error while attempting to access session signatures: ", err);
throw err;
});
const pkpWallet = new PKPEthersWallet({
pkpPubKey: PKP_PUBLIC_KEY,
rpc: POLYGON_MUMBAI_RPC_URL,
controllerSessionSigs: sessionSigs,
});
```
#### Use with ZeroDev
Use the provider from Lit Protocol to create a smart account signer, which can be passed to a validator. For detailed guidance on using a validator, refer to our documentation on [creating accounts](/sdk/v5_3_x/core-api/create-account#api).
```typescript
import { signerToEcdsaValidator } from "@zerodev/ecdsa-validator"
import { KERNEL_V3_1 } from "@zerodev/sdk/constants"
import { providerToSmartAccountSigner, ENTRYPOINT_ADDRESS_V07 } from 'permissionless';
import { createPublicClient } from "viem";
import { polygonAmoy } from 'viem/chains';
const smartAccountSigner = await providerToSmartAccountSigner(pkpWallet);
const publicClient = createPublicClient({
// Use your own RPC provider (e.g. Infura/Alchemy).
transport: http('https://rpc-amoy.polygon.technology'),
chain: polygonAmoy,
})
// Pass your `smartAccountSigner` to the validator
const ecdsaValidator = await signerToEcdsaValidator(publicClient, {
signer: smartAccountSigner,
entryPoint: ENTRYPOINT_ADDRESS_V07,
kernelVersion: KERNEL_V3_1
})
// You can now use this ECDSA Validator to create a Kernel account
```
import VersionWarning from "../VersionWarning"
## Use Magic with ZeroDev
[Magic](https://magic.link/) is a popular embedded wallet provider that supports social logins. While social logins are great, your users still need to onramp in order to pay for gas, which introduces significant friction.
By combining ZeroDev with Magic, you can use Magic to enable a smooth social login experience, while using ZeroDev as the smart wallet to sponsor gas for users, batch transactions, and more.
You can check out Magic's [official ZeroDev guide](https://magic.link/docs/wallets/integrations/zerodev-account-abstraction), or keep reading our guide.
### Set up
To use Magic with ZeroDev, first create an application that integrates with Magic.
* Refer to the [Magic documentation site](https://magic.link/docs/home/welcome) for instructions on setting up an application with the Magic SDK.
* For a quick start, Magic provides a CLI to create a starter project, available [here](https://magic.link/docs/home/quickstart/cli).
### Integration
:::info
Check out [this example](https://github.com/zerodevapp/zerodev-signer-examples/tree/main/magic) for custom integration with Magic.
:::
Integrating ZeroDev with Magic is straightforward after setting up the Magic SDK. Magic provides an Externally Owned Account (EOA) wallet to use as a signer with Kernel.
#### Create the Magic object
After following the Magic documentation, you will have access to a MagicBase object as shown below:
```typescript
import { Magic as MagicBase } from 'magic-sdk';
const magic = new MagicBase(process.env.MAGIC_API_KEY as string, {
network: {
rpcUrl: getNetworkUrl(),
chainId: getChainId(),
},
extensions: [new AuthExtension(), new OAuthExtension()],
});
```
#### Use with ZeroDev
Use the provider from Magic to create a smart account signer, which can be passed to a validator. For detailed guidance on using a validator, refer to our documentation on [creating accounts](/sdk/v5_3_x/core-api/create-account#api).
```typescript
import { signerToEcdsaValidator } from "@zerodev/ecdsa-validator"
import { KERNEL_V3_1 } from "@zerodev/sdk/constants"
import { providerToSmartAccountSigner, ENTRYPOINT_ADDRESS_V07 } from 'permissionless';
import { createPublicClient } from "viem";
import { polygonAmoy } from 'viem/chains';
// Get the Provider from Magic and convert it to a SmartAccountSigner
const magicProvider = await magic.wallet.getProvider();
const smartAccountSigner = await providerToSmartAccountSigner(magicProvider);
const publicClient = createPublicClient({
// Use your own RPC provider (e.g. Infura/Alchemy).
transport: http('https://rpc-amoy.polygon.technology'),
chain: polygonAmoy,
})
// Pass your `smartAccountSigner` to the validator
const ecdsaValidator = await signerToEcdsaValidator(publicClient, {
signer: smartAccountSigner,
entryPoint: ENTRYPOINT_ADDRESS_V07,
kernelVersion: KERNEL_V3_1
})
// You can now use this ECDSA Validator to create a Kernel account
```
import VersionWarning from "../VersionWarning"
## Use Particle Network with ZeroDev
[Particle Network](https://particle.network/) is an intent-centric, modular wallet-as-a-service (WaaS). By utilizing MPC-TSS for key management, Particle can streamline onboarding via familiar Web2 methods such as Google, emails, and phone numbers.
By combining ZeroDev with Particle, you can use Particle to enable a smooth social login experience, while using ZeroDev as the smart wallet to sponsor gas for users, batch transactions, and more.
### Set up
To use Particle Network with ZeroDev, first create an application that integrates with Particle Network.
* Refer to the [Particle Network documentation site](https://docs.particle.network/) for instructions on setting up an application with the Particle Network.
* For a quick start, Particle Network provides a guide, available [here](https://docs.particle.network/getting-started/get-started).
### Integration
Integrating ZeroDev with Particle Network is straightforward after setting up the project. Particle Network provides an Externally Owned Account (EOA) wallet to use as a signer with Kernel.
#### Create the Particle Network object
After following the Particle Network documentation, you will have access to a `ParticleProvider` object as shown below:
```typescript
import { ParticleNetwork } from "@particle-network/auth";
import { ParticleProvider } from "@particle-network/provider";
// Param options here will be specific to your project. See the Particle docs for more info.
const particle = new ParticleNetwork({
projectId,
clientKey,
appId,
chainName,
chainId,
});
const particleProvider = new ParticleProvider(particle.auth)
```
#### Use with ZeroDev
Use the provider from Particle Network to create a smart account signer, which can be passed to a validator. For detailed guidance on using a validator, refer to our documentation on [creating accounts](/sdk/v5_3_x/core-api/create-account#api).
```typescript
import { signerToEcdsaValidator } from "@zerodev/ecdsa-validator"
import { KERNEL_V3_1 } from "@zerodev/sdk/constants"
import { providerToSmartAccountSigner, ENTRYPOINT_ADDRESS_V07 } from 'permissionless';
import { createPublicClient } from "viem";
import { polygonAmoy } from 'viem/chains';
// Convert the particleProvider to a SmartAccountSigner
const smartAccountSigner = await providerToSmartAccountSigner(particleProvider);
const publicClient = createPublicClient({
// Use your own RPC provider (e.g. Infura/Alchemy).
transport: http('https://rpc-amoy.polygon.technology'),
chain: polygonAmoy,
})
// Pass your `smartAccountSigner` to the validator
const ecdsaValidator = await signerToEcdsaValidator(publicClient, {
signer: smartAccountSigner,
entryPoint: ENTRYPOINT_ADDRESS_V07,
kernelVersion: KERNEL_V3_1
})
// You can now use this ECDSA Validator to create a Kernel account
```
import VersionWarning from "../VersionWarning"
## Use Portal with ZeroDev
[Portal](https://www.portalhq.io/) is an embedded blockchain infrastructure company that powers companies with an end to end platform for key management for self-custodial wallets (MPC and AA), security firewall, and web3 protocol connect kit.
### Set up
To use Portal with ZeroDev, you have two options: Portal's native integration using ZeroDev, or a custom integration using Portal's Externally Owned Account (EOA) as a signer for ZeroDev. Choose the approach that best fits your needs.
#### Native Integration
Portal natively supports account abstraction using ZeroDev. This integration allows your organization to sponsor gas fees for your clients using specific policies and chains, with additional features coming soon.
* For more information, visit the [Portal Account Abstraction documentation](https://docs.portalhq.io/resources/account-abstraction-alpha)
#### Custom Integration
If you require ZeroDev functionality not yet supported natively by Portal, a custom integration using Portal's EOA as a signer might be preferable.
* Begin by setting up your application with Portal, as detailed in the [Portal documentation](https://docs.portalhq.io/).
* Portal also offers a quick start guide for their web SDK, available [here](https://docs.portalhq.io/sdk/web).
### Implementing Custom Integration
Integrating ZeroDev with Portal is straightforward once your application is set up. Portal provides an EOA wallet to use as a signer with Kernel.
#### Create the Portal object
After following the Portal documentation, you will have access to a `Portal` object as shown below:
```typescript
import Portal, { type PortalOptions } from "@portal-hq/web";
// Config options here will be specific to your project. See the Portal docs for more info.
const portalOptions: PortalOptions = { ... };
const portal = new Portal(portalOptions);
```
#### Use with ZeroDev
Use the provider from Portal to create a smart account signer, which can be passed to a validator. For detailed guidance on using a validator, refer to our documentation on [creating accounts](/sdk/v5_3_x/core-api/create-account#api).
```typescript
import { signerToEcdsaValidator } from "@zerodev/ecdsa-validator"
import { KERNEL_V3_1 } from "@zerodev/sdk/constants"
import { providerToSmartAccountSigner, ENTRYPOINT_ADDRESS_V07 } from 'permissionless';
import { createPublicClient } from "viem";
import { polygonAmoy } from 'viem/chains';
// Get the Provider from Portal and convert it to a SmartAccountSigner
const portalProvider = portal.provider;
const smartAccountSigner = await providerToSmartAccountSigner(portalProvider);
const publicClient = createPublicClient({
// Use your own RPC provider (e.g. Infura/Alchemy).
transport: http('https://rpc-amoy.polygon.technology'),
chain: polygonAmoy,
})
// Pass your `smartAccountSigner` to the validator
const ecdsaValidator = await signerToEcdsaValidator(publicClient, {
signer: smartAccountSigner,
entryPoint: ENTRYPOINT_ADDRESS_V07,
kernelVersion: KERNEL_V3_1
})
// You can now use this ECDSA Validator to create a Kernel account
```
import VersionWarning from "../VersionWarning"
## Use Privy with ZeroDev
[Privy](https://privy.io/) offers a seamless user onboarding experience for both mobile and desktop platforms, accommodating users with or without existing wallets. It simplifies the process of setting up self-custodial wallets for users logging in via email, SMS, or social media accounts. Additionally, it provides flexibility for web3-savvy users to continue using their existing wallets with your application, offering them a choice based on their preference.
### Set up
To use Privy with ZeroDev, you have two options: Privy's native integration that utilizes ZeroDev, or a custom integration using Privy's Externally Owned Account (EOA) as a signer. Choose the approach that best fits your needs.
#### Native Integration
Privy natively supports account abstraction using ZeroDev. This integration allows you to sponsor gas fees, bundle transactions, recover and transfer accounts, utilize session keys.
* For more information and how to get started, visit the Privy's [Account Abstraction with ZeroDev documentation](https://docs.privy.io/guide/frontend/account-abstraction/zerodev).
#### Custom Integration
:::info
Check out [this example](https://github.com/zerodevapp/zerodev-signer-examples/tree/main/privy) for custom integration with Privy.
:::
If you would like to use ZeroDev directly with a Privy project, you can set up a custom integration using Privys's EOA as a signer.
* Begin by setting up your application with Privy, as detailed in the [Privy documentation](https://docs.privy.io/).
* Privy also offers a quick start guide, available [here](https://docs.privy.io/guide/quickstart).
### Implementing Custom Integration
Integrating ZeroDev with Privy is straightforward once your application is set up. Privy provides an EOA wallet to use as a signer with Kernel.
#### Get the Privy wallet's Provider
To begin, ensure your application is integrated with Privy. Detailed guidance is available in the [Privy documentation](https://docs.privy.io/guide/quickstart). You should also configure your PrivyProvider to create embedded wallets for your users when they login.
The following example demonstrates the use of Privy's react auth SDK to get the embedded wallet and use it as a signer for ZeroDev.
```typescript
import { useWallets } from "@privy-io/react-auth";
// Use the `useWallets` hook to get the primary wallet
const { wallets } = useWallets();
// Get the privy embeded wallet.
const embeddedWallet = wallets.find(
(wallet) => wallet.walletClientType === "privy"
);
if (!embeddedWallet) throw new Error("User does not have an embedded wallet");
// Get the provider for the embeded wallet, we will use in the next section
const privyProvider = await embeddedWallet.getEthereumProvider();
```
#### Use with ZeroDev
Use the provider from Privy to create a smart account signer, which can be passed to a validator. For detailed guidance on using a validator, refer to our documentation on [creating accounts](/sdk/v5_3_x/core-api/create-account#api).
```typescript
import { signerToEcdsaValidator } from "@zerodev/ecdsa-validator"
import { KERNEL_V3_1 } from "@zerodev/sdk/constants"
import { providerToSmartAccountSigner, ENTRYPOINT_ADDRESS_V07 } from 'permissionless';
import { createPublicClient } from "viem";
import { polygonAmoy } from 'viem/chains';
// Use the Provider from Privy to create a SmartAccountSigner
const smartAccountSigner = await providerToSmartAccountSigner(privyProvider);
const publicClient = createPublicClient({
// Use your own RPC provider (e.g. Infura/Alchemy).
transport: http('https://rpc-amoy.polygon.technology'),
chain: polygonAmoy,
})
// Pass your `smartAccountSigner` to the validator
const ecdsaValidator = await signerToEcdsaValidator(publicClient, {
signer: smartAccountSigner,
entryPoint: ENTRYPOINT_ADDRESS_V07,
kernelVersion: KERNEL_V3_1
})
// You can now use this ECDSA Validator to create a Kernel account
```
### Templates
A user has helpfully created a ZeroDev + Privy template for React Native (Expo). [Check it out here.](https://github.com/Stephen-Gordon/zerodev-privy-expo)
import VersionWarning from "../VersionWarning"
## Use Turnkey with ZeroDev
[Turnkey](https://turnkey.com/) is a key infrastructure provider with a great developer API and a powerful security policy engine.
By combining ZeroDev with Turnkey, you can create **custodial AA wallets** whose security is provided by Turnkey, with powerful functionalities such as sponsoring gas, batching transactions, etc.
### Set up
To use Turnkey with ZeroDev, first create an application that integrates with Turnkey.
* Refer to the [Turnkey documentation site](https://docs.turnkey.com/) for instructions on setting up an application with the Turnkey.
* For a quick start, Turnkey provides examples, available [here](https://docs.turnkey.com/getting-started/examples).
### Integration
Integrating ZeroDev with Turnkey is straightforward after setting up the project. Turnkey provides an Externally Owned Account (EOA) wallet to use as a signer with Kernel.
#### Create the TurnkeyClient and a Turnkey viem account
After following the Turnkey documentation, you will have access to a `TurnkeyClient`. An example is shown below:
```typescript
import { TurnkeyClient } from "@turnkey/http";
import { createAccount } from "@turnkey/viem";
// Param options here will be specific to your project. See the Turnkey docs for more info.
const turnkeyClient = new TurnkeyClient({ baseUrl: '' }, stamper);
const turnkeyAccount = createAccount({
client: turnkeyClient,
organizationId: subOrganizationId, // Your subOrganization id
signWith: signWith, // Your suborganization `signWith` param.
})
```
#### Use with ZeroDev
Use the WalletClient from Turnkey to create a smart account signer, which can be passed to a validator. For detailed guidance on using a validator, refer to our documentation on [creating accounts](/sdk/v5_3_x/core-api/create-account#api).
```typescript
import { signerToEcdsaValidator } from "@zerodev/ecdsa-validator"
import { KERNEL_V3_1 } from "@zerodev/sdk/constants"
import { walletClientToSmartAccountSigner, ENTRYPOINT_ADDRESS_V07 } from 'permissionless';
import { createWalletClient, createPublicClient } from "viem";
import { polygonAmoy } from 'viem/chains';
// Create a SmartAccountSigner from the turnkeyAccount
const walletClient = createWalletClient({
account: turnkeyAccount,
transport: http('https://rpc-amoy.polygon.technology'),
})
const smartAccountSigner = walletClientToSmartAccountSigner(walletClient);
const publicClient = createPublicClient({
// Use your own RPC provider (e.g. Infura/Alchemy).
transport: http('https://rpc-amoy.polygon.technology'),
chain: polygonAmoy,
})
// Pass your `smartAccountSigner` to the validator
const ecdsaValidator = await signerToEcdsaValidator(publicClient, {
signer: smartAccountSigner,
entryPoint: ENTRYPOINT_ADDRESS_V07,
kernelVersion: KERNEL_V3_1
})
// You can now use this ECDSA Validator to create a Kernel account
```
import VersionWarning from "../VersionWarning"
## Use Web3Auth with ZeroDev
[Web3Auth](https://web3auth.io/) is a popular embedded wallet provider that supports social logins. While social logins are great, your users still need to onramp in order to pay for gas, which introduces significant friction.
By combining ZeroDev with Web3Auth, you can use Web3Auth to enable a smooth social login experience, while using ZeroDev as the smart wallet to sponsor gas for users, batch transactions, and more.
### Set up
To use Web3Auth with ZeroDev, first create an application that integrates with Web3Auth.
* Refer to the [Web3Auth documentation site](https://web3auth.io/docs/index.html) for instructions on setting up an application with the Web3Auth.
* For a quick start, Web3Auth provides example starter projects, available [here](https://web3auth.io/docs/examples?product=Plug+and+Play\&sdk=Plug+and+Play+Web+Modal+SDK).
### Integration
Integrating ZeroDev with Web3Auth is straightforward after setting up the project. Web3Auth provides an Externally Owned Account (EOA) wallet to use as a signer with Kernel.
#### Create the Web3Auth object
After following the Web3Auth documentation, you will have access to a `web3auth` object as shown below:
```typescript
import { Web3Auth } from "@web3auth/modal";
// Config options here will be specific to your project. See the Web3Auth docs for more info.
const web3auth = new Web3Auth({
clientId,
chainConfig: {},
uiConfig: {},
web3AuthNetwork: WEB3AUTH_NETWORK.SAPPHIRE_MAINNET,
});
```
#### Use with ZeroDev
Use the provider from Web3Auth to create a smart account signer, which can be passed to a validator. For detailed guidance on using a validator, refer to our documentation on [creating accounts](/sdk/v5_3_x/core-api/create-account#api).
```typescript
import { signerToEcdsaValidator } from "@zerodev/ecdsa-validator"
import { KERNEL_V3_1 } from "@zerodev/sdk/constants"
import { providerToSmartAccountSigner, ENTRYPOINT_ADDRESS_V07 } from 'permissionless';
import Web3 from "web3";
import { type Hex, createPublicClient } from "viem"
import { polygonAmoy } from 'viem/chains';
// Get the Provider and EOA address (this will be the address of the signer) from Web3Auth
const web3authProvider = await web3auth.provider;
const web3 = new Web3(provider as any);
const [address] = await web3.eth.getAccounts();
// Create the smart account signer from the provider and signer address
const smartAccountSigner = await providerToSmartAccountSigner(web3authProvider, address as Hex);
const publicClient = createPublicClient({
// Use your own RPC provider (e.g. Infura/Alchemy).
transport: http('https://rpc-amoy.polygon.technology'),
chain: polygonAmoy,
})
// Pass your `smartAccountSigner` to the validator
const ecdsaValidator = await signerToEcdsaValidator(publicClient, {
signer: smartAccountSigner,
entryPoint: ENTRYPOINT_ADDRESS_V07,
kernelVersion: KERNEL_V3_1
})
// You can now use this ECDSA Validator to create a Kernel account
```
## Passkeys
Passkeys are cryptographic key pairs created on end-user devices. [Apple](https://developer.apple.com/passkeys) and [Google](https://developers.google.com/identity/passkeys) are two major industry players pushing for the passkeys standard, which means that passkeys are widely available on consumer devices such as:
* iPhones / iPads / Macbooks
* Android phones / tablets
* Chrome (on Windows / Mac / Android)
[See here for a full list of systems that support passkeys.](https://passkeys.dev/device-support/#matrix)
The biggest value-add of passkeys, in the context of Web3, is **saving users from manually managing and securing their private keys.** Instead of writing down 12-word seed phrases, your user can simply use a passkey-enabled device to manage their wallet, and trust that the hardware will safely store the passkey, and the hardware vendor (e.g. Apple/Google) will [securely backup the keys](#how-are-passkeys-sync-ed-and-recovered).
### Demo
* Passkeys
* [Demo](https://passkey-demo.zerodev.app)
* [Source code](https://github.com/zerodevapp/passkey-tutorial/tree/deployed)
* Passkeys + Session Keys
* [Demo](https://passkey-session-key-demo.zerodev.app)
* [Source code](https://github.com/zerodevapp/passkey-session-key-example)
* [Read here](#can-i-use-passkeys-with-session-keys) for why you want to use passkeys with session keys.
### How ZeroDev supports passkeys
ZeroDev/Kernel supports using passkeys as signers. The support comes in two flavors:
* **Native passkeys** using precompiles via [RIP-7212](https://github.com/ethereum/RIPs/blob/master/RIPS/rip-7212.md) on rollups and [EIP-7951](https://eips.ethereum.org/EIPS/eip-7951) on Ethereum. Native passkeys are the best option when available, since it uses the least amount of gas (only 3450 gas for verifying a P256 signature). [See here](#chains-with-native-passkey-precompiles) for a list of chains that support native passkey precompiles.
* **Smart contract passkeys** using either the [Daimo](https://github.com/daimo-eth/p256-verifier) or [FCL](https://github.com/rdubois-crypto/FreshCryptoLib) implementation. Smart contract passkeys can work on all EVM networks, but they are expensive (300-400k gas for verifying a P256 signature).
ZeroDev implements passkey supports through a **progressive passkey validator**, which uses native passkeys if ERC-7212 is available, and falls back to smart contract passkeys otherwise. Notably, this means that if you use passkeys on a network where ERC-7212 isn't available, and the network later adds support for ERC-7212, you don't need to upgrade your validator -- it will automatically start taking advantage of the ERC-7212 precompile.
### Quickstart
[Follow this tutorial](/smart-accounts/use-plugins/passkeys/tutorial) to get started with passkey smart accounts.
### Installation
:::code-group
```bash [npm]
npm i @zerodev/passkey-validator
```
```bash [yarn]
yarn add @zerodev/passkey-validator
```
```bash [pnpm]
pnpm i @zerodev/passkey-validator
```
```bash [bun]
bun add @zerodev/passkey-validator
```
:::
### API
#### Setting up passkey server
In this tutorial, we will be using ZeroDev's passkey server. If you want to use your own passkey server, [read this](#how-do-i-use-my-own-passkeys-server). If you wonder why a passkey server is needed at all, [read this](#why-do-we-need-a-passkeys-server).
Head to the [ZeroDev dashboard](https://dashboard.zerodev.app), select a project, and copy the passkey server URL:
If you are testing on `localhost`, just leave the domain empty. If you are deploying to a domain, enter and save the domain.
#### Creating a new passkey
```ts
import { toPasskeyValidator, toWebAuthnKey, WebAuthnMode, PasskeyValidatorContractVersion } from "@zerodev/passkey-validator"
import { KERNEL_V3_3, getEntryPoint } from "@zerodev/sdk/constants"
const webAuthnKey = await toWebAuthnKey({
passkeyName: "passkey name",
passkeyServerUrl: "your passkey server URL",
mode: WebAuthnMode.Register,
passkeyServerHeaders: {}
})
const passkeyValidator = await toPasskeyValidator(publicClient, {
webAuthnKey,
entryPoint: getEntryPoint("0.7"),
kernelVersion: KERNEL_V3_3,
validatorContractVersion: PasskeyValidatorContractVersion.V0_0_3_PATCHED
})
```
`toWebAuthnKey` will prompt the user to create a passkey with the given name.
#### Using an existing passkey
```ts
import { toPasskeyValidator, toWebAuthnKey, WebAuthnMode, PasskeyValidatorContractVersion } from "@zerodev/passkey-validator"
import { KERNEL_V3_3, getEntryPoint } from "@zerodev/sdk/constants"
const webAuthnKey = await toWebAuthnKey({
passkeyName: "passkey name",
passkeyServerUrl: "your passkey server URL",
mode: WebAuthnMode.Login,
passkeyServerHeaders: {}
})
const passkeyValidator = await toPasskeyValidator(publicClient, {
webAuthnKey,
entryPoint: getEntryPoint("0.7"),
kernelVersion: KERNEL_V3_3,
validatorContractVersion: PasskeyValidatorContractVersion.V0_0_3_PATCHED
})
```
`toWebAuthnKey` will prompt the user to select an existing passkey.
#### Creating Kernel accounts
Now you can proceed to [create Kernel accounts](https://docs.zerodev.app/sdk/core-api/create-account#create-a-kernel-account) using the passkey validator as the sudo validator.
### FAQs
#### Can I use passkeys with session keys?
Yes! Check out [this demo](https://passkey-session-key-demo.zerodev.app/) and [the source code](https://github.com/zerodevapp/passkey-session-key-example).
Using passkeys with ECDSA session keys has multiple benefits:
* If ERC-7212 hasn't been deployed on your network, passkeys can be expensive. With session keys, UserOps can be sent through ECDSA keys very cheaply. You only need to pay for the passkey validation cost once when you create a session key.
* Your users don't have to deal with passkey signing prompts for every UserOp.
#### Why do we need a passkeys server?
A passkey is generated from a client-server handshake. In theory, we could simulate the handshake on the frontend, then store the public key on-chain. However, storing the public key on-chain involves sending a transaction, so you would want to do that as a part of deploying the account. However, if you must deploy a passkey account before you can use it, that breaks one of the core optimizations of AA which is counterfactual deployment -- the ability to use the address of a smart account without first deploying it.
We are working on ways to remove the dependency on a passkey server. In the mean time, keep in mind that the centralization concern is mitigated by the following:
* You can [use your own passkeys server](#how-do-i-use-my-own-passkeys-server).
* The passkeys server only stores the public authentication data. Even if it's compromised, your users's keys are stored on their devices only.
If the passkey server is lost, only users who have not yet deployed their accounts (i.e. users who have been using accounts counterfactually) will be unable to recover their accounts. Users who have deployed their accounts will have their authentication data stored on-chain, so their accounts will be safe even if the passkey server is lost.
#### How do I use my own passkeys server?
You can optionally implement your own passkey server. To do that, make sure that your server implements the following URLs:
* `/register/options`: Generate and return registration options to the client. The client will use these options to prompt the user to create a passkey. If you are utilizing the [@simplewebauthn/server](https://simplewebauthn.dev/) library, the `generateRegistrationOptions` function can be used for this purpose. During this process, consider generating and storing a unique userID for later database reference.
```ts
import { generateRegistrationOptions } from "@simplewebauthn/server"
const options = await generateRegistrationOptions({
rpName, // your app name
rpID, // your app domain
userID, // a unique user ID
userName, // user name (passkey name)
userDisplayName,
authenticatorSelection: {
residentKey: "required",
userVerification: "required",
authenticatorAttachment: "platform",
},
})
return options
```
* `/register/verify`: Verify the registration response (cred) and return the results to the client. The `verifyRegistrationResponse` function is also available for this verification. Upon successful verification, store the user's credentials, such as pubKey and credentialId, in your database.
```ts
import { verifyRegistrationResponse } from "@simplewebauthn/server"
// get credential from request
const { cred } = await request.json<{
cred: RegistrationResponseJSON
}>()
const clientData = JSON.parse(atob(cred.response.clientDataJSON))
const verification = await verifyRegistrationResponse({
response: cred,
expectedChallenge: clientData.challenge,
expectedRPID, // your app domain
expectedOrigin: c.req.header("origin")!, //! Allow from any origin
requireUserVerification: true,
})
if (verification.verified) {
// save the user credential like pubKey, credentialId to your database
// ...
// return the verification result
return { verification }
}
// return 401 error if the verification is failed
```
* `/login/options`: Generate login options, including a challenge for verification, and return them to the client. The `generateAuthenticationOptions` function will assist you in creating these options.
```ts
import { generateAuthenticationOptions } from "@simplewebauthn/server"
const options = await generateAuthenticationOptions({
userVerification: "required",
rpID: domainName,
})
return options
```
* `/login/verify`: Verify the login response (cred) and report the outcome to the client. Use the `verifyAuthenticationResponse` for the verification process. In the event of successful verification, retrieve the new counter from authenticationInfo and update the user's credentials in your database. It's crucial to send both the verification result and the user's public key back to the client, as the public key is not known to the client during the login process.
```ts
import { verifyAuthenticationResponse } from "@simplewebauthn/server"
const cred = await request.json<{
cred: AuthenticationResponseJSON
}>()
const clientData = JSON.parse(atob(cred.response.clientDataJSON))
// get user credential from your database
const user = await userRepo.get(userId)
const credential = user.credentials[cred.id]
const verification = await verifyAuthenticationResponse({
response: cred,
expectedChallenge: clientData.challenge,
expectedOrigin: c.req.header("origin")!, //! Allow from any origin
expectedRPID: domainName,
authenticator: credential,
})
if (verification.verified) {
// get new counter
const { newCounter } = verification.authenticationInfo
// update the user credential in your database
// ...
// return the verification result and the user's public key
return { verification, pubKey: credential.pubKey }
}
// return 401 error if the verification is failed
```
***
Then, you can pass your server URL as `passkeyServerUrl`.
```ts
// creating a new passkey
const webAuthnKey = await toWebAuthnKey({
passkeyName: "passkey name",
passkeyServerUrl: "your passkey server URL",
mode: WebAuthnMode.Register,
passkeyServerHeaders: {}
})
// using an existing passkey
const webAuthnKey = await toWebAuthnKey({
passkeyName: "passkey name",
passkeyServerUrl: "your passkey server URL",
mode: WebAuthnMode.Login,
passkeyServerHeaders: {}
})
// create passkey validator
const passkeyValidator = await toPasskeyValidator(publicClient, {
webAuthnKey,
entryPoint: ENTRYPOINT_ADDRESS_V07,
kernelVersion: KERNEL_V3_3,
validatorContractVersion: PasskeyValidatorContractVersion.V0_0_3_PATCHED
})
```
If you want to refer to the ZeroDev passkey server implementation, you can find it [here](https://github.com/zerodevapp/passkey-server)
#### How are passkeys sync-ed and recovered?
Synchronization and recovery are both supported natively by Apple and Google:
* With Apple, Passkeys created on one device are synced through [iCloud Keychain](https://support.apple.com/en-us/109016) as long as the user is logged in with their Apple ID. Apple covers both syncing and recovery in ["About the security of passkeys"](https://support.apple.com/en-us/102195). For some additional detail, see [this Q\&A with the passkey team](https://developer.apple.com/news/?id=21mnmxow). Apple's account recovery process is documented in [this support page](https://support.apple.com/en-us/HT204921).
* With Google, [Google Password Manager](https://passwords.google/) syncs passkeys across devices seamlessly. Google has plans to support syncing more broadly across different operating systems, see [this support summary](https://developers.google.com/identity/passkeys/supported-environments#chrome-passkey-support-summary). Recovery is covered in [this FAQ ("What happens if a user loses their device?")](https://developers.google.com/identity/passkeys/faq#what_happens_if_a_user_loses_their_device): it relies on Google's overall [account recovery process](https://support.google.com/accounts/answer/7682439?hl=en) because passkeys are attached to Google accounts.
### Chains with Native Passkey Precompiles
This is an incomplete list of chains that support native passkey precompiles via RIP-7212 or EIP-7951:
#### Mainnet
* Ethereum
* OP Mainnet
* BNB Smart Chain
* Unichain Mainnet
* Polygon
* Monad Mainnet
* Ethernity Mainnet
* Mint Mainnet
* opBNB
* ZKsync Era
* Shape
* Flow
* Perennial
* Story
* Abstract
* Edge Mainnet
* Mantle
* ZetaChain Mainnet
* Polynomial Mainnet
* B3 Mainnet
* Base
* Warden Protocol
* Apechain
* mode-mainnet
* Arbitrum One
* Arbitrum Nova
* Celo
* Hemi Network
* Avalanche
* Ink
* Linea Mainnet
* BOB
* Onyx
* plume
* Scroll
* Katana
* Degen
#### Testnet
* Binance Smart Chain Testnet
* Ethernity Testnet
* prod-testnet
* mode-sepolia
* Unichain Sepolia
* Story Aeneid
* vector-chain
* Mantle Sepolia Testnet
* MegaETH Testnet v2
* Monad Testnet
* Ethereum Holesky Testnet
* Incentiv Testnet
* Curtis Testnet
* Avalanche Fuji
* Linea Sepolia Testnet
* Polygon Amoy
* Base Sepolia
* plume-testnet
* Arbitrum Sepolia
* Scroll Sepolia
* Open Campus Codex
* Hemi Sepolia
* Ink Sepolia
* Sepolia
* OP Sepolia
* Arbitrum Blueberry
## ZeroDev Tutorial -- Passkeys
In this tutorial, we will be building a Next.js app where your users can create smart accounts and send UserOps with [passkeys](/smart-accounts/use-plugins/passkeys/overview).
### Clone the template
We have prepared a [Next.js template](https://github.com/zerodevapp/passkey-tutorial) for you:
```bash
git clone git@github.com:zerodevapp/passkey-tutorial.git
```
If you ever want to check out the completed code, you can checkout [the `completed` branch](https://github.com/zerodevapp/passkey-tutorial/tree/completed). You can also see a deployed demo [here](https://passkey-demo.zerodev.app/).
Run the app in development mode:
```bash
npm i
npm run dev
```
Open `app/page.tsx`. We will be working on this file for the rest of the tutorial.
### Create a ZeroDev project
For this tutorial, [create a ZeroDev project](https://dashboard.zerodev.app) for Sepolia.
On `app/page.tsx`, fill out these variables with the URLs found on your dashboard.
```ts
const ZERODEV_RPC = ""
const ZERODEV_RPC = ""
const PASSKEY_SERVER_URL = ""
```
### Create a smart account using passkeys
Let's hook up the `Register` and `Login` buttons so they actually do something.
In `handleRegister`, add the following code:
```ts
// Function to be called when "Register" is clicked
const handleRegister = async () => {
setIsRegistering(true)
const webAuthnKey = await toWebAuthnKey({ // [!code focus]
passkeyName: username, // [!code focus]
passkeyServerUrl: PASSKEY_SERVER_URL, // [!code focus]
mode: WebAuthnMode.Register, // [!code focus]
passkeyServerHeaders: {} // [!code focus]
}) // [!code focus]
const passkeyValidator = await toPasskeyValidator(publicClient, { // [!code focus]
webAuthnKey, // [!code focus]
entryPoint, // [!code focus]
kernelVersion: KERNEL_V3_3, // [!code focus]
validatorContractVersion: PasskeyValidatorContractVersion.V0_0_3_PATCHED // [!code focus]
}) // [!code focus]
await createAccountAndClient(passkeyValidator) // [!code focus]
setIsRegistering(false)
window.alert('Register done. Try sending UserOps.')
}
```
And in `handleLogin`, add the following code:
```ts
const handleLogin = async () => {
setIsLoggingIn(true)
const webAuthnKey = await toWebAuthnKey({ // [!code focus]
passkeyName: username, // [!code focus]
passkeyServerUrl: PASSKEY_SERVER_URL, // [!code focus]
mode: WebAuthnMode.Login, // [!code focus]
passkeyServerHeaders: {} // [!code focus]
}) // [!code focus]
const passkeyValidator = await toPasskeyValidator(publicClient, { // [!code focus]
webAuthnKey, // [!code focus]
entryPoint, // [!code focus]
kernelVersion: KERNEL_V3_3, // [!code focus]
validatorContractVersion: PasskeyValidatorContractVersion.V0_0_3_PATCHED // [!code focus]
}) // [!code focus]
await createAccountAndClient(passkeyValidator) // [!code focus]
setIsLoggingIn(false)
window.alert('Login done. Try sending UserOps.')
}
```
In this tutorial, we are using a public passkey server URL. In practice, you'd create your own passkey server URL from [the dashboard](https://dashboard.zerodev.app/).
Now modify `createAccountAndClient` to actually create the account using the `passkeyValidator`:
```ts
const createAccountAndClient = async (passkeyValidator: any) => {
kernelAccount = await createKernelAccount(publicClient, { // [!code focus]
plugins: { // [!code focus]
sudo: passkeyValidator, // [!code focus]
}, // [!code focus]
entryPoint, // [!code focus]
kernelVersion: KERNEL_V3_1 // [!code focus]
}) // [!code focus]
kernelClient = createKernelAccountClient({ // [!code focus]
account: kernelAccount, // [!code focus]
chain: CHAIN, // [!code focus]
bundlerTransport: http(ZERODEV_RPC), // [!code focus]
client: publicClient, // [!code focus]
paymaster: { // [!code focus]
getPaymasterData: (userOperation) => { // [!code focus]
const zerodevPaymaster = createZeroDevPaymasterClient({ // [!code focus]
chain: CHAIN, // [!code focus]
transport: http(ZERODEV_RPC), // [!code focus]
}) // [!code focus]
return zerodevPaymaster.sponsorUserOperation({ // [!code focus]
userOperation, // [!code focus]
}) // [!code focus]
} // [!code focus]
}, // [!code focus]
}) // [!code focus]
setIsKernelClientReady(true) // [!code focus]
setAccountAddress(kernelAccount.address) // [!code focus]
}
```
At this point, you should be able to create passkey accounts with either `Register` or `Login`.
### Sending UserOps
Sending UserOps from a passkey account is the same as sending them from any account. Modify `handleSendUserOp` as such:
```ts
const handleSendUserOp = async () => {
setIsSendingUserOp(true)
setUserOpStatus('Sending UserOp...')
const userOpHash = await kernelClient.sendUserOperation({ // [!code focus]
callData: await kernelAccount.encodeCalls([{ // [!code focus]
to: contractAddress, // [!code focus]
value: BigInt(0), // [!code focus]
data: encodeFunctionData({ // [!code focus]
abi: contractABI, // [!code focus]
functionName: "mint", // [!code focus]
args: [kernelAccount.address], // [!code focus]
}), // [!code focus]
}]), // [!code focus]
}) // [!code focus]
setUserOpHash(userOpHash)
await kernelClient.waitForUserOperationReceipt({ // [!code focus]
hash: userOpHash, // [!code focus]
}) // [!code focus]
// Update the message based on the count of UserOps
const userOpMessage = `UserOp completed. Click here to view.`
setUserOpStatus(userOpMessage)
setIsSendingUserOp(false)
}
```
Now try sending some UserOps!
Also, the UserOps are sponsored thanks to paymasters -- that's why you are able to send UserOps from an account with no ETH.
### Next Steps
In this tutorial, you were able to create smart accounts and send UserOps with passkeys.
For next steps:
* Check out [the core API](/smart-accounts/create-a-smart-account) to learn more about the SDK
* Learn more about [passkeys](/smart-accounts/use-plugins/passkeys/overview)
* Read some [code examples](https://github.com/zerodevapp/zerodev-examples) of using ZeroDev
## Build Your Own Action
Guide coming soon.
## Build Your Own Signer
Guide coming soon.
## ECDSA Signer
The ECDSA signer signs with a single ECDSA key, specifically with the `secp256k1` curve, which is the same algorithm that EOAs use.
### API
```typescript
import { toECDSASigner } from "@zerodev/permissions/signers"
// Use any Viem account
const signer = privateKeyToAccount(generatePrivateKey())
const ecdsaSigner = await toECDSASigner({
signer,
})
const validator = toPermissionValidator(publicClient, {
entryPoint,
kernelVersion,
signer: ecdsaSigner,
policies: [
// ...
],
})
```
## Multisig Signer
The weighted ECDSA (multisig) signer signs with a collection of ECDSA keys. Each key is weighted, so that the signature will pass as long as enough signers with enough weight have signed.
Read [the multisig doc](/smart-accounts/use-plugins/multisig) for more details.
### API
```typescript
import { toWeightedECDSASigner } from "@zerodev/permissions/signers"
const multisigSigner = await toWeightedECDSASigner(publicClient, {
config: {
threshold: 100,
delay: 0,
signers: [
{ address: signer1.address, weight: 50 },
{ address: signer2.address, weight: 50 }
]
},
signers: [signer1, signer2]
})
const validator = toPermissionValidator(publicClient, {
entryPoint,
kernelVersion,
signer: multisigSigner,
policies: [
// ...
],
})
```
## WebAuthn Signer
The WebAuthn (passkeys) signer signs with a single passkey. Read [the passkeys doc](/smart-accounts/use-plugins/passkeys/overview) for a more detailed intro to passkeys.
### API
```typescript
import { toWebAuthnKey, toWebAuthnSigner, WebAuthnMode, WebAuthnSignerVersion} from "@zerodev/permissions/signers"
const passkeyName = "Key Name" // any name you want
const passkeyServerUrl = "..." // get this from ZeroDev dashboard
const mode = WebAuthnMode.Register // can also be "login" if you are using an existing key
const webAuthnKey = await toWebAuthnKey({
passkeyName,
passkeyServerUrl,
mode,
passkeyServerHeaders: {}
})
const webAuthnSigner = await toWebAuthnSigner(publicClient, {
webAuthnKey,
webAuthnSignerVersion: WebAuthnSignerVersion.V0_0_2
})
const validator = toPermissionValidator(publicClient, {
entryPoint,
kernelVersion,
signer: webAuthnSigner,
policies: [
// ...
],
})
```
For the params:
* `passkeyName` can be any name
* `passkeyServerUrl` is a [passkey server URL](/smart-accounts/use-plugins/passkeys/overview#setting-up-passkey-server). You can get it from the ZeroDev dashboard.
* `mode` is either `register` or `login`, depending on whether you are creating a new key or using an existing key.
## Build Your Own Policy
Guide coming soon.
## Call Policy
The call policy limits the target (either contract or EOA) that the UserOp can interact with. If the target is a contract, then you can further specify the functions the UserOp can interact with, as well as putting constraints on the values of the function arguments.
### API
```ts
import { ParamCondition, toCallPolicy, CallPolicyVersion } from "@zerodev/permissions/policies"
const callPolicy = toCallPolicy({
policyVersion: CallPolicyVersion.V0_0_4,
permissions: [
{
// target address
target: contractAddress,
// Maximum value that can be transferred. In this case we
// set it to zero so that no value transfer is possible.
valueLimit: BigInt(0),
// Contract abi
abi: contractABI,
// Function name
functionName: "mint",
// An array of conditions, each corresponding to an argument for
// the function.
args: [
{
condition: ParamCondition.EQUAL,
value: value,
},
],
},
],
})
const validator = toPermissionValidator(publicClient, {
entryPoint,
kernelVersion,
signer: someSigner,
policies: [
callPolicy,
// ...other policies
],
})
```
* `target`: the target contract to call or address to send ETH to. If this is `zeroAddress`, then the target can be any contract as long as the ABI matches (or it can be any address if no ABI is specified).
* `valueLimit`: the maximum value. that can be transmitted.
* `abi`: the contract ABI
* `functionName`: the function name
* `selector`: if you have multiple functions with the same name, you can distinguish them with `selector`. For example: `selector: toFunctionSelector("transfer(uint256, uint256)")`.
* `args`: an array of conditions, each corresponding to an argument, in the order that the arguments are laid out. use `null` to skip an argument.
* `operator`: this can be `EQUAL`, `GREATER_THAN`, `LESS_THAN`, `GREATER_THAN_OR_EQUAL`, `LESS_THAN_OR_EQUAL`, `NOT_EQUAL`.
* `value`: the value of the argument to use with the operator. For instance, `operator = EQUAL` and `value = 2` would mean "the argument must be equal to 2".
* `operation`: whether this is a call or a delegatecall. Defaults to call.
## Gas Policy
The gas policy specifies how much gas the signer can use in total, across all UserOps it sends. It can also enforce that the UserOps must use paymasters, or use a specific paymaster.
### API
```ts
import { toGasPolicy } from "@zerodev/permissions/policies"
// Set a total amount
const gasPolicy = toGasPolicy({
allowed: parseEther('0.1'),
})
// Or enforce that a paymaster must be used
const gasPolicy = toGasPolicy({
enforcePaymaster: true,
})
// Or enforce that a specific paymaster is used
const gasPolicy = toGasPolicy({
allowedPaymaster: "PAYMASTER_ADDRESS",
})
const validator = toPermissionValidator(publicClient, {
entryPoint,
kernelVersion,
signer: someSigner,
policies: [
gasPolicy,
// ...other policies
],
})
```
`toGasPolicy` takes one or more of the following arguments:
* `allowed`: an amount, in wei, of the ETH (or whatever native token) that the signer can spend on gas, in total across all UserOps it sends.
* `enforcePaymaster`: a boolean value. If set to true, enforce that a paymaster must be used.
* `allowedPaymaster`: a paymaster address. If set, enforce that the specific paymaster is used.
## Rate Limit Policy
The rate limit policy specifies the frequency at which the signer is allowed to send UserOps.
We have two types of rate limit policies:
* **Rate limits with no reset**: send one UserOp per `interval`, for up to `count` times.
* **Rate limits with reset**: send `count` UserOps within an `interval`, for an indefinite number of intervals.
### Rate limit with no reset
Send one UserOp per `interval`, for up to `count` times. Each UserOp call must have at least an `interval` of time between it and the next call.
#### API
```ts
import { toRateLimitPolicy } from "@zerodev/permissions/policies"
// In this example, the signer can send one UserOp per month
const rateLimitPolicy = toRateLimitPolicy({
count: 1,
interval: 60 * 60 * 24 * 30, // one month in seconds
})
const validator = toPermissionValidator(publicClient, {
entryPoint,
kernelVersion,
signer: someSigner,
policies: [
rateLimitPolicy,
// ...other policies
],
})
```
Arguments to `toRateLimitPolicy`:
* `count`: the number of intervals.
* (optional) `interval`: the length of an interval.
* (optional) `startAt`: the starting UNIX timestamp for when the rate limit should take effect. Before that, the signer cannot send any UserOps.
### Rate limit with reset
Send `count` UserOps within an `interval`, for an indefinite number of intervals.
The Rate Limit Policy with reset allows you to define a recurring allowance of UserOps that refreshes after each interval period. This is useful for creating recurring permissions that automatically renew, such as monthly subscription payments or regular administrative actions.
#### API
Unlike the standard Rate Limit Policy which counts down a total number of allowed operations, the reset version gives the signer a fresh allocation of operations after each interval passes.
```ts
import { toRateLimitPolicy, RATE_LIMIT_POLICY_WITH_RESET_CONTRACT } from "@zerodev/permissions/policies"
// In this example, the signer can send one UserOp per month
const rateLimitPolicy = toRateLimitPolicy({
count: 1,
interval: 60 * 60 * 24 * 30, // one month in seconds
})
// only difference from non-reset is using RATE_LIMIT_POLICY_WITH_RESET_CONTRACT for policyAddress
const validator = toPermissionValidator(publicClient, {
policyAddress : RATE_LIMIT_POLICY_WITH_RESET_CONTRACT,
entryPoint,
kernelVersion,
signer: someSigner,
policies: [
rateLimitPolicy,
// ...other policies
],
})
```
### Examples
If you want to do a monthly payment for 2 years (no reset after two years), the parameters will be:
```
count : 24,
interval : 60 * 60 * 24 * 30 // 30 days for month
startAt :
```
If you want to do a monthly payment indefinitely, the parameters will be:
```
policyAddress : RATE_LIMIT_POLICY_WITH_RESET_CONTRACT,
count : 1,
interval : 60 * 60 * 24 * 30 // 30 days for month
startAt : 0 or undefined
```
### Notes
* We are aware that the semantics of `count` and `interval` changes completely between the `no reset` version and the `reset` version and it's very confusing; this is technical debt we intend to clean up.
* The `reset` version technically violates ERC-4337 storage rules since it needs to access `block.timestamp`, so it won't work with all bundler, but it's known to work with [UltraRelay](https://docs.zerodev.app/sdk/core-api/sponsor-gas#ultrarelay) and Pimlico.
## Signature Caller Policy
The signature caller policy specifies a list of addresses that are allowed to validate messages signed by the signer.
This is useful when you want the signer to sign messages for a set of particular protocols only. For example, if you want to create a signer that can only sign USDC [permits](https://eips.ethereum.org/EIPS/eip-2612), then you can use this policy to ensure that only the USDC contract can validate its messages.
### API
```ts
import { toSignatureCallerPolicy } from "@zerodev/permissions/policies"
const signaturePolicy = toSignatureCallerPolicy({
allowedCallers: [address1, address2]
})
const validator = toPermissionValidator(publicClient, {
entryPoint,
kernelVersion,
signer: someSigner,
policies: [
signaturePolicy,
// ...other policies
],
})
```
* `allowedCallers` is a list of addresses that are allowed to validate messages signed by the signer.
## Sudo Policy
The sudo policy gives full permission to the signer. The signer will be able to send any UserOps and sign any messages.
### API
```ts
import { toSudoPolicy } from "@zerodev/permissions/policies"
const sudoPolicy = toSudoPolicy({})
const validator = toPermissionValidator(publicClient, {
entryPoint,
kernelVersion,
signer: someSigner,
policies: [
sudoPolicy,
// ...other policies
],
})
```
## Timestamp Policy
The timestamp policy specifies the start and end time for when the signer is valid.
### API
```ts
import { toTimestampPolicy } from "@zerodev/permissions/policies"
// In this example, the signer can send one UserOp per month
const timestampPolicy = toTimestampPolicy({
validAfter: 1704085200, // January 1, 2024 12:00 AM UTC
validUntil: 1735707599, // December 31, 2024 11:59 PM UTC
})
const validator = toPermissionValidator(publicClient, {
entryPoint,
kernelVersion,
signer: someSigner,
policies: [
timestampPolicy,
// ...other policies
],
})
```
Arguments to `toTimestampPolicy`:
* `validAfter`: the time after which the signer becomes valid. If not specified, the signer is immediately valid.
* `validUntil`: the time before which the signer is valid. If not specified, the signer never expires.
import VersionWarning from "../../VersionWarning"
## Build Your Own Action
Guide coming soon.
import VersionWarning from "../../VersionWarning"
## Build Your Own Policy
Guide coming soon.
import VersionWarning from "../../VersionWarning"
## Call Policy
The call policy limits the target (either contract or EOA) that the UserOp can interact with. If the target is a contract, then you can further specify the functions the UserOp can interact with, as well as putting constraints on the values of the function arguments.
### API
```ts
import { ParamCondition, toCallPolicy, CallPolicyVersion } from "@zerodev/permissions/policies"
const callPolicy = toCallPolicy({
policyVersion: CallPolicyVersion.V0_0_3,
permissions: [
{
// target address
target: contractAddress,
// Maximum value that can be transferred. In this case we
// set it to zero so that no value transfer is possible.
valueLimit: BigInt(0),
// Contract abi
abi: contractABI,
// Function name
functionName: "mint",
// An array of conditions, each corresponding to an argument for
// the function.
args: [
{
condition: ParamCondition.EQUAL,
value: value,
},
],
},
],
})
const validator = toPermissionValidator(publicClient, {
entryPoint,
kernelVersion,
signer: someSigner,
policies: [
callPolicy,
// ...other policies
],
})
```
* `target`: the target contract to call or address to send ETH to. If this is `zeroAddress`, then the target can be any contract as long as the ABI matches (or it can be any address if no ABI is specified).
* `valueLimit`: the maximum value. that can be transmitted.
* `abi`: the contract ABI
* `functionName`: the function name
* `selector`: if you have multiple functions with the same name, you can distinguish them with `selector`. For example: `selector: toFunctionSelector("transfer(uint256, uint256)")`.
* `args`: an array of conditions, each corresponding to an argument, in the order that the arguments are laid out. use `null` to skip an argument.
* `operator`: this can be `EQUAL`, `GREATER_THAN`, `LESS_THAN`, `GREATER_THAN_OR_EQUAL`, `LESS_THAN_OR_EQUAL`, `NOT_EQUAL`.
* `value`: the value of the argument to use with the operator. For instance, `operator = EQUAL` and `value = 2` would mean "the argument must be equal to 2".
* `operation`: whether this is a call or a delegatecall. Defaults to call.
import VersionWarning from "../../VersionWarning"
## Gas Policy
The gas policy specifies how much gas the signer can use in total, across all UserOps it sends. It can also enforce that the UserOps must use paymasters, or use a specific paymaster.
### API
```ts
import { toGasPolicy } from "@zerodev/permissions/policies"
// Set a total amount
const gasPolicy = toGasPolicy({
allowed: parseEther('0.1'),
})
// Or enforce that a paymaster must be used
const gasPolicy = toGasPolicy({
enforcePaymaster: true,
})
// Or enforce that a specific paymaster is used
const gasPolicy = toGasPolicy({
allowedPaymaster: "PAYMASTER_ADDRESS",
})
const validator = toPermissionValidator(publicClient, {
entryPoint,
kernelVersion,
signer: someSigner,
policies: [
gasPolicy,
// ...other policies
],
})
```
`toGasPolicy` takes one or more of the following arguments:
* `allowed`: an amount, in wei, of the ETH (or whatever native token) that the signer can spend on gas, in total across all UserOps it sends.
* `enforcePaymaster`: a boolean value. If set to true, enforce that a paymaster must be used.
* `allowedPaymaster`: a paymaster address. If set, enforce that the specific paymaster is used.
import VersionWarning from "../../VersionWarning"
## Rate Limit Policy
The rate limit policy specifies the frequency at which the signer is allowed to send UserOps.
### API
```ts
import { toRateLimitPolicy } from "@zerodev/permissions/policies"
// In this example, the signer can send one UserOp per month
const rateLimitPolicy = toRateLimitPolicy({
count: 1,
interval: 60 * 60 * 24 * 30, // one month in seconds
})
const validator = toPermissionValidator(publicClient, {
entryPoint,
kernelVersion,
signer: someSigner,
policies: [
rateLimitPolicy,
// ...other policies
],
})
```
Arguments to `toRateLimitPolicy`:
* `count`: the number of times the signer can send UserOps in the given internal.
* (optional) `interval`: the length of the interval, in seconds.
* If not specified, then the interval is infinite, which means that you can use `count` to specify the number of times the signer can send UserOps in total.
* (optional) `startAt`: the starting UNIX timestamp for when the rate limit should take effect. Before that, the signer cannot send any UserOps.
import VersionWarning from "../../VersionWarning"
## Signature Caller Policy
The signature caller policy specifies a list of addresses that are allowed to validate messages signed by the signer.
This is useful when you want the signer to sign messages for a set of particular protocols only. For example, if you want to create a signer that can only sign USDC [permits](https://eips.ethereum.org/EIPS/eip-2612), then you can use this policy to ensure that only the USDC contract can validate its messages.
### API
```ts
import { toSignatureCallerPolicy } from "@zerodev/permissions/policies"
const signaturePolicy = toSignatureCallerPolicy({
allowedCallers: [address1, address2]
})
const validator = toPermissionValidator(publicClient, {
entryPoint,
kernelVersion,
signer: someSigner,
policies: [
signaturePolicy,
// ...other policies
],
})
```
* `allowedCallers` is a list of addresses that are allowed to validate messages signed by the signer.
import VersionWarning from "../../VersionWarning"
## Sudo Policy
The sudo policy gives full permission to the signer. The signer will be able to send any UserOps and sign any messages.
### API
```ts
import { toSudoPolicy } from "@zerodev/permissions/policies"
const sudoPolicy = toSudoPolicy({})
const validator = toPermissionValidator(publicClient, {
entryPoint,
kernelVersion,
signer: someSigner,
policies: [
sudoPolicy,
// ...other policies
],
})
```
import VersionWarning from "../../VersionWarning"
## Timestamp Policy
The timestamp policy specifies the start and end time for when the signer is valid.
### API
```ts
import { toTimestampPolicy } from "@zerodev/permissions/policies"
// In this example, the signer can send one UserOp per month
const timestampPolicy = toTimestampPolicy({
validAfter: 1704085200, // January 1, 2024 12:00 AM UTC
validUntil: 1735707599, // December 31, 2024 11:59 PM UTC
})
const validator = toPermissionValidator(publicClient, {
entryPoint,
kernelVersion,
signer: someSigner,
policies: [
timestampPolicy,
// ...other policies
],
})
```
Arguments to `toTimestampPolicy`:
* `validAfter`: the time after which the signer becomes valid. If not specified, the signer is immediately valid.
* `validUntil`: the time before which the signer is valid. If not specified, the signer never expires.
import VersionWarning from "../../VersionWarning"
## Build Your Own Signer
Guide coming soon.
import VersionWarning from "../../VersionWarning"
## ECDSA Signer
The ECDSA signer signs with a single ECDSA key, specifically with the `secp256k1` curve, which is the same algorithm that EOAs use.
### API
```typescript
import { toECDSASigner } from "@zerodev/permissions/signers"
// Use any Viem account
const signer = privateKeyToAccount(generatePrivateKey())
const ecdsaSigner = toECDSASigner({
signer,
})
const validator = toPermissionValidator(publicClient, {
entryPoint,
kernelVersion,
signer: ecdsaSigner,
policies: [
// ...
],
})
```
import VersionWarning from "../../VersionWarning"
## Multisig Signer
The weighted ECDSA (multisig) signer signs with a collection of ECDSA keys. Each key is weighted, so that the signature will pass as long as enough signers with enough weight have signed.
Read [the multisig doc](/sdk/v5_3_x/advanced/multisig) for more details.
### API
```typescript
import { toWeightedECDSASigner } from "@zerodev/permissions/signers"
const multisigSigner = await toWeightedECDSASigner(publicClient, {
config: {
threshold: 100,
delay: 0,
signers: [
{ address: signer1.address, weight: 50 },
{ address: signer2.address, weight: 50 }
]
},
signers: [signer1, signer2]
})
const validator = toPermissionValidator(publicClient, {
entryPoint,
kernelVersion,
signer: multisigSigner,
policies: [
// ...
],
})
```
import VersionWarning from "../../VersionWarning"
## WebAuthn Signer
The WebAuthn (passkeys) signer signs with a single passkey. Read [the passkeys doc](/sdk/v5_3_x/advanced/passkeys) for a more detailed intro to passkeys.
### API
```typescript
import { toWebAuthnKey, toWebAuthnSigner, WebAuthnMode, WebAuthnSignerVersion} from "@zerodev/permissions/signers"
const passkeyName = "Key Name" // any name you want
const passkeyServerUrl = "..." // get this from ZeroDev dashboard
const mode = WebAuthnMode.Register // can also be "login" if you are using an existing key
const webAuthnKey = await toWebAuthnKey({
passkeyName,
passkeyServerUrl,
mode,
passkeyServerHeaders: {}
})
const webAuthnSigner = await toWebAuthnSigner(publicClient, {
webAuthnKey,
webAuthnSignerVersion: WebAuthnSignerVersion.V0_0_2
})
const validator = toPermissionValidator(publicClient, {
entryPoint,
kernelVersion,
signer: webAuthnSigner,
policies: [
// ...
],
})
```
For the params:
* `passkeyName` can be any name
* `passkeyServerUrl` is a [passkey server URL](/sdk/v5_3_x/advanced/passkeys#setting-up-passkey-server). You can get it from the ZeroDev dashboard.
* `mode` is either `register` or `login`, depending on whether you are creating a new key or using an existing key.
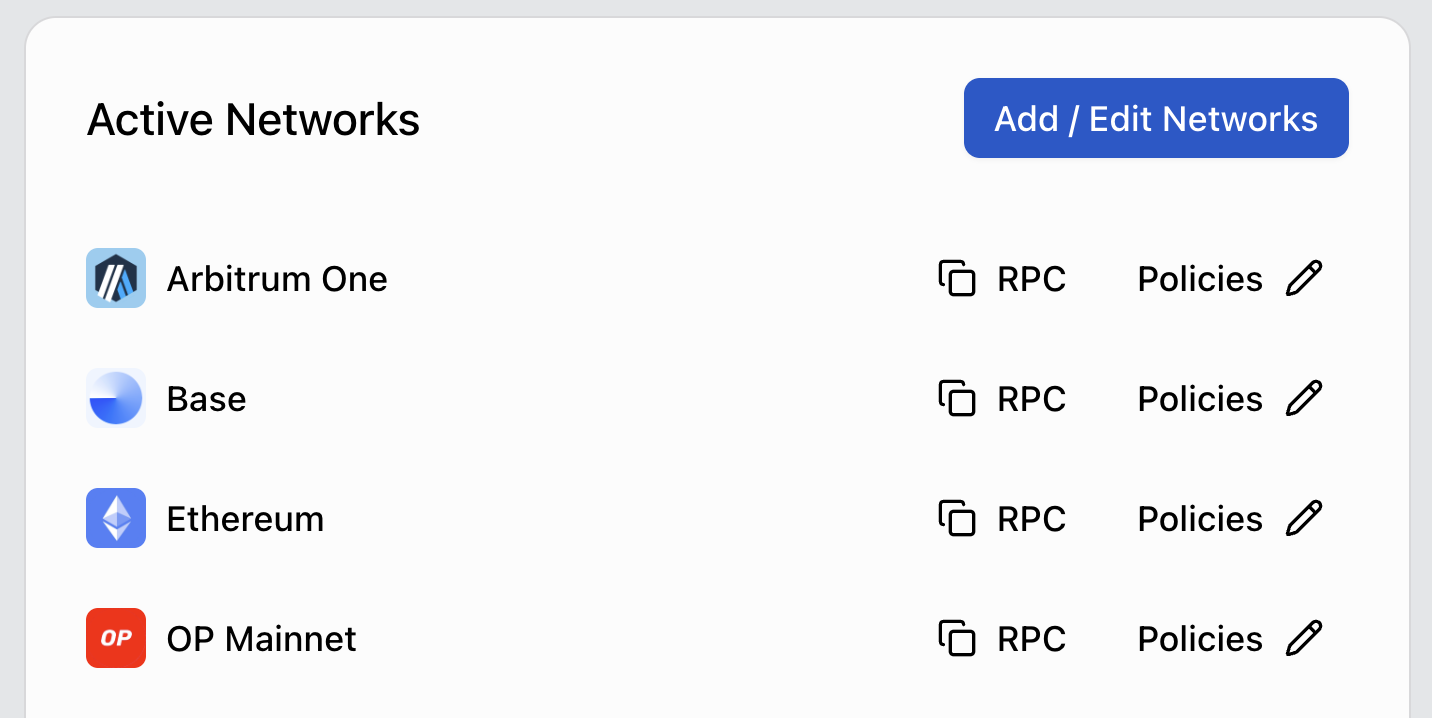
 A search of “roadmap” on Ethereum Magicians
 Poorly drawn by the new GPT-4o.